
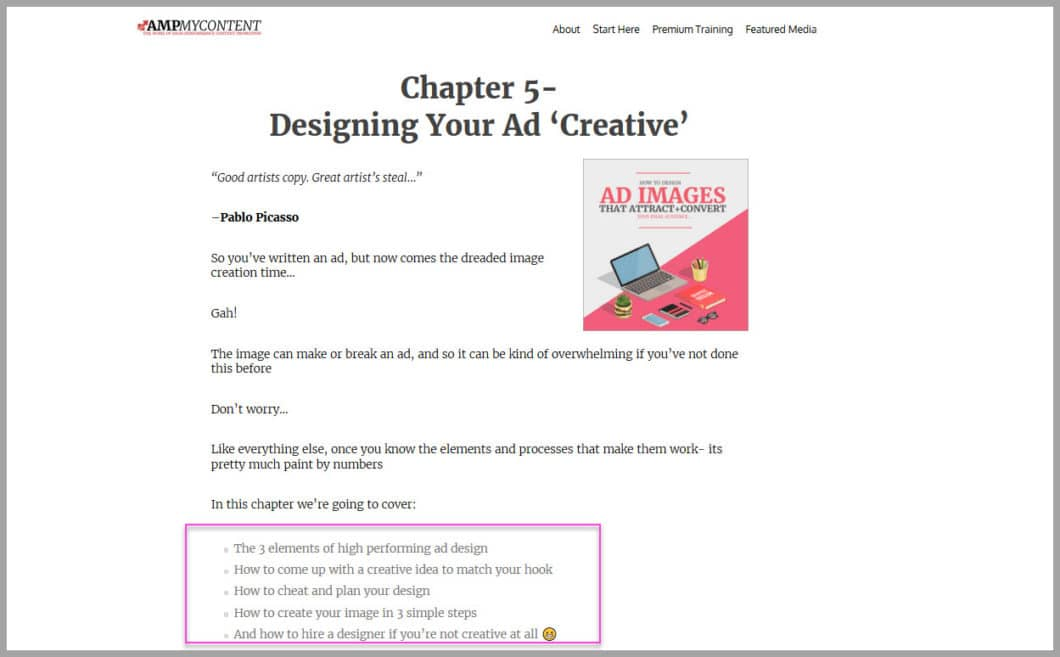
Failure…
Fear of failing is what stops most people from having a winning advert, because they want it to be profitable on day one.
And when it doesn’t work, they simply assume that ads ‘just don’t work for them’…
But the reality is that almost every ad starts at a loss. Unless you’re on a new platform with insanely cheap clicks, or an ad somehow goes viral, then yeah – they all start off losing money, and that’s ok.
The goal instead is to get initial data and then improve it to make it more profitable, either by throwing a huge budget at the AI, or by tweaking and testing for yourself first.
If your serious about creating profitable ads, then you need to embrace the failure, so you can find your winner. Otherwise you run the risk of ‘shiny object’ marketing: bouncing from one channel to the next, hoping for a silver bullet.
In this chapter I’m going to walk you through a step-by-step process, breaking down EXACTLY how to test your Facebook ads, so that by the end, you’ll have a profitable ad running to a cold audience.
Keep reading to learn how…
 |
 |
|---|---|
 |
 |
 |
 |
 |
 |
Bottom Up A/B Testing: How To Take Your Ad From Negative To Positive ROI
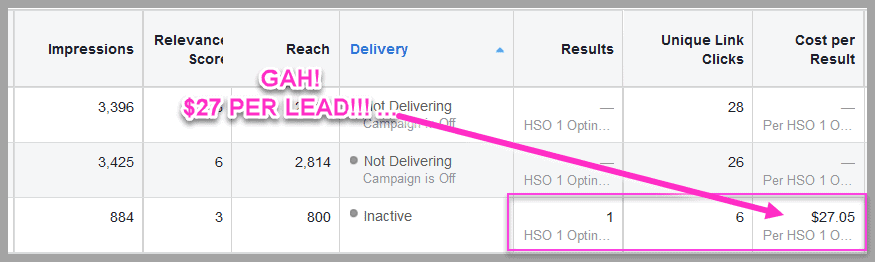
A few weeks back, we started running paid traffic to a new blog post
The issue?
It was losing money…
Most people would have stopped here, but the thing is?
It wasn’t losing money…
…we were ‘buying data’
We needed to find what failed, to find what worked
This isn’t anything revolutionary
Its a method used in product design all the time…
You can know all the best practices but the reality is?
You can’t know what works, without testing
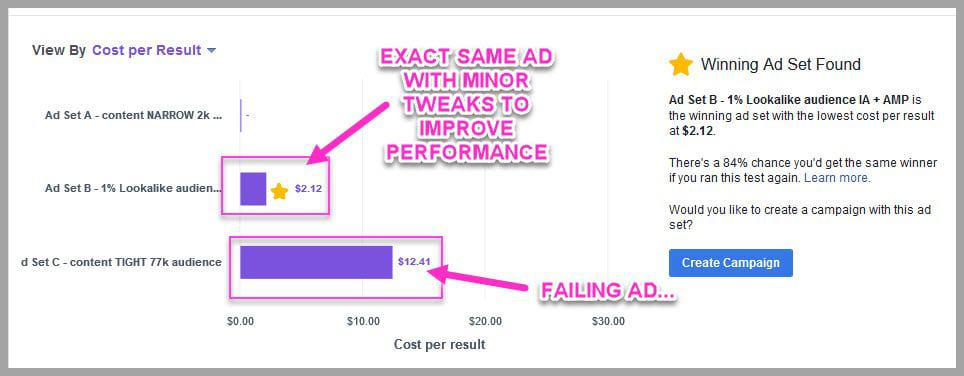
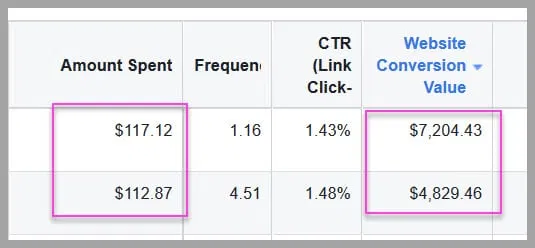
And so with each new test, the ad cost lowered, and the CTR improved
It went from losing money, to breaking even, to making a small profit
Until suddenly?
We were getting huge returns while promoting our content…
The best part?
You can run this same process for your own ads… even if you only have a small daily budget
The 5-Step Facebook Ad Testing Strategy
Just 5 simple steps:
Step #1-4: Run a sequence of test’s to improve the ads performance
Step #5: Broaden the audience and goal and unleash the AI
Let me break it down…
You’re going to run 4 A/B tests to your focus group audience
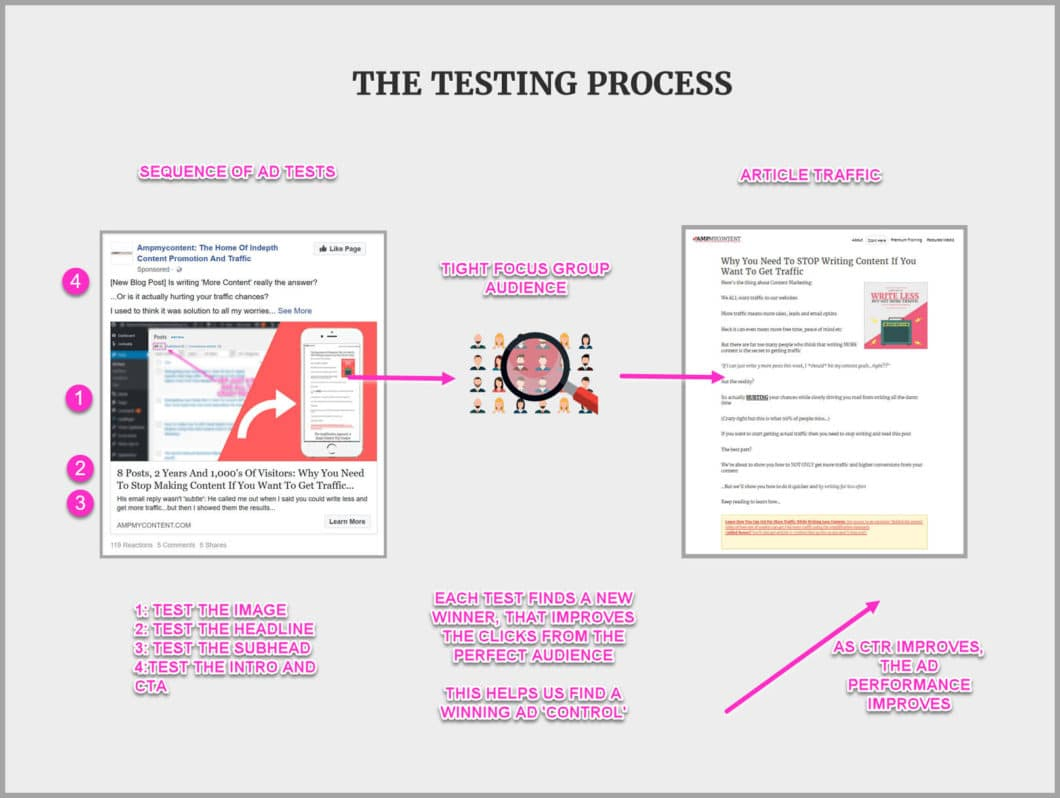
Each test is designed to improve the click through rate of the advert-to make it so appealing that people can’t help but want to click on it
You test each element to find what fails, and what improves
Then you put those winning elements together, to create the most effective ad
Easy right?
By now the ad costs less to run, and it gets the most clicks
Then?
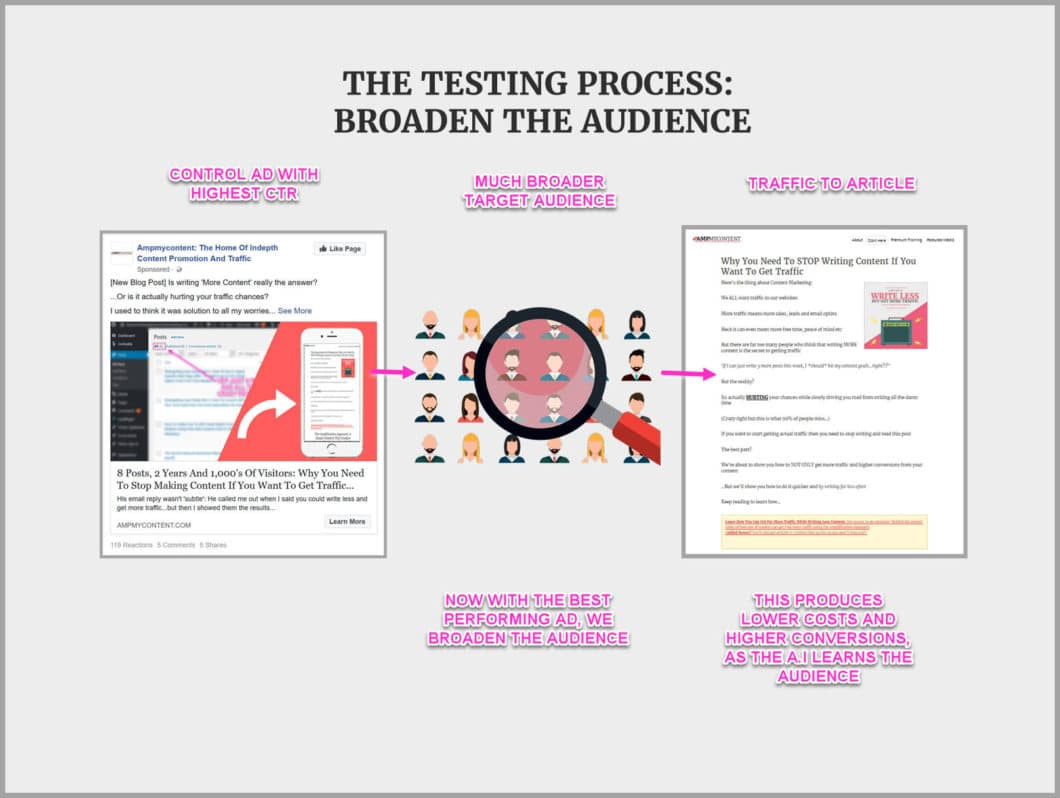
Then you simply scale it out to a broader audience, and let the AI do its thing
This lowers the cost even further, and it helps you scale up your audience…
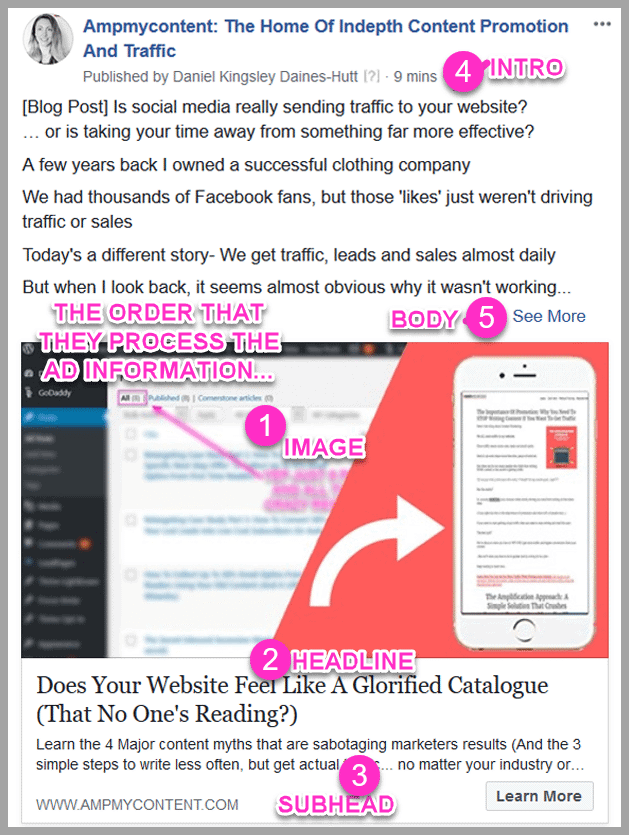
How To Test Facebook Ads(Using Only A Simple ‘A/B’ Testing Framework )
Each test is ran in a specific order, based on highest impact:
- Test #1: The Image
- Test #2: The Headline
- Test #3: The Subhead
- Test #4: The CTA
We base this order, off of how someone consumes an advert…
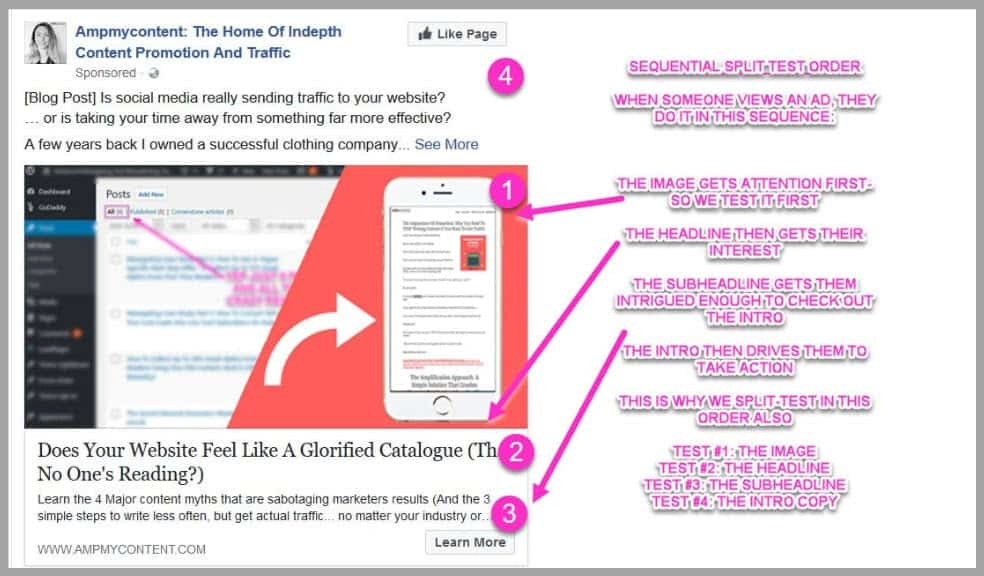
Remember:
The image is the first thing that gets their attention- that’s why you improve this first
Then they check the headline, so you improve this 2nd
Then they read the sub head
Only then do they read the ad copy and take the CTA
By improving the most important elements first, you’ll see faster improvements in CTR
Make sense?
Once you find the winning variation, you have a ‘Control’…
The control is the winning version…
Its the baseline result that you measure all future tests against
(i.e. Did it improve or lower performance etc)
With each test you improve the CTR and find a new winning element
This element then gets added to your new ‘Control’
(This way each new test always performs better than the last)
Now don’t worry
It might seem complex, but its actually super simple to do
When you break it down?
Each test takes about 5 minutes to set up
So lets walk you through it all…
Step #1: The Image Test
The image is the first thing that gets their attention
You’re going to test out different images, to find an image that gets the most clicks
If you’ve been following along, then you should have a few image variations already made from Chapter #5: Ad Design
I recommend you have at least 4 image variations for this test
Go ahead and open up your Facebook ads creator HERE
When it loads up, select the ‘Traffic’ option…
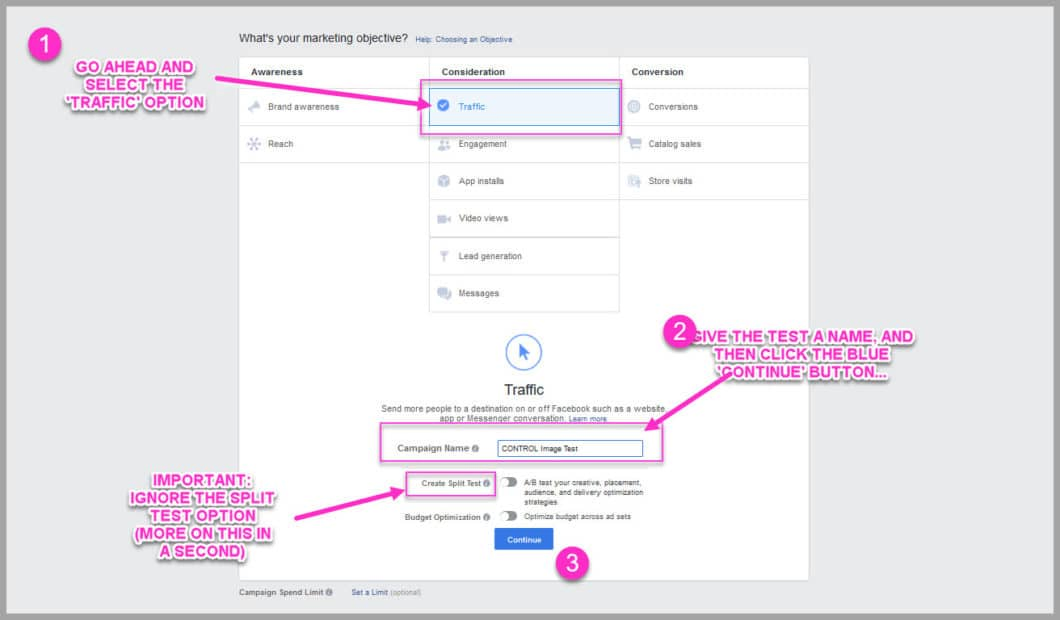
Go ahead and give the campaign a name, then click the blue continue button
Important:
Facebook has its own split test feature, but its expensive and doesn’t let you test everything that you want to
We have a work around for this, which I will share in just a second
Make sure you leave this split test option unpicked
Once you click continue, the ‘Ad Set’ will now load up…
Give it a name, and then select the ‘to website’ traffic option
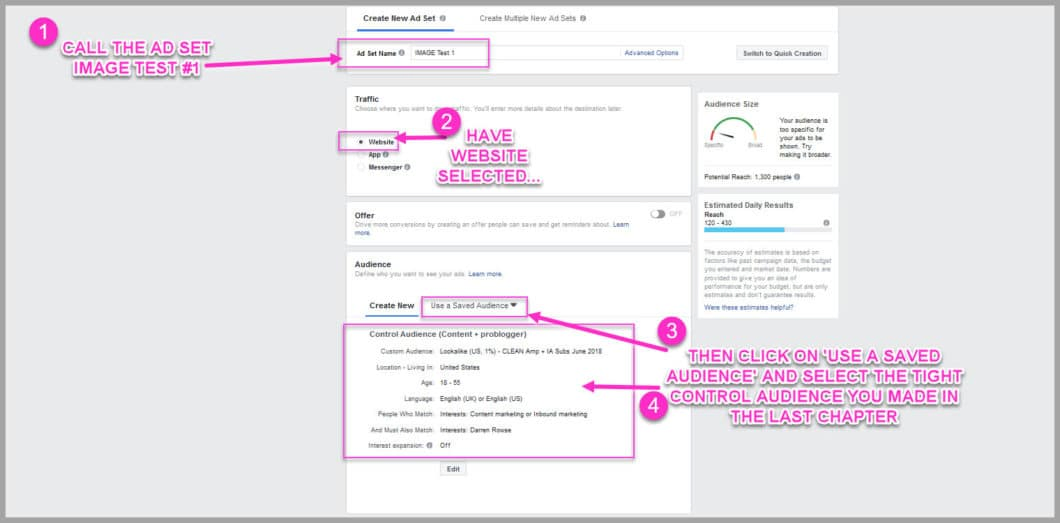
Scroll down to the audience section
Click on the ‘Use A Saved Audience’ option
Choose the focus group audience that you made in the last chapter
Then scroll down to the ‘Placements’ options
Because you’re running News feed ads only, remove the other options…
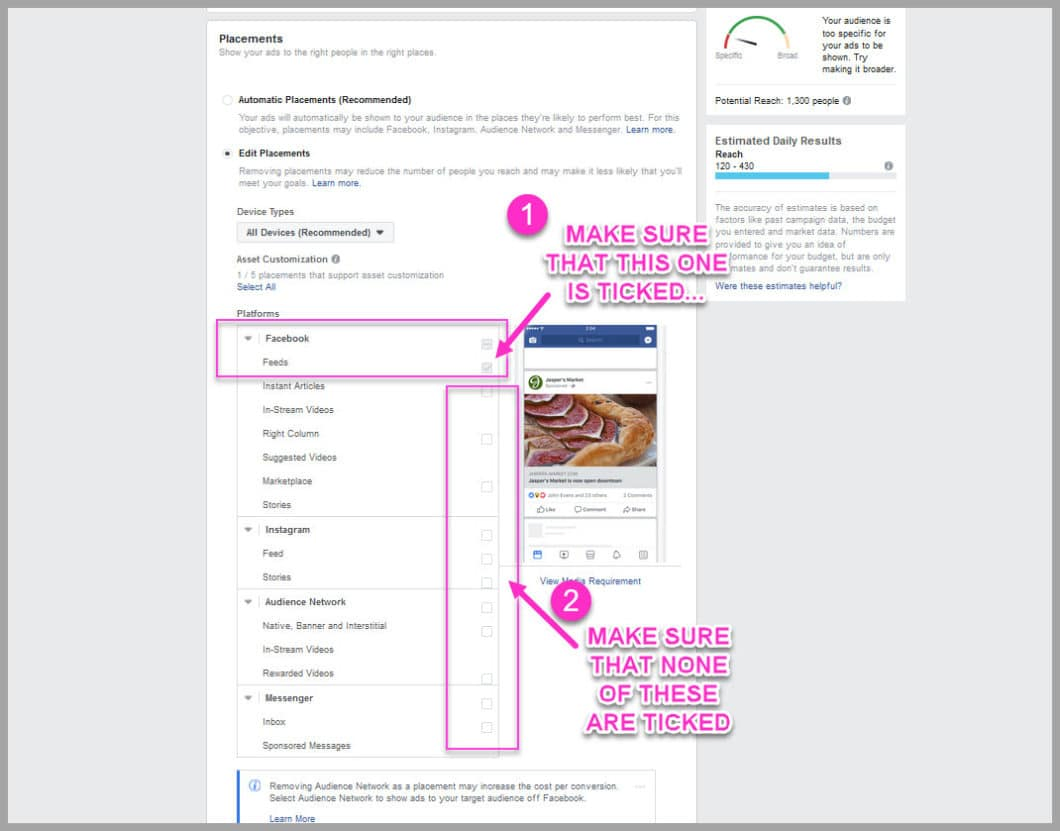
Note:
You CAN run ads in those locations later on
The issue is that they have different requirements, such as image size or text available to use etc
This current advert is tailored for the News feed
By using it in the other locations, it would only show half an image or no text etc, and would simply waste your money
Make sure they are NOT ticked, then scroll down to the ‘Budget + Schedule’ section…
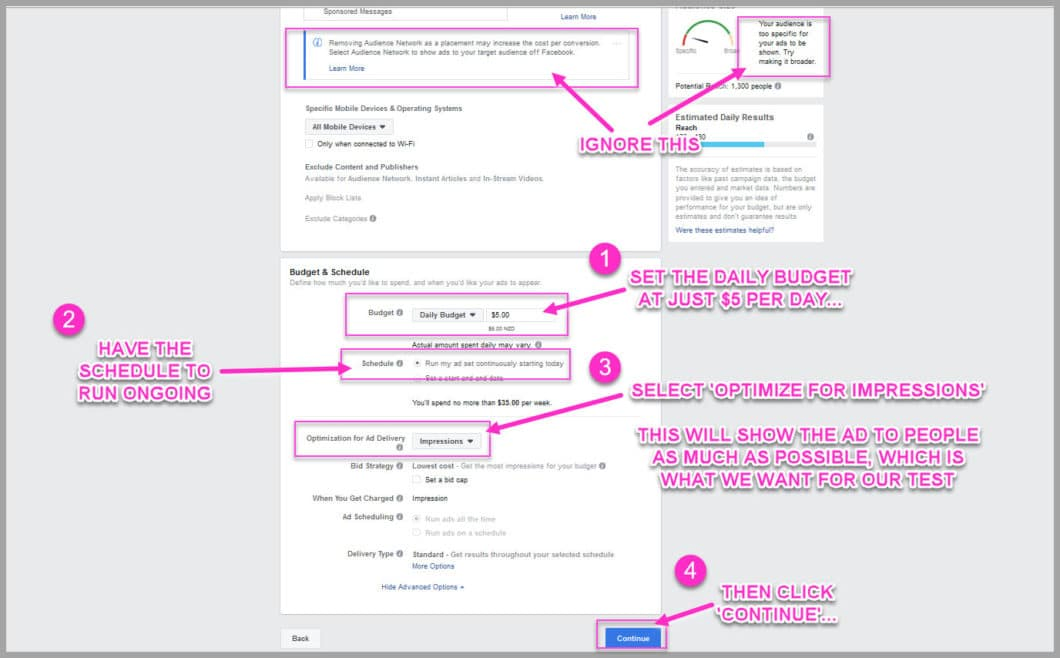
Set the budget at just $5 per day, and have the schedule set to ‘Run my ad continuously’
Then select the ‘Optimize For Impressions’ button
This will then show your advert to your audience as often as possible
Why do this?
Because it can take 5-12 impressions before people pay attention to your adverts, you need them to see the ad as much as possible
By optimizing for impressions, they will see it more often, and you’ll see results quicker
Once you’ve done that, click the blue ‘Continue’ button
Now its time to set up the advert…
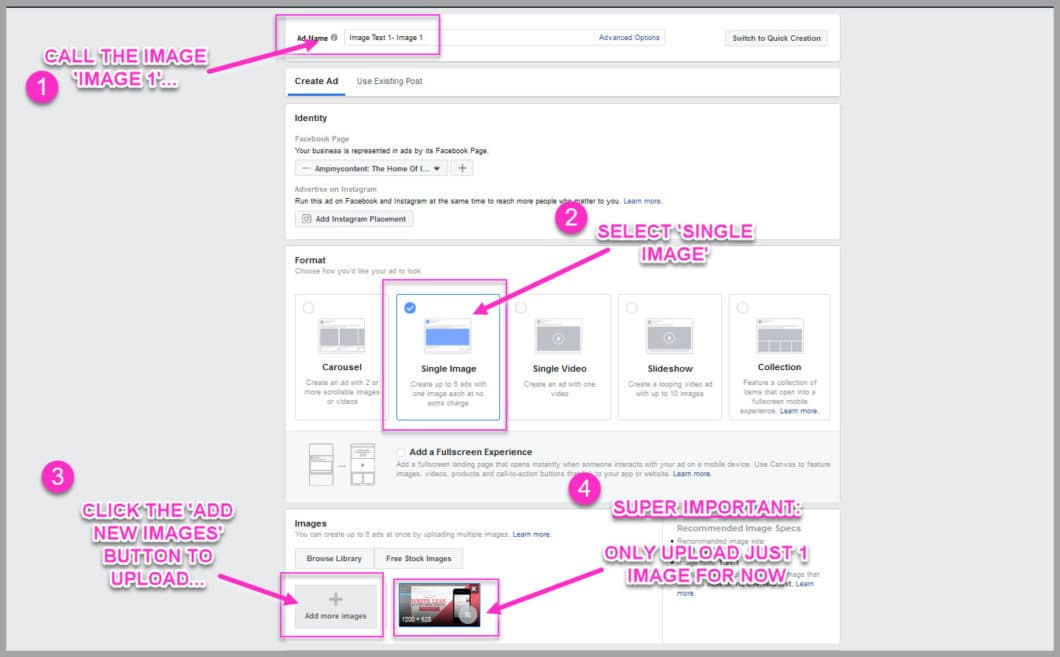
Go ahead and give the image a name
Then select the ‘Single Image’ option
(This will allow you to use the large News Feed image you created earlier)
Then click the upload button
Now this is SUPER IMPORTANT
Only upload just 1 image for now
Why do this this?
Remember how I said we would show you how to get around the split testing, without using Facebook’s split test option?
This is how you’re going to do that
I’ll show you the other steps in just a second, but for now just make sure that you only upload the one image
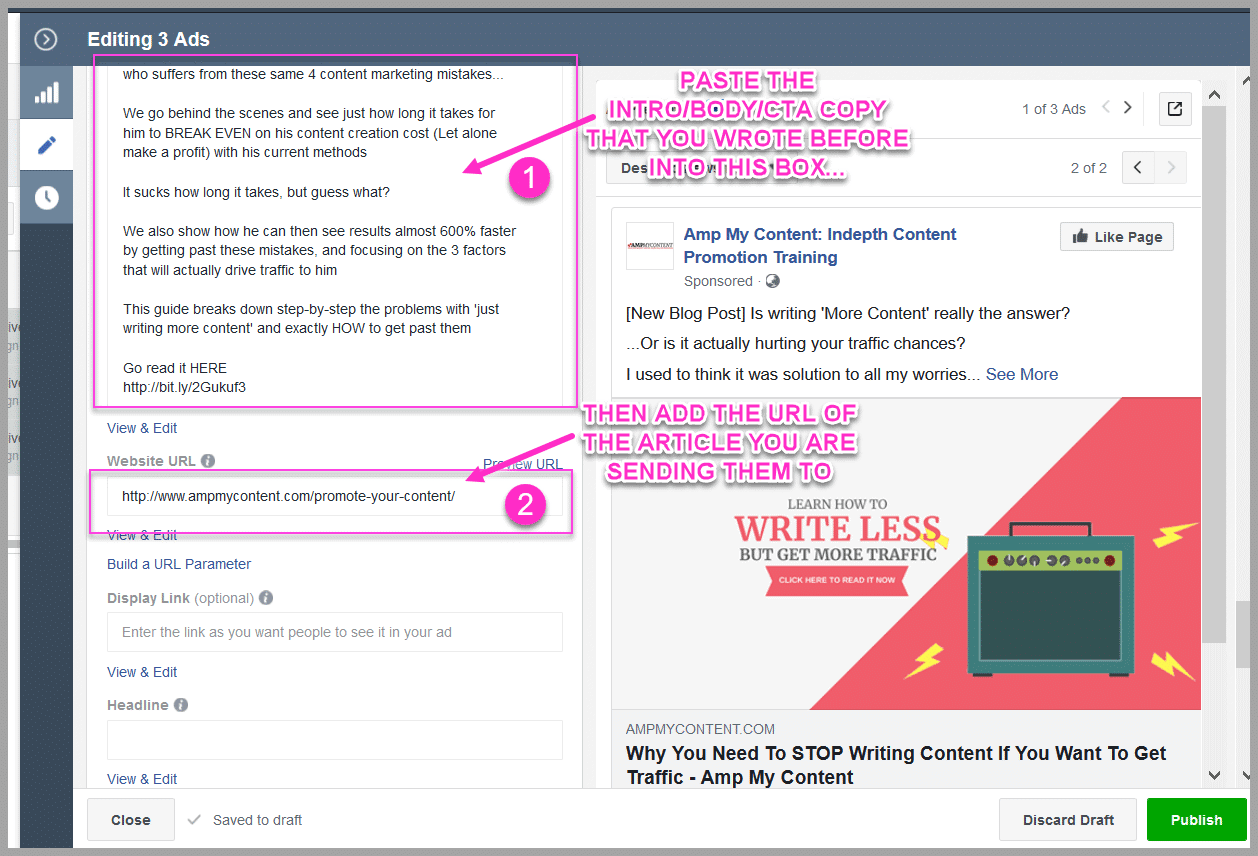
When you’ve done that, scroll down the page to the ‘Links’ option
Go ahead and enter the URL of the article that you want to send them to…
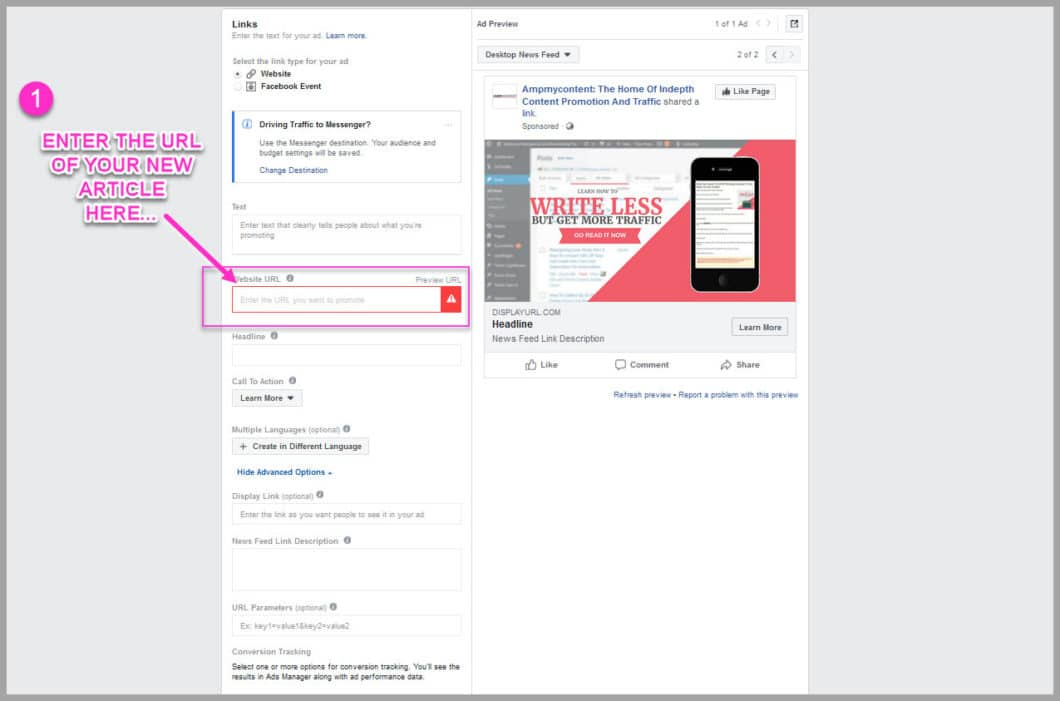
Once you enter the URL, the ad will auto populate words from your article for the headline etc
You don’t want that
You want the ad copy that you wrote earlier
Go ahead and load up the advert ‘copy’ that you wrote back in Chapter #4: Ad Copy…
Simply open up your ad copy document, then copy and paste it across
Easy right?
Be sure to copy the right text, into the right place…
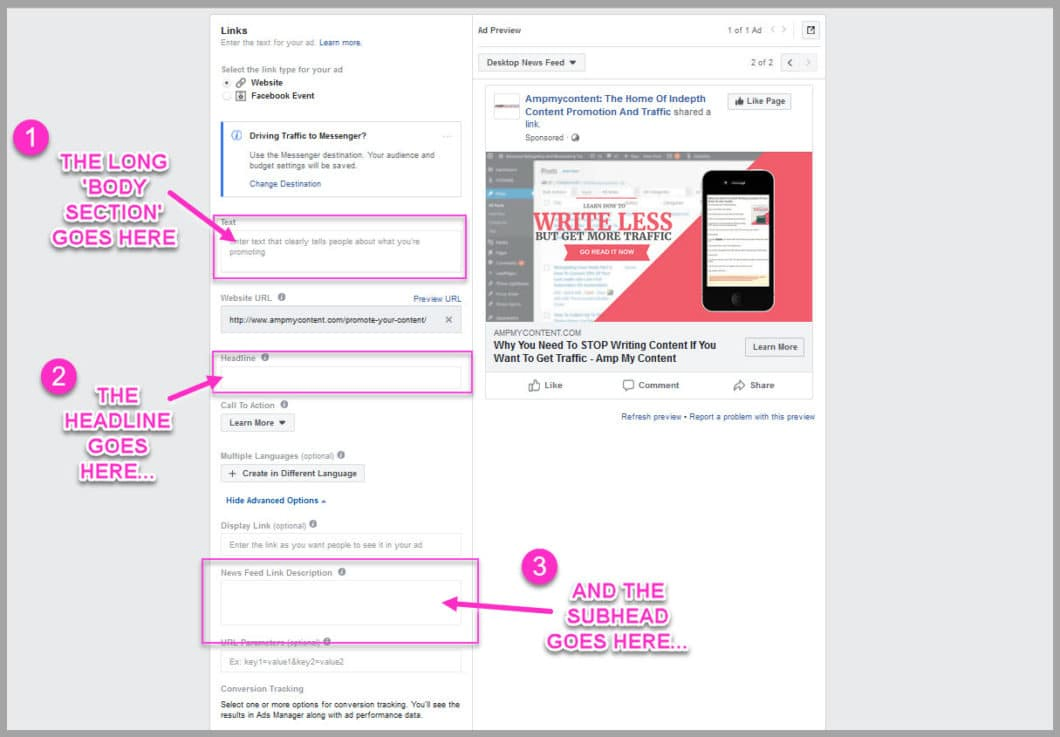
‘Headline’ is the headline
‘News Feed Description’ is the subhead
And ‘Text’ is where the rest of the content goes (Intro, body and CTA- the majority of the advert copy basically)
Once you copy it across, you’ll notice the ad preview will change
It should look similar to this
(With different ad copy ofc :P)…

Easy so far right?
Once you’ve added your ad copy, scroll down a little further
Make sure that your tracking pixel is turned on, and then click the green ‘Continue’ button…
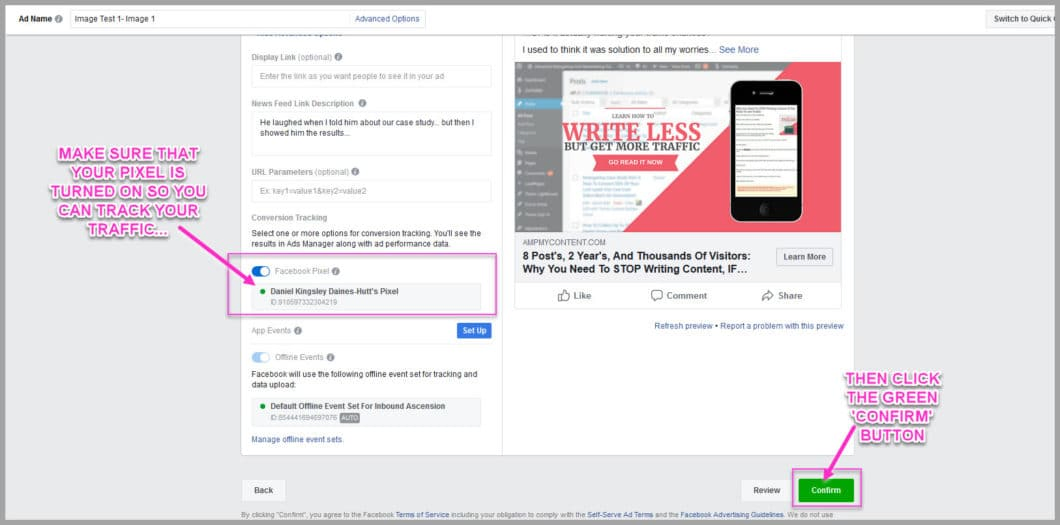
Congratulations!
You now have you ad running with just 1 image, to your focus audience
Now you’re probably thinking:
‘Aren’t we supposed to be testing different images to find a winner?’
You sure are, and you’ll add them in just a second
The only issue?
The tools that Facebook gives you are broken…
What Happens When You Upload Multiple Images
Facebook allows you to upload and run up to 6 images in an advert
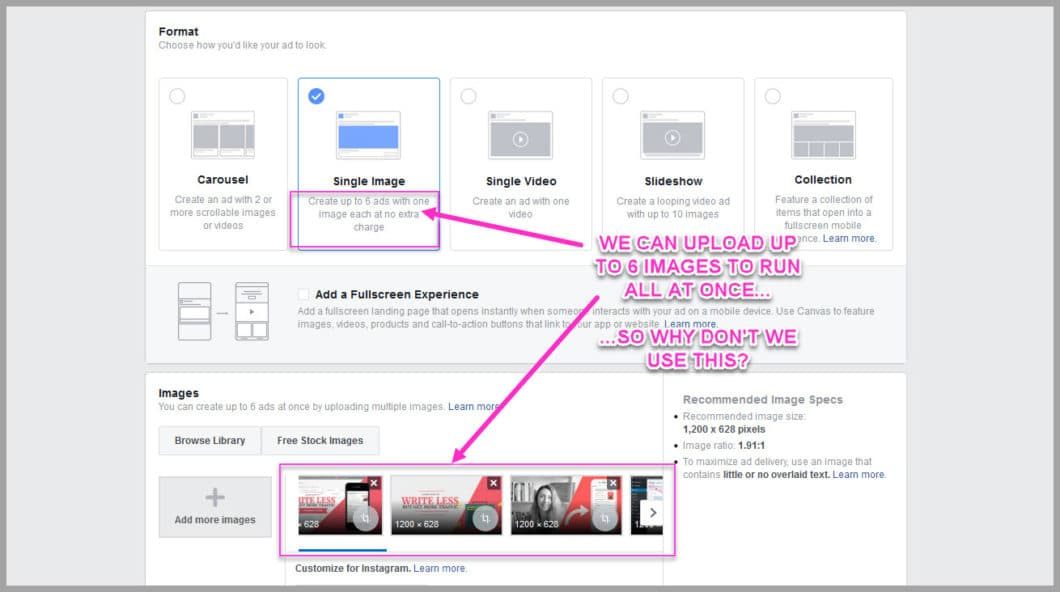
The only problem with this?
There’s a flaw in the algorithm…
Once one image starts to outperform others, it stops showing the other images as often
That’s what happened here:
Facebook decided that the 1st image was better, and so it stopped showing the 2nd image
In fact?
It showed the 1st image almost 5x more!
Why care?
Because the ‘winner’ Facebook chooses, is not always the best performing advert
(It chooses far too early)
In my experience, you can have other variations that are slow to start- but then end up being the best performers
Make sense?
That’s why you don’t test multiple images in the same campaign…
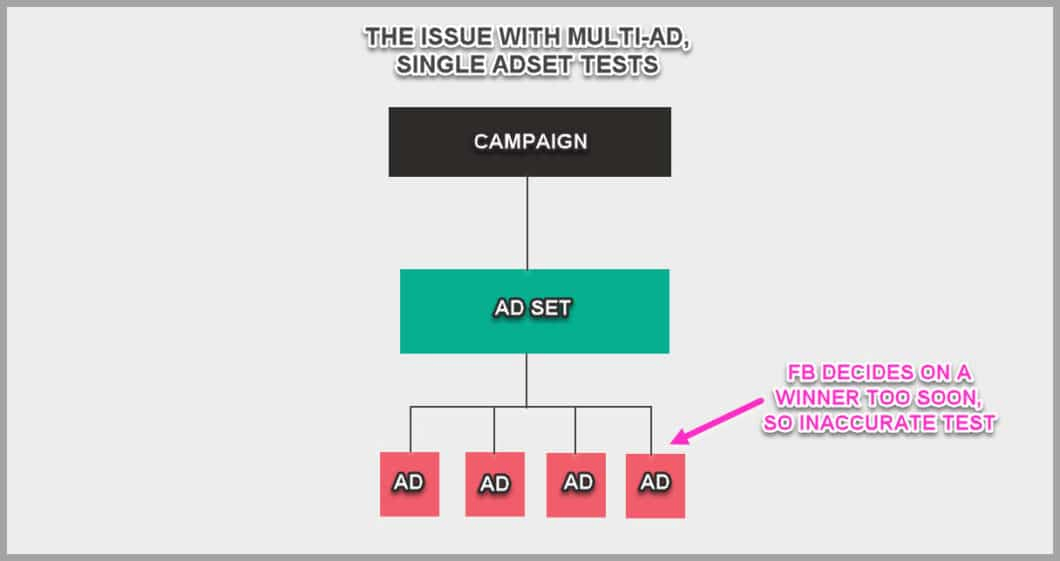
You need an unbiased way of testing instead
So what can you do?…
Why Not Use The Split Test Tool?
Facebook does have a split test option
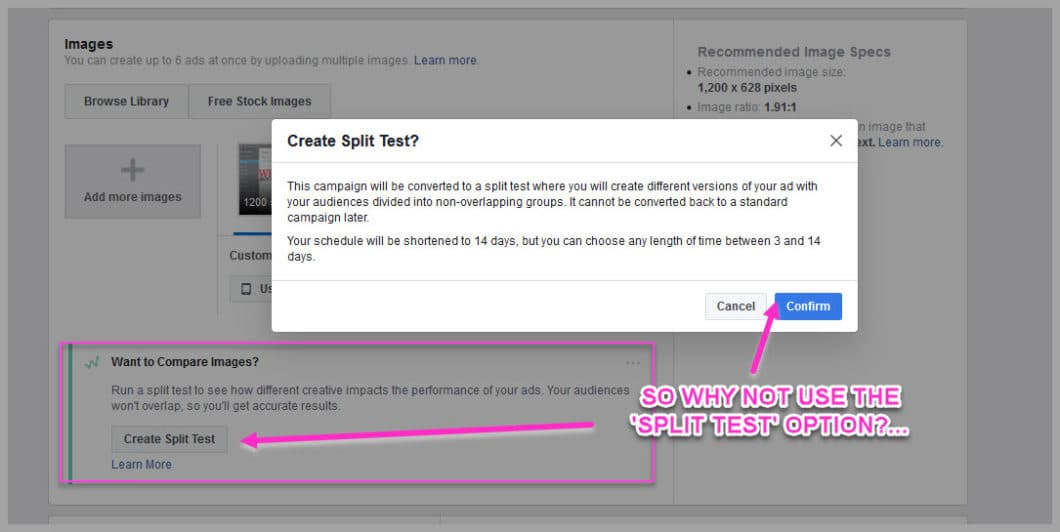
You choose your variations, and it will split the audience equally to test
The thing is?
It usually costs more to test like this
(Facebook will usually charge more to show the test to people)
Not only that?
It only allows you to test Image or Audience variations…
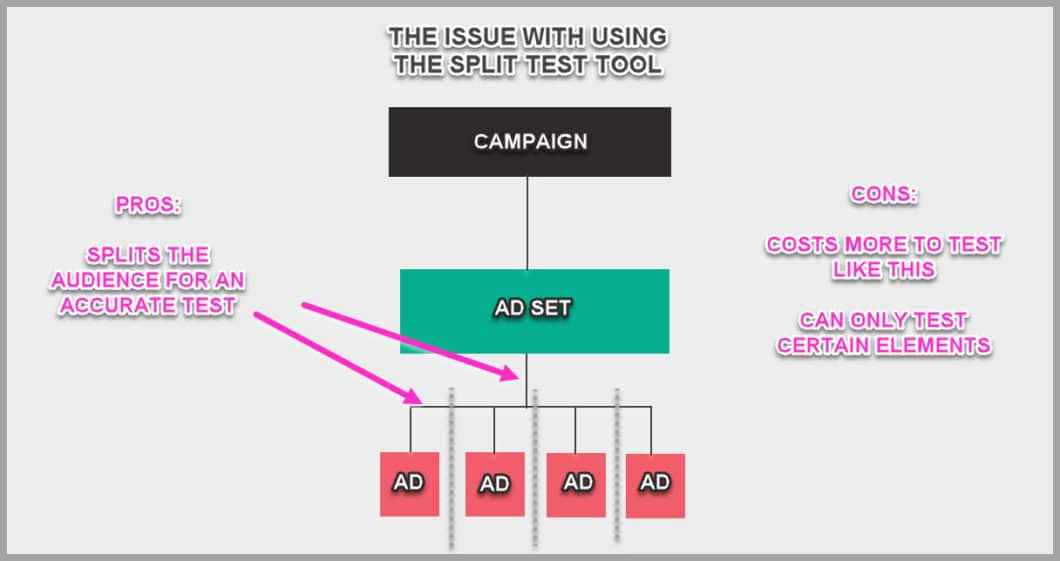
Why care?
Because we know that tests for the headline, subhead and copy can make a HUGE difference to improving your CTR
(Its not all about the image you know!)
But this tool doesn’t allow you to test those elements
Fortunately there’s a work around
Its called ‘Duplication, Variation Testing’ or D.V.T
If you want to split test your ads easier and cheaper, then here’s what you need to do…
Duplication, Variation Testing:How To Get Accurate, Low Cost Test Results
So this is the best way I’ve found to test Facebook ads
Let me break it down…
All you do?
- Make duplicate copies of the adset and advert that you just made
- Change some minor targeting details so that the copies don’t ‘compete’ with each other
- Change that one element that you want to test (In this case, the image)
Its as simple as that
Copy, edit, publish
Easy right?
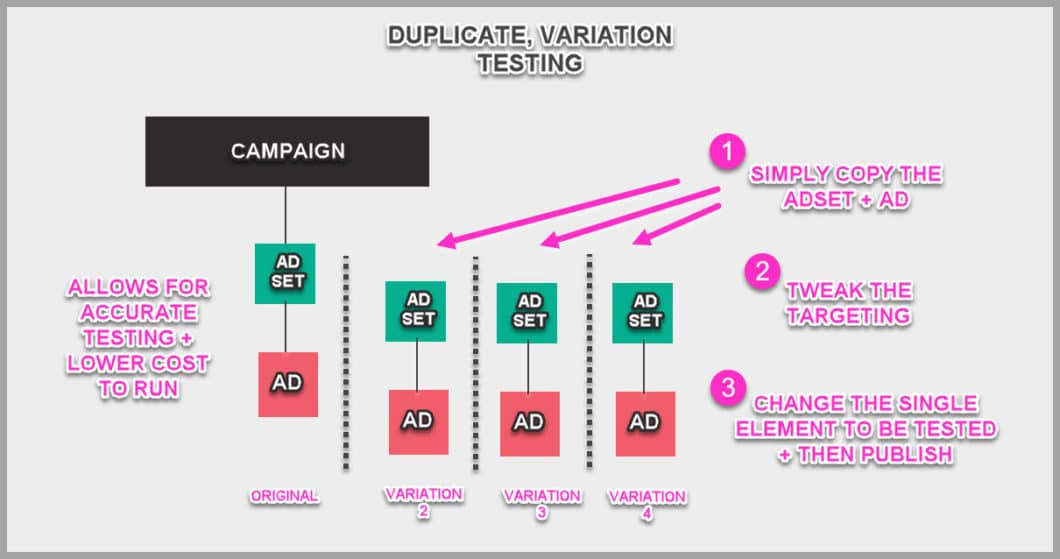
This method allows you to get accurate tests of different elements of your ad- all at a lower cost
The best part?
It takes 2 minutes to set up
Lets walk you through it super quick…
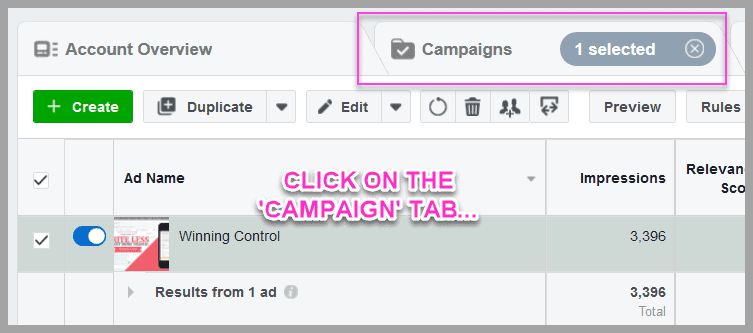
Duplicate The Adset And Advert
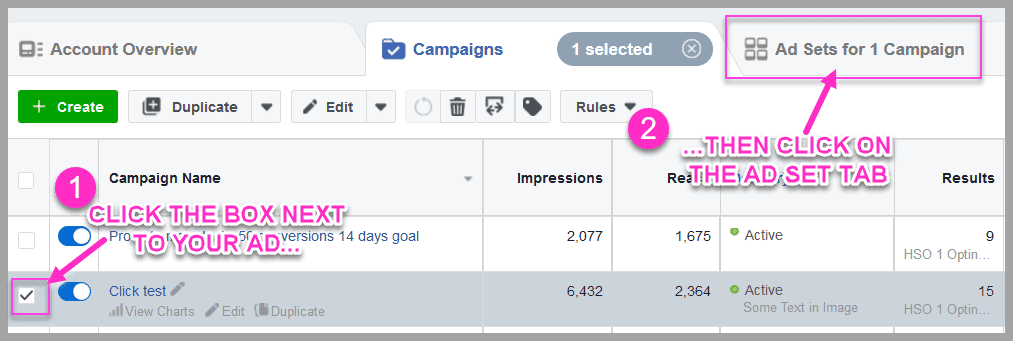
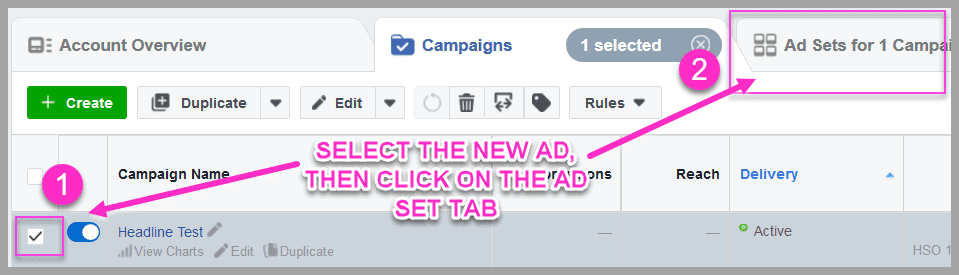
Log back into your ads manager and find the ad that you just created
Tick the box next to the ad
When you tick it, the adset and image tabs will load up and allow you to edit them…
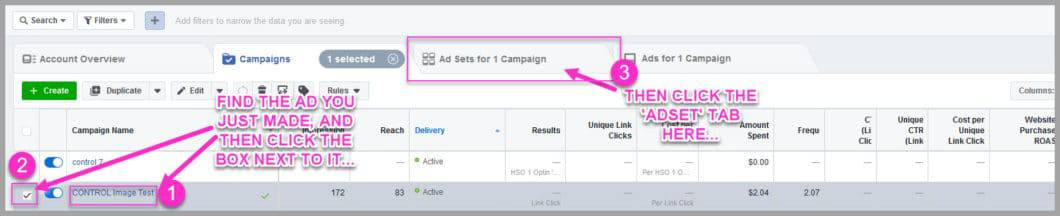
Go ahead and click on the tab that says ‘Ad Sets for 1 Campaign’
(If it says more than 1 campaign, then you must have multiple boxes ticked by accident)
Once you click on that tab, a new page will load up…

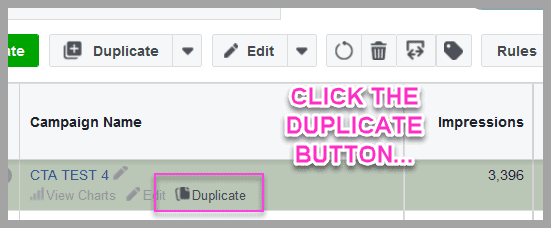
Scroll your mouse over your advert to see some new options
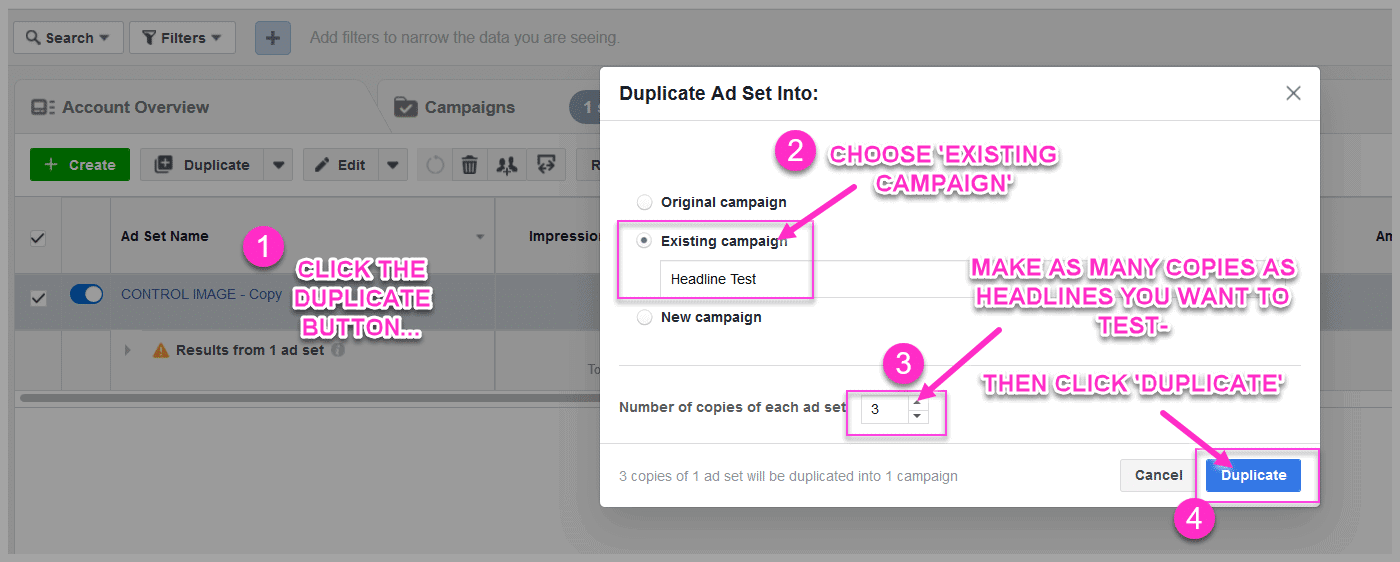
Click on the ‘Duplicate’ text
A new pop up will load on the screen…
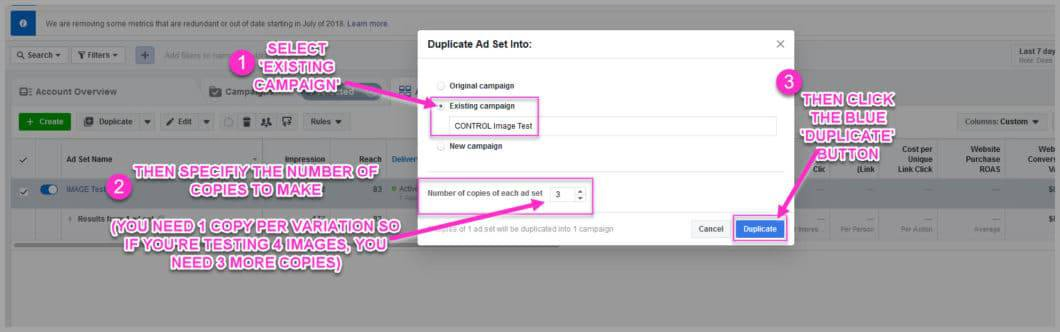
Go ahead and select duplicate ‘Existing Campaign’
Then go ahead and enter how many copies you want to make
Remember:
You need to make 1 new copy for every test variation
That means if you want to test 4 different images, then you need 3 more copies
(You already have 1 variation)
Does that make sense?
Go ahead and click the blue ‘Duplicate’ button
This will now make 3 more copies of both the adset AND the advert that you created
Now you need to edit each copy…
Organize the Adset
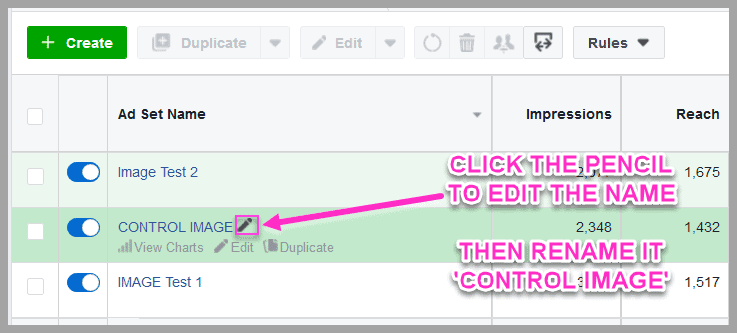
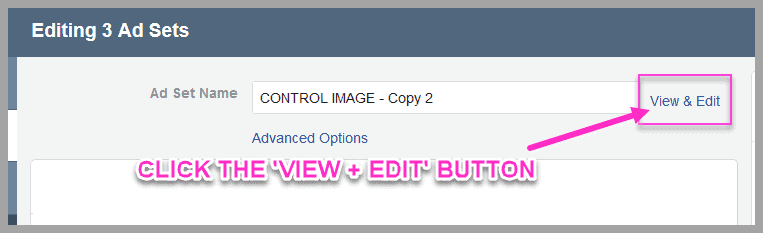
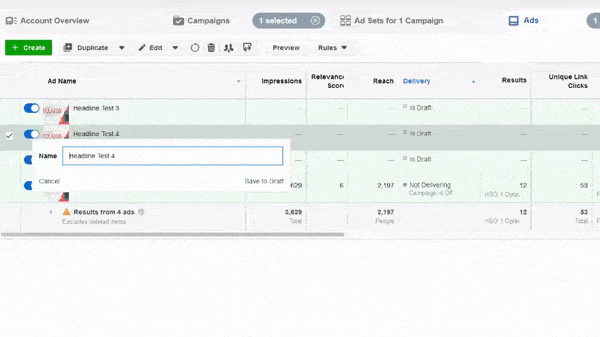
A new page will load up, showing the copies that you just made
First thing is to get organised
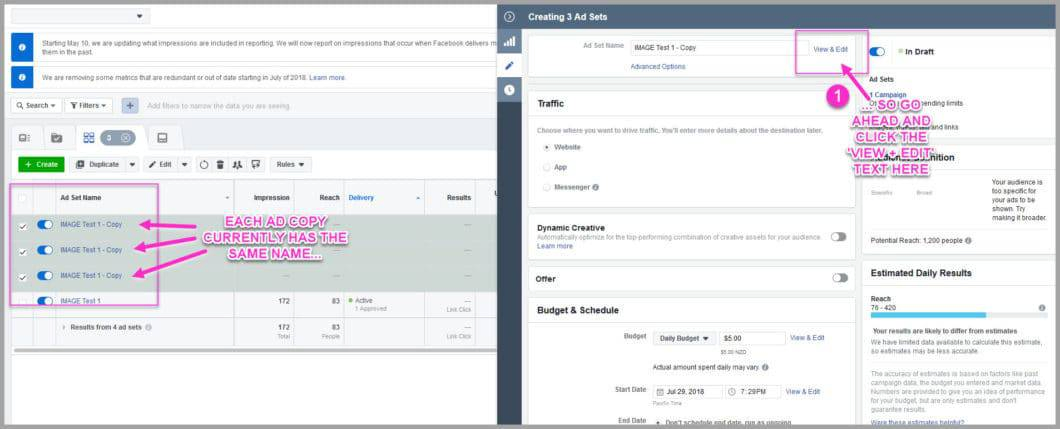
You’ll notice that all of the copies currently have the same name
Go ahead and click the ‘View + Edit’ text on the top right of the page
A new pop up will appear
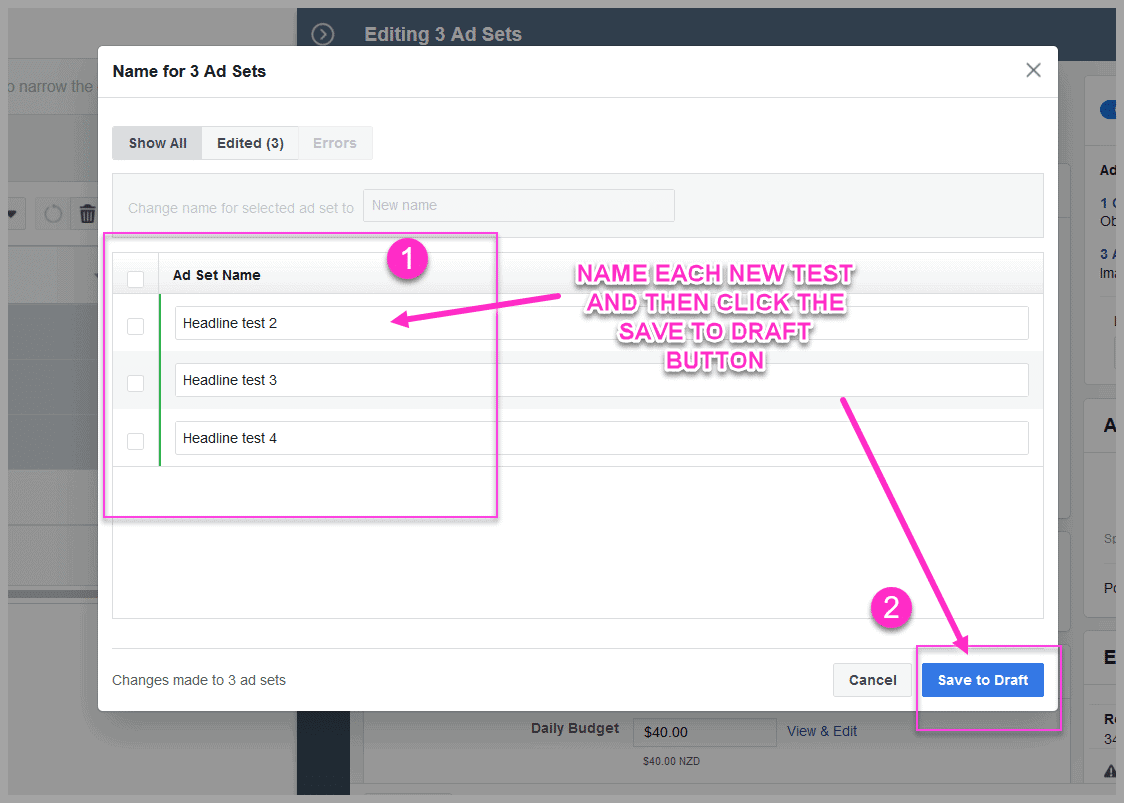
Go ahead and rename each of the copies…
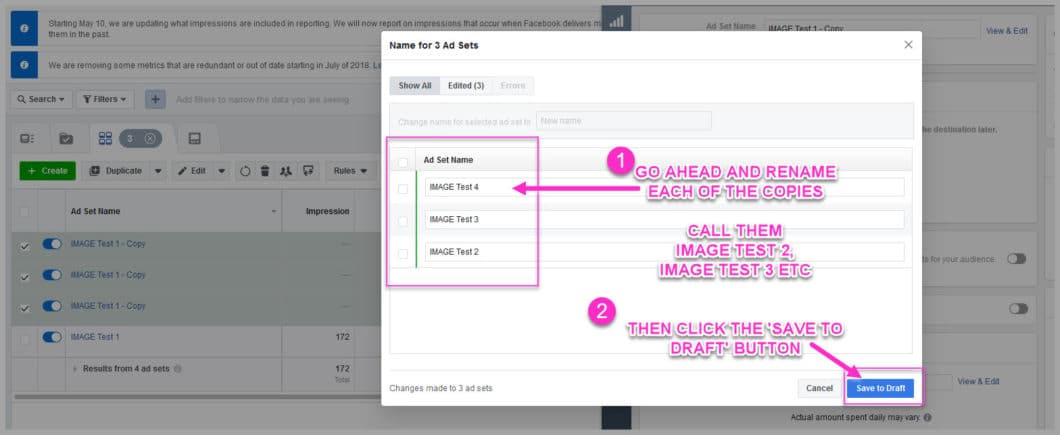
Call them image test 2, image test 3 and so on
(Do this for each copy that you have)
Then click the blue ‘Save to Draft’ button
Now that you have each adset organized, you need to edit them slightly
Why?
If you have 4 adverts with the exact same audience + bid cap, then Facebook will make each variation compete with each other
Basically?
You’ll be bidding against yourself, and spending more money
You can get around this by editing the audience slightly
Why?
That way Facebook see’s them as different, and so you won’t compete with yourself
All you need to do?
Simply change the age range for each copy, by 1 year
(This makes Facebook then see them as different audiences)
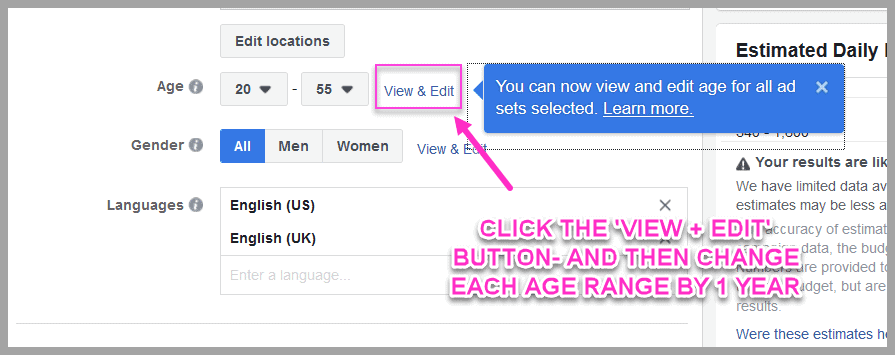
With each copy still ticked, scroll down to the location section on the right hand side…
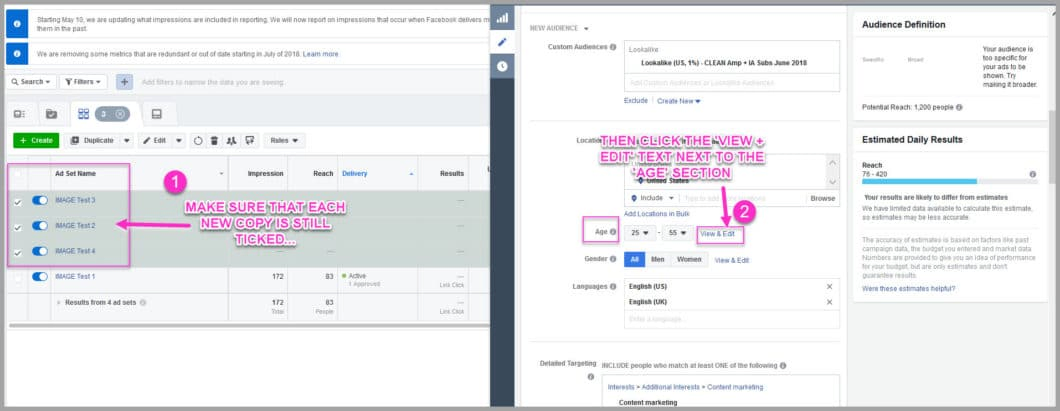
See the ‘Age’ option?
Go ahead and click the ‘View + Edit’ button next to it
This will load a new pop up
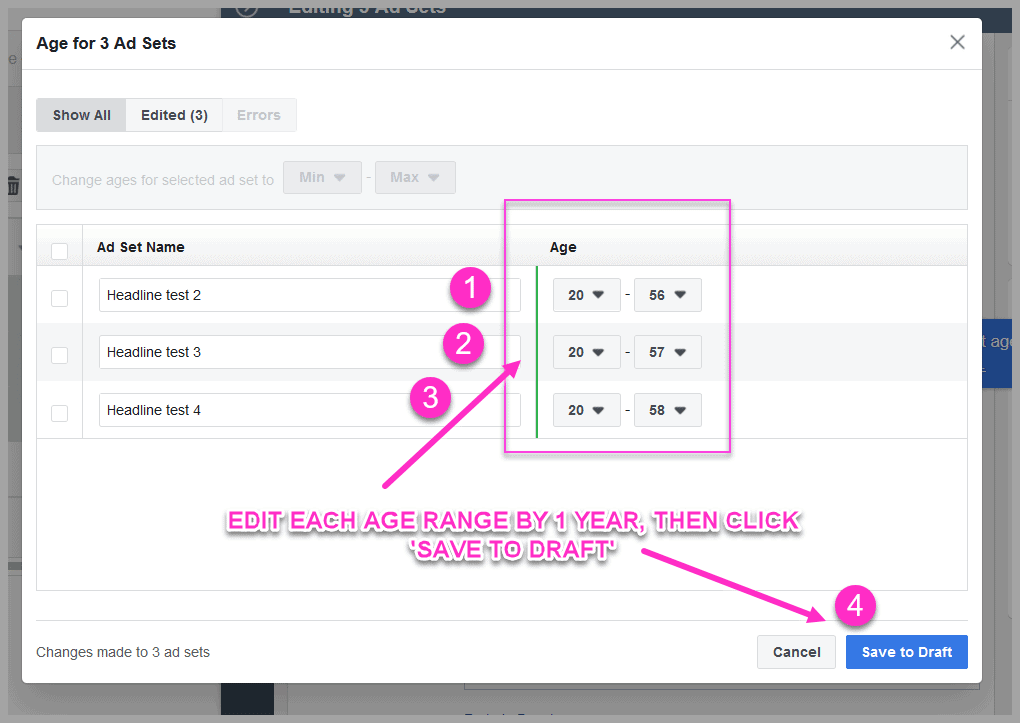
Change the age range of each copy by 1 year each…
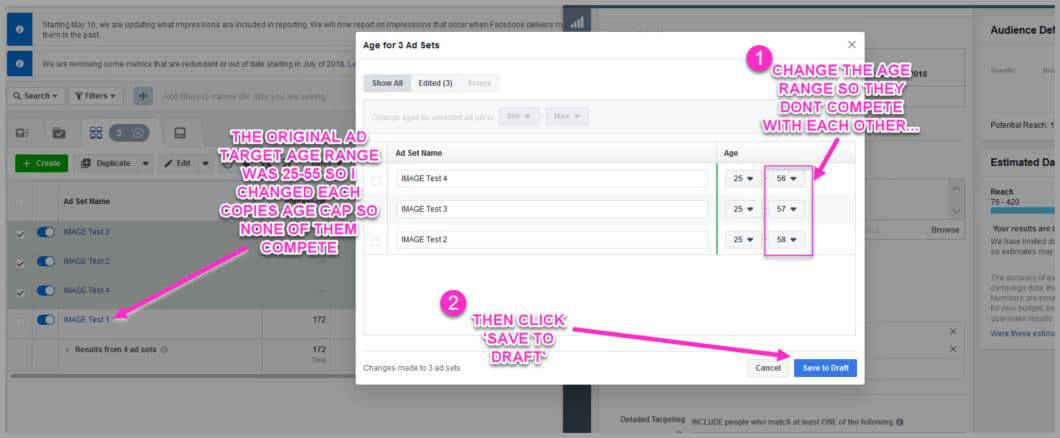
Be sure to change the age range on EACH copy, so that none of them compete with the original ad
For Example:
- Original 25-55
- Copy 1 25-56
- Copy 2 25-57 etc
When you’ve done that, click the ‘Save To Draft’ button
Now you just need to add the different images to test…
Add The Variation To Test (Different Image)
Scroll back up the screen
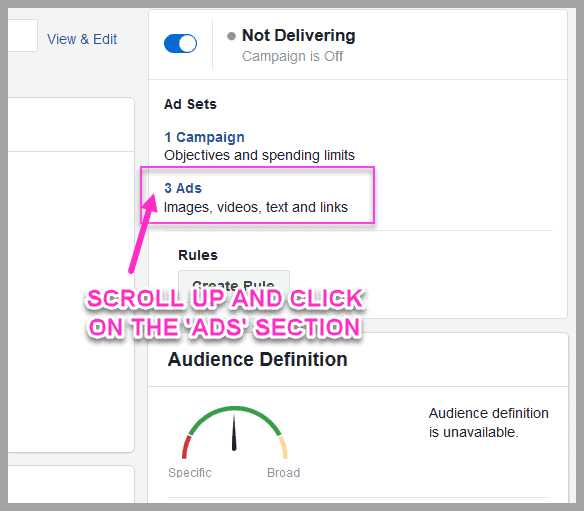
Click on the ‘Ads’ section, in the top right
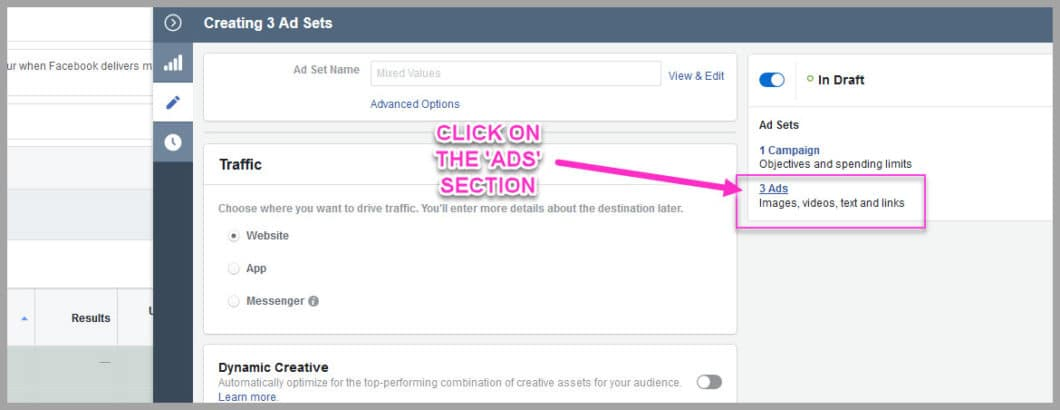
A new page will load up, with each copy of your ad
You need to edit them one at a time
Deselect each of the copies, by clicking the top tick box on the left…
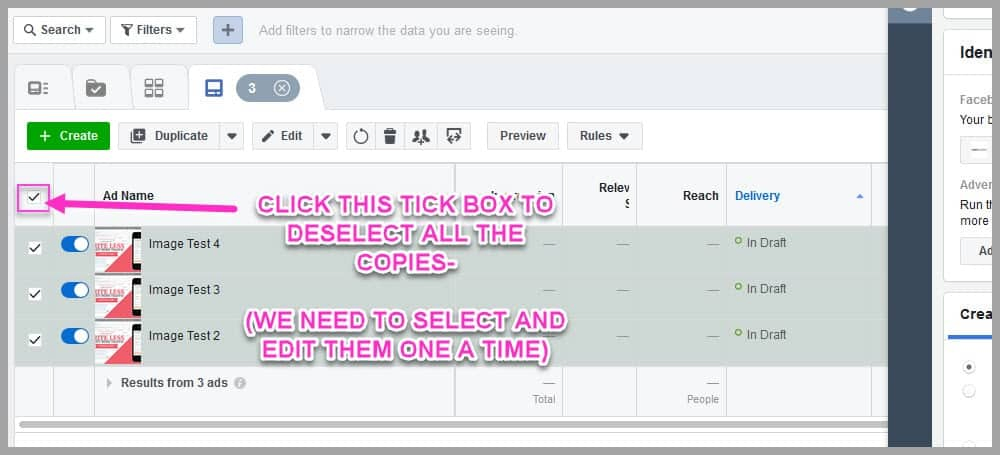
Note:
A pop up may appear asking if you want to publish those changes
(If that happens, then just click ok)
Now you need to click just 1 copy at a time, and upload a different image…
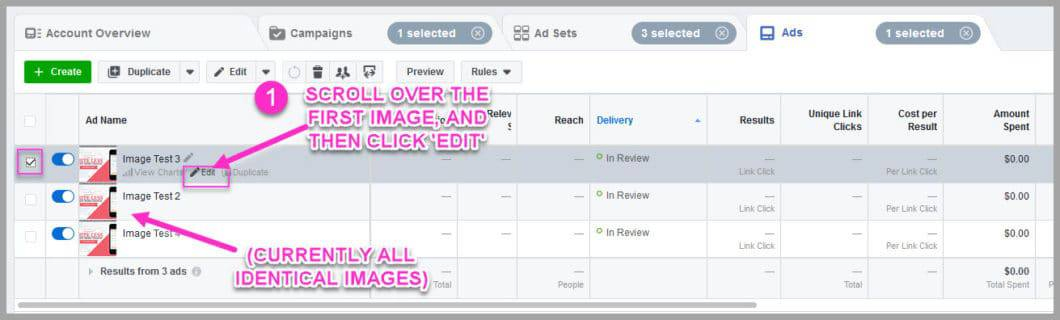
Scroll over the top image until you see the ‘Edit’ button
Give it a click
The ad manager editor will open on the right hand side…
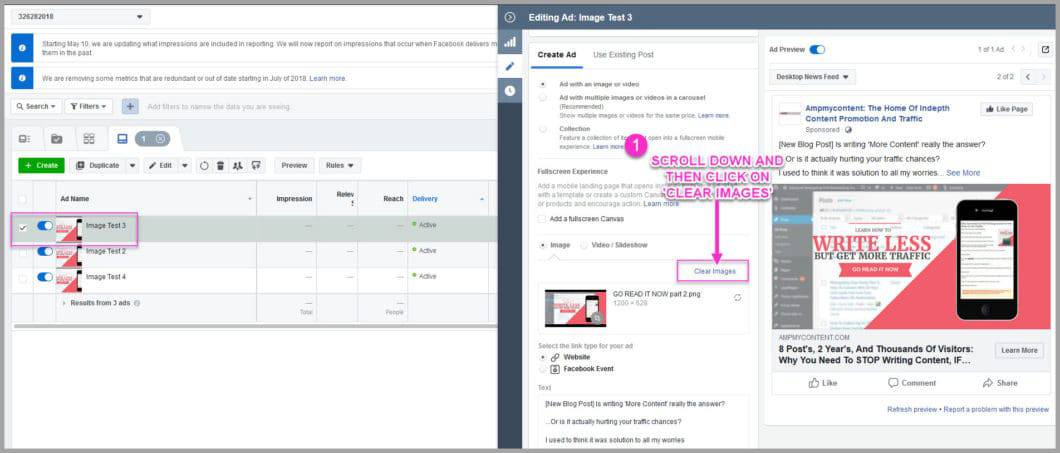
Scroll down until you see the ‘Clear Images’ text
Click that and the image will disappear
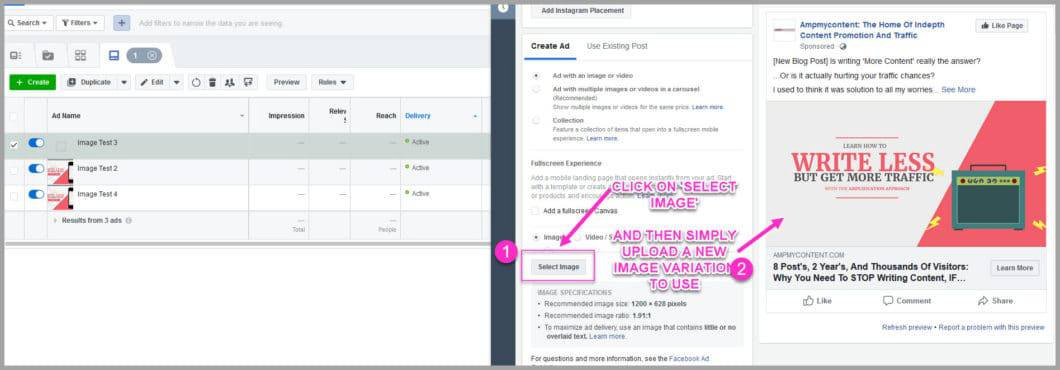
Click on ‘Select Image’ then upload a new image variation
(Be sure to use a different images each time)
Now you just need repeat that for each copy:
- Tick the ad you want to change
- Remove the image
- Upload a new one
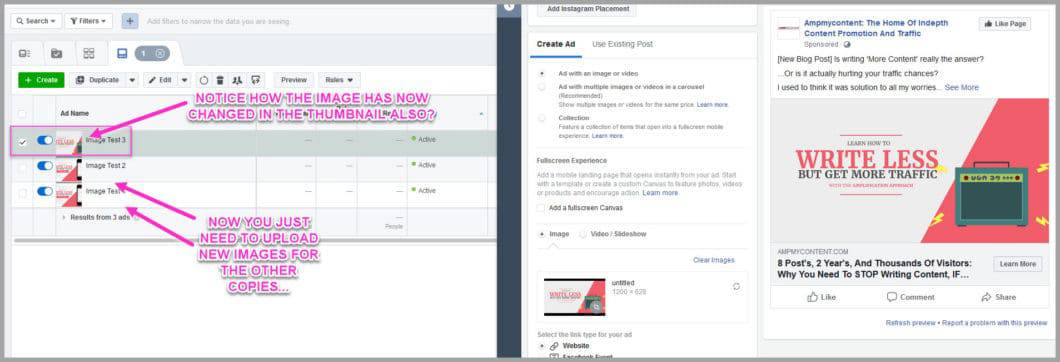
Once you’ve changed each image, click the ‘Save + Publish’ button
Easy right?
That’s your image test all set up
Side Note:
The first test takes the most effort
After this the tests are far easier and quicker to set up
All you need to do now?
Is make sure the ad is running!…
Check The Ads Are Working
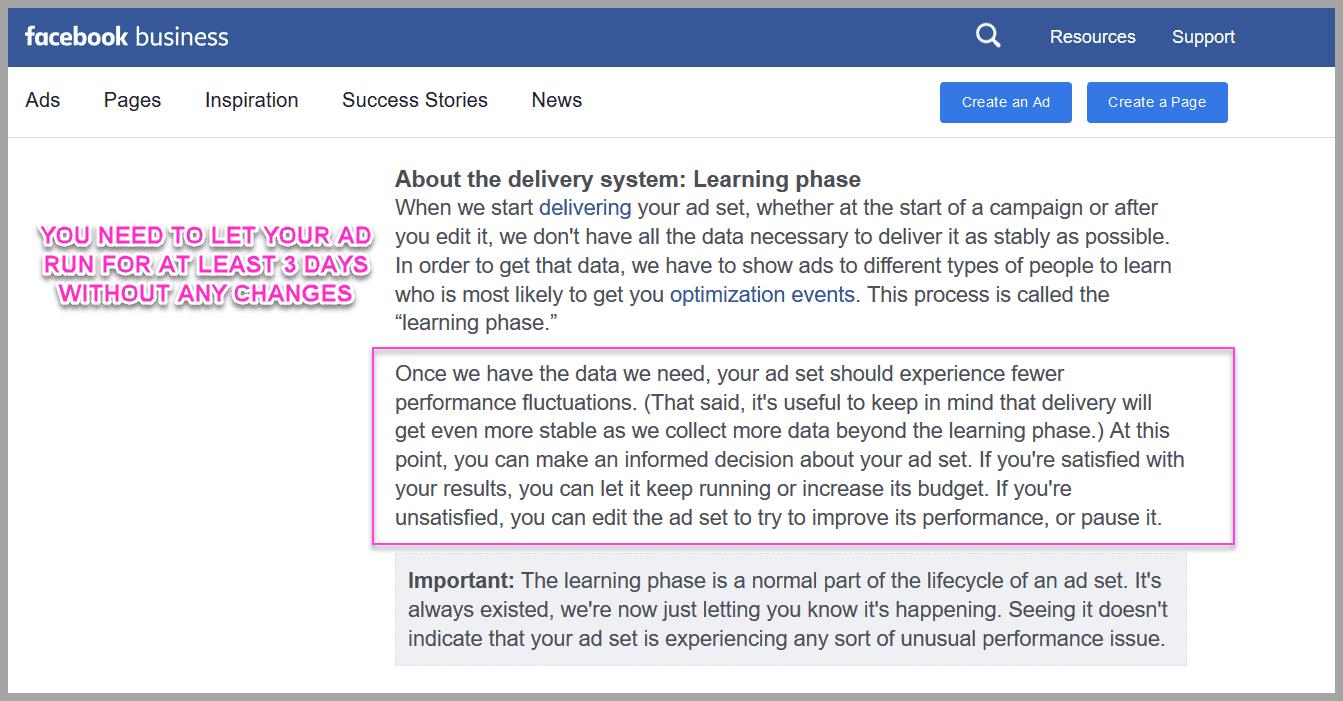
A lot of people ask me how long it takes to test a Facebook ad
The reality?
They have to run for AT LEAST 3 days before you do anything
Why?
Because it takes around 3 days for Facebook to balance out an ads performance
(This means you can’t make any changes during that time)
But before you sit back and wait?
You need to check the ad is running!
(It would suck to wait 3 days and then come back and realize its not turned on right?)
It can take 15- 30 minutes for an ad to be approved
So simply wait for 15 minutes and then check back into your ads manager…
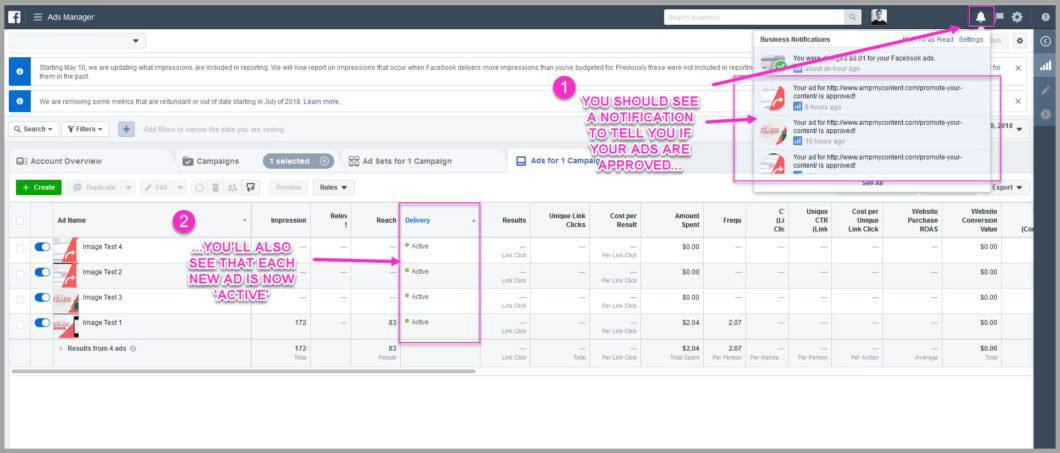
You will see a notification letting you know your ads have been approved
(Along with a green ‘Active’ notification next to each advert)
Now its up and running?
You wait…
4th Day Check In + Test
By now your ad has been running for 3 days
This gives Facebook enough time to balance out the ads performance
(Too soon and it might not be shown yet, or give random results)
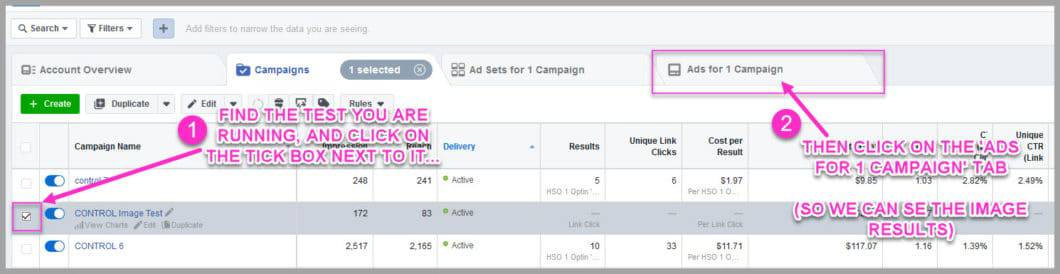
Log back into your ads manager and find your advert
Click on the tick box next to it, and click on the ‘ads for 1 campaign tab’
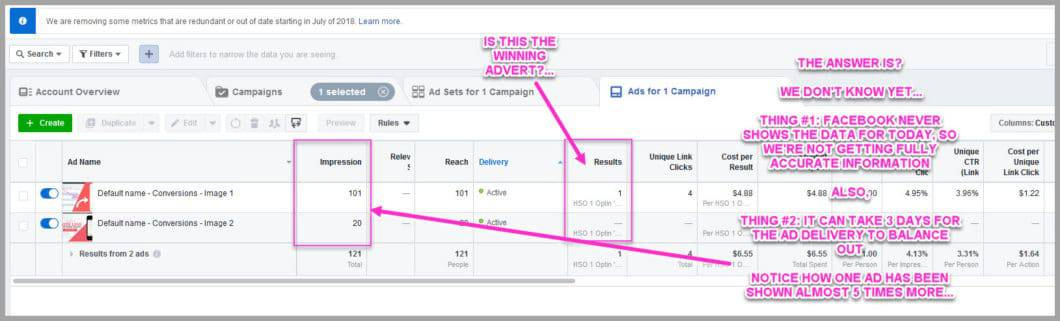
This will load up the results from each image test…
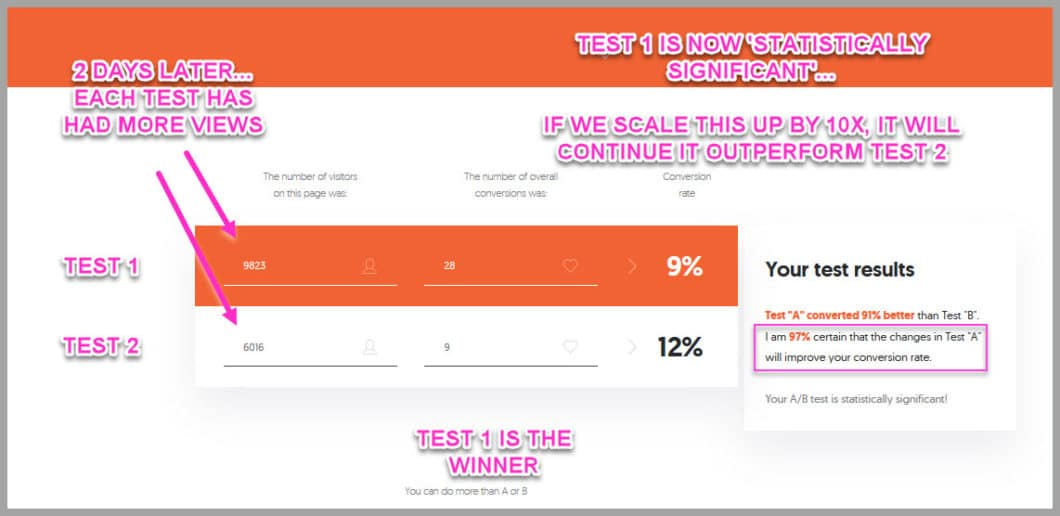
You’re interested in:
- Impressions (How many times the ad has been seen) against
- ‘Results’ (How many clicks its had)
This will then help us measure the CTR of each variation
It should look like this…
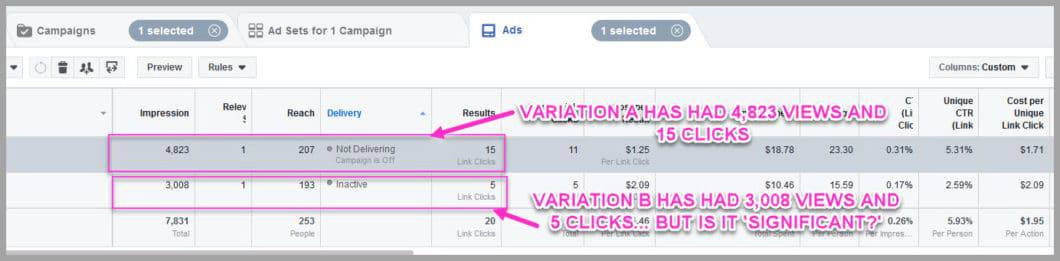
(Notice how there are different results for each variation)
You need to measure those results
Go ahead and open up this A/B Testing calculator in a new tab
(Its totally free to use)
Put the impressions in the left column, and the results in the right…
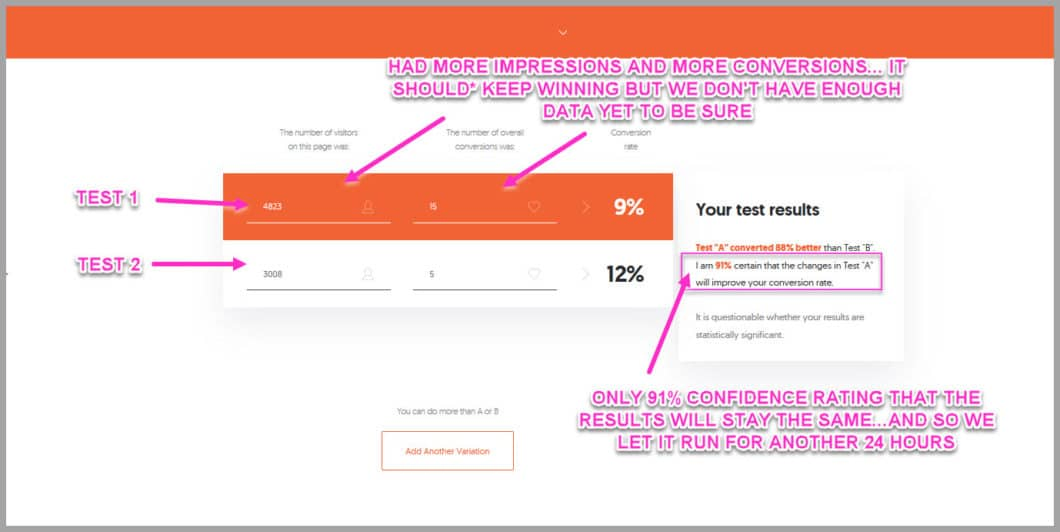
Do that for each image test
This will show you the current ‘winning’ ad
I say ‘current’ because you probably don’t have enough data yet, for an ‘accurate’ test
I won’t go into all the boring math, but you need to see a confidence rating of 95%
All you need to do?
Simply let it run longer…
This way you’ll know that:
- The winner is accurate, and
- The winner will continue to perform at that level as you scale up to a larger audience
Why care?
Because choosing too soon can mean choosing a weaker advert
(Which can lead to losing thousands of dollars as you scale up…)
Not great right?
If you don’t have a 95% confidence rating, just keep the ad running and test the results again in 24 hours…
That’s all there is to it
Now you know which image will get the most clicks from your audience
We call this winner the ‘Control Image’
Its the image that you’ll use for the rest of your tests
Even better?
Because your using that winning image for the next tests, it means they should see higher clicks right away
Pretty cool right?
So now its time to test out the other elements of your ad
Good news?
The rest are much quicker to set up…
Step #2: The Headline Test
Alright so these next tests are real quick
You simply
- Copy the winning campaign,
- Add the variations, and then
- Test it for 3 days
Easy right?
Lets get into it…
Set Up The Winning Control
Time for a bit of organization
Go ahead and log into ads manager
Click the tick box next to your advert, and then go across to the ad set section
The ad set tab will load
Find your winner, and rename it to CONTROL IMAGE
Then go ahead and delete the other ad sets
(This will also remove the failing ads and images)
Simply tick the box next to the ones you want to delete, then click the trashcan
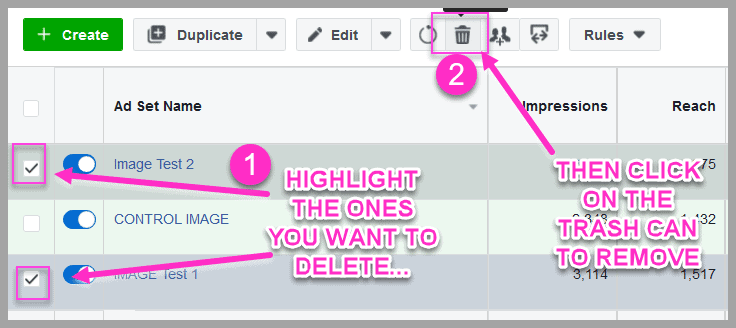
Super Important:
Make sure your winning image isn’t highlighted also, otherwise you’ll delete it as well!
Now that you’ve tidied up the ad, its time to duplicate the control campaign…
Start New Test From Zero
You always start a new test from zero
This helps to make sure the ads perform fairly
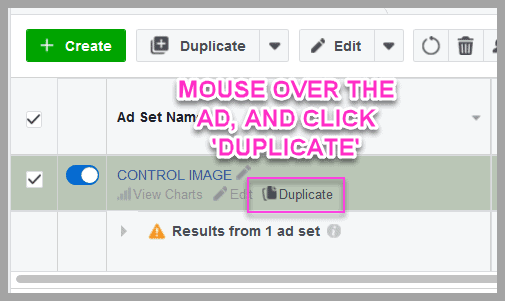
Mouse over the winning ad, and then click on the duplicate text
When you click that, a new pop up will appear
This time the duplication is a little different
You’re going to duplicate an entire NEW CAMPAIGN from this control…
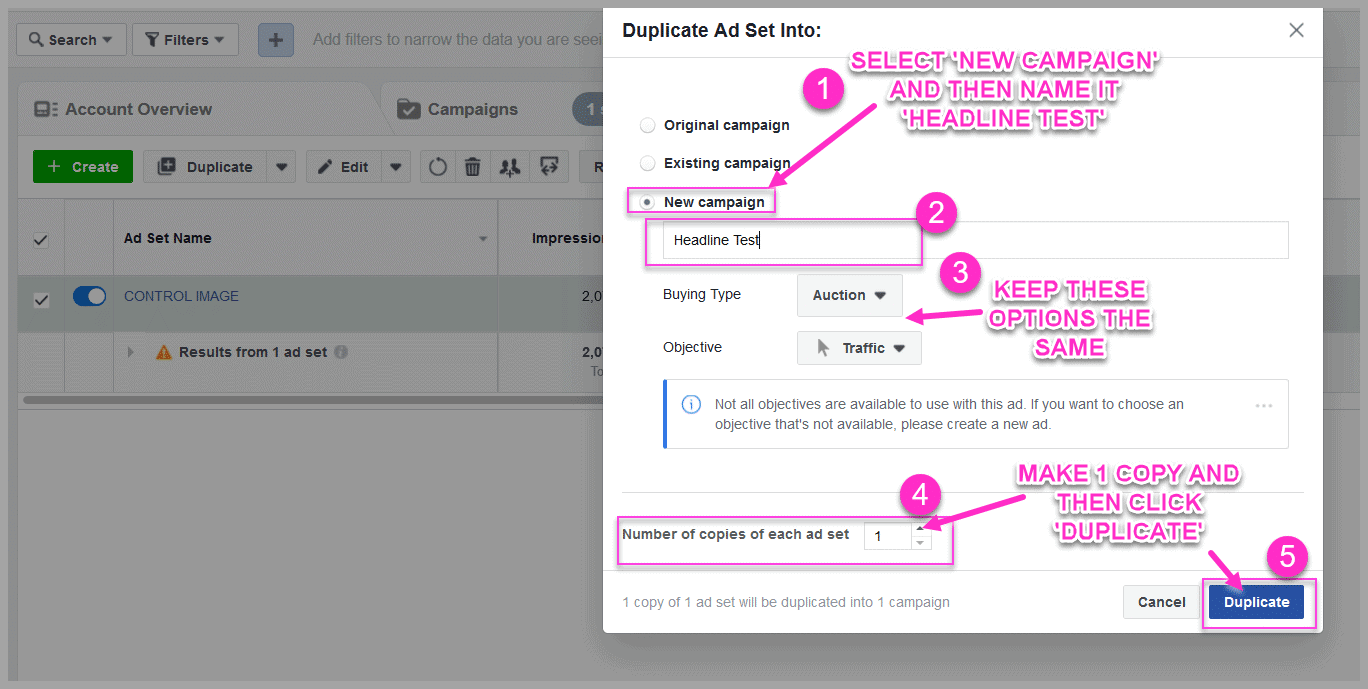
Select ‘New Campaign’ and then call it ‘Headline Test’
Leave the bid options the same
Make just 1 copy, and then click duplicate
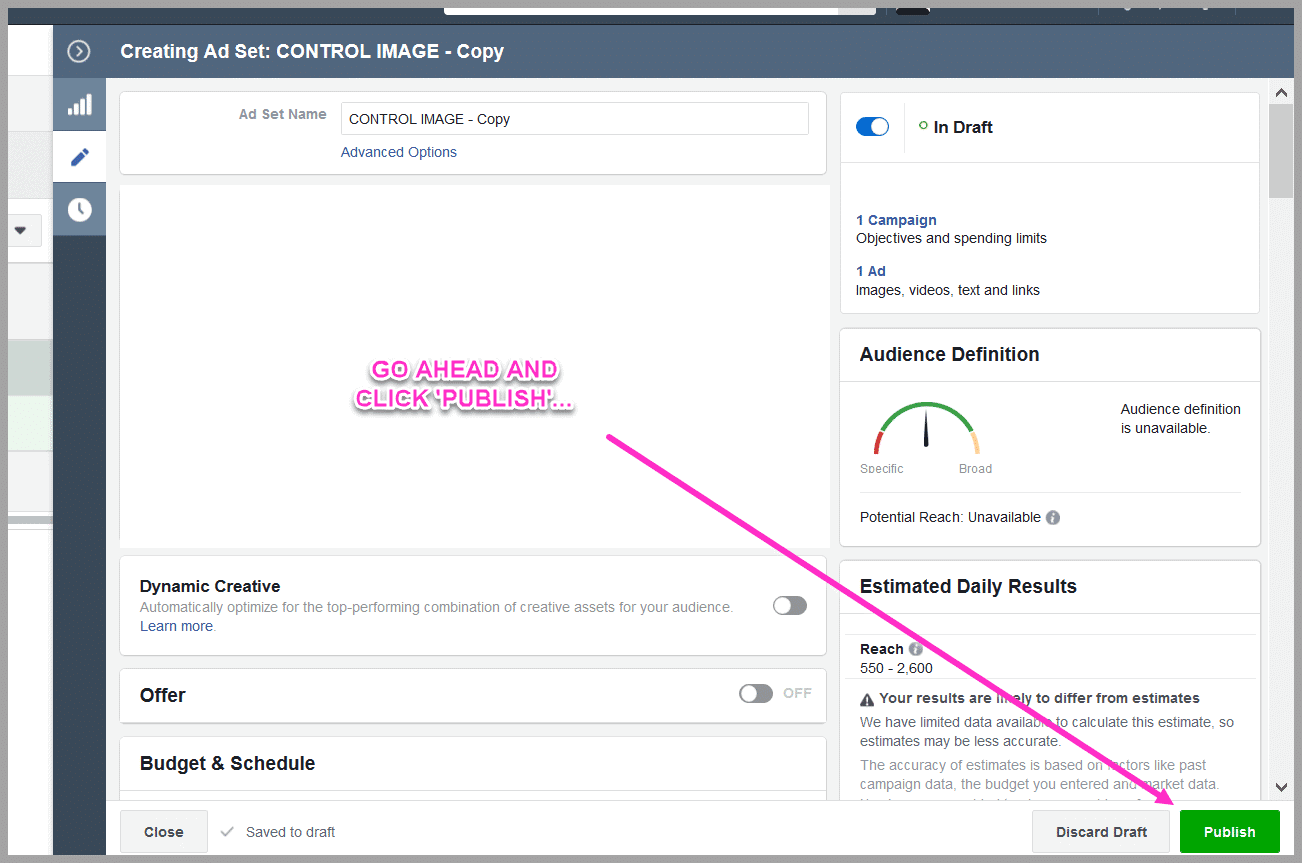
The ad will load up as before, with all the settings of the winning ad from the last test
(Same image, headline, sub head and copy)
Click the green ‘Publish’ button
So now you have the new control ad up and running (from zero)
The last thing to do, is turn off the previous image test
Go back to your campaigns and find it…
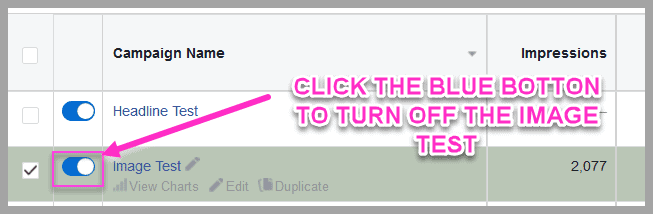
Then simply click the blue button so it turns grey
So now you’re all organized, its time to set up the new variables…
Set Up The New Headline Test Variables
Same as before
You’re going to:
- Dupe the control,
- tweak the audience to not compete with yourself,
- and then test different headlines
Click the box next to your Headline test, and then click on the ‘ad set’ tab
Once the Ad Set loads up, mouse over the ad so you can see the duplicate option
Give it a click
Then select ‘existing campaign’ and choose the headline test you just created…
Make 3 copies, and then click duplicate
The new copies will appear
Now you just need to tweak those audiences, so that you don’t self compete…
Tweak the Audience
Start off by editing each of the new copies names
Click the ‘View + Edit’ text to edit them all at once
Then edit their names …
Adjust the audiences so they don’t compete with each other
Scroll down to the age section
Click on the ‘View + Edit’ text…
This will load up each ad
Edit the age by 1 year for each
(This way you won’t compete with yourself)
Easy right?
Now that those duplicates are all organized, its time to add your new variable to test…
Add The New Headlines
You should have a list of different headlines from the work you did in Chapter #4 ???(LINK
Go ahead and open up that document
Pick 3 headlines that you want to test
Then scroll to the top of the screen and click on the ‘Ads section’
Now this part isn’t complicated, its just frustrating
Why?
Facebook doesn’t allow you to simply edit the advert, as its a copy of a previous ad
That’s fine for the control…
…but you need to tweak the headlines right?
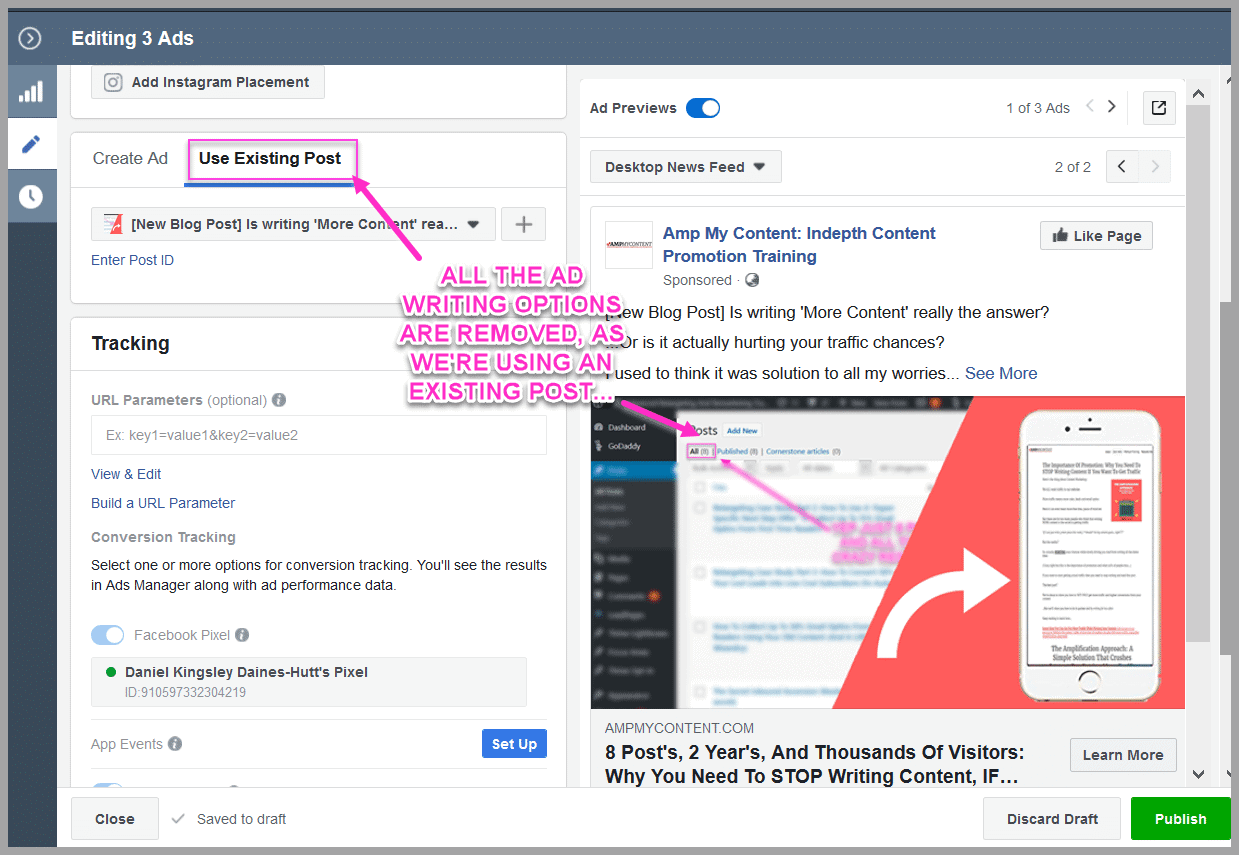
(Notice all the text options are removed-gah!)
So what can you do?
Its a little long winded…
Make sure that you have each of the duplicates selected, and then click on the ‘Create Ad’ button
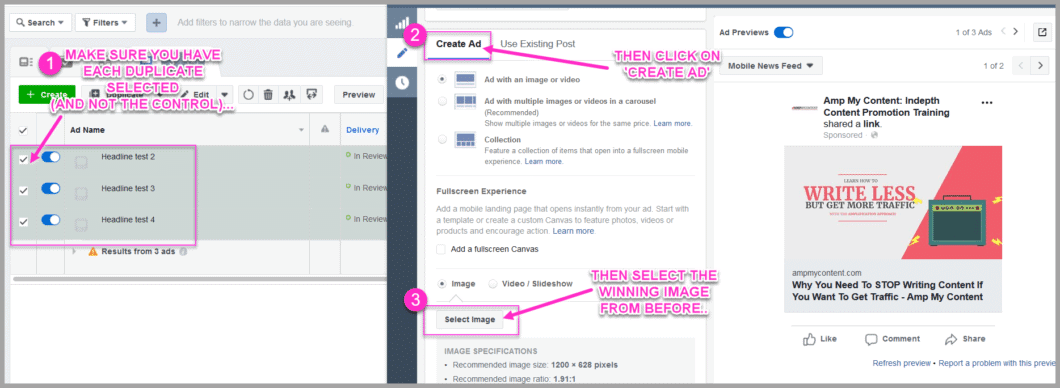
This will then remove all the ad copy, and image’s from before…
Not great, BUT it does allow you to enter different headlines
(Sorry but its the only work around atm)
All we do?
Simply copy and paste again…
With each duplicate still selected, click on ‘select image’ and choose the winning image from the last test
This will upload that image to each copy
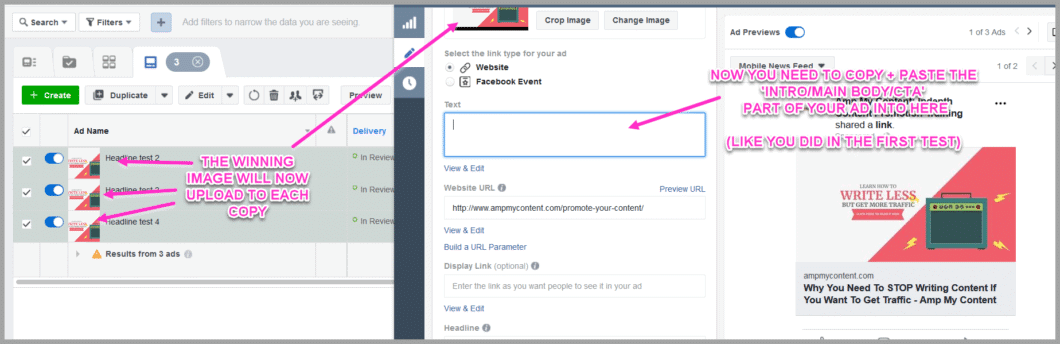
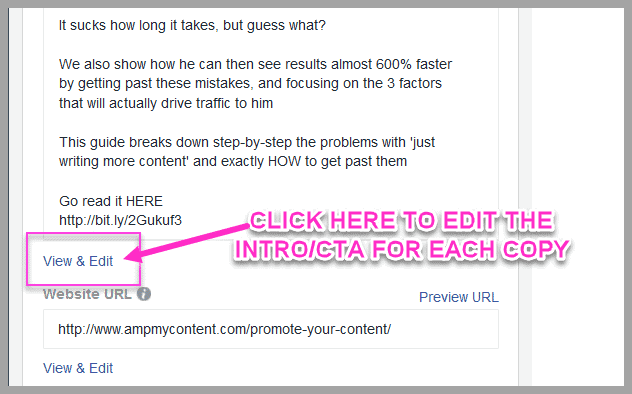
Scroll down the page to the ‘text’ section
Still got your original Word document open with your ad?
Awesome
Go ahead and paste the intro/body/cta section into the first box
(Just like you did in the first test)
Then enter the URL for the article in the box below that
Scroll down to the ‘Headline’ box
This is a little different
Click the ‘View + Edit’ option below it…
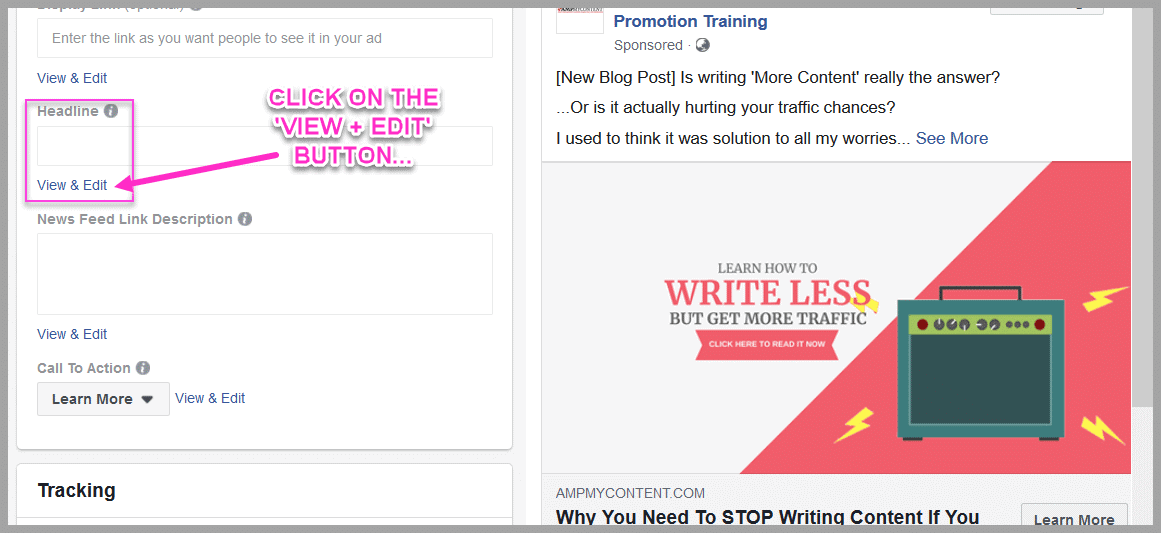
A new pop up will appear
Go ahead and enter the new headlines that you want to test
(Just 1 variation per box)
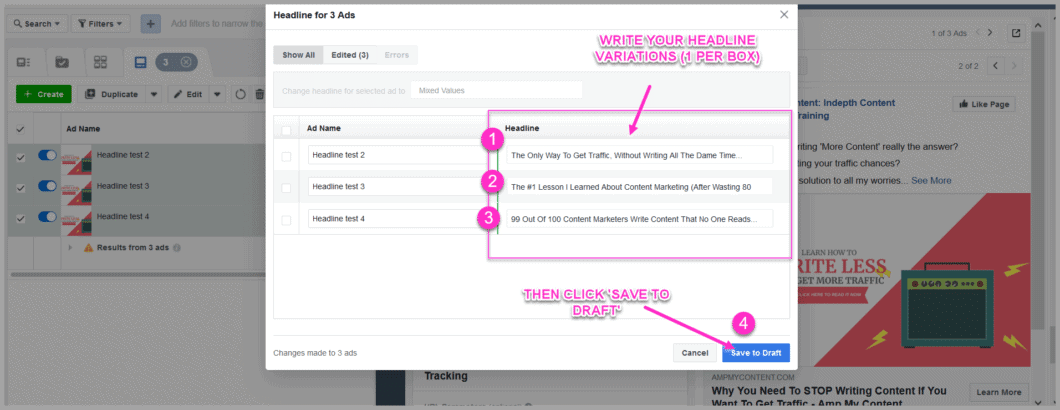
Sidenote:
You don’t need to ad the original headline, as that’s being tested with the control ad
Once you’ve added the new headline variations, click the blue ‘Save to Draft’ option
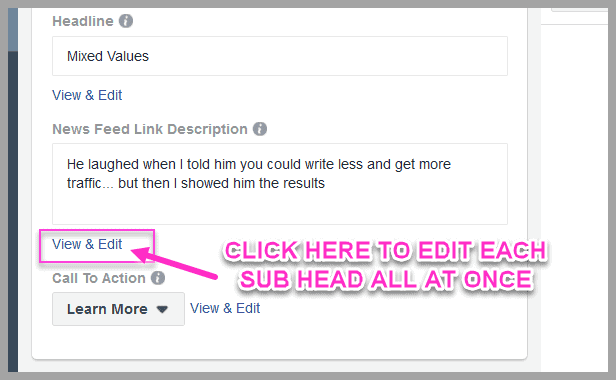
Then scroll down to the ‘News Feed Link Description’ box
Paste the SubHead of your advert here…
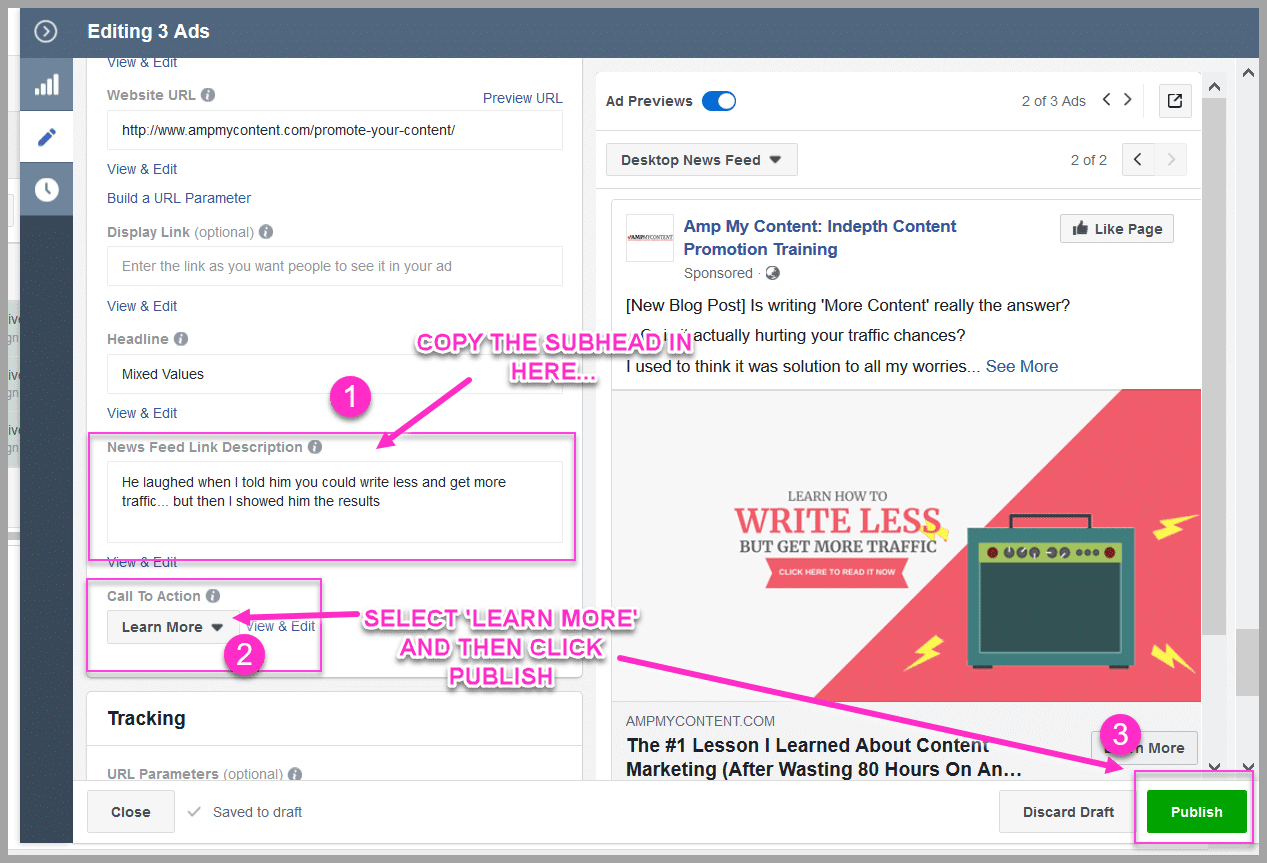
Then select the ‘Learn More’ button, and click the green publish option
Boom!
That’s the 2nd test all set up
You’re now running the winning image with original headline, vs winning image with new headlines
Every test from now on, follows this same pattern
The only difference is which control you keep, and which new variable you test
Make sense?
Now you just need to measure the results…
Test And Measure
Just like before
- Wait for 15 minutes and check the ads are running
- Wait for 3 days and then test the results using the A/B Test tool
- Keep running and testing each day, until you have 95% confidence rating
You now have a winning headline AND a winning image
At this point you should already see a lift in click through rate
Now its time to test that sub head…
Step #3: The Sub Head Test
Quick recap:
The audience is scrolling through their News Feed
The image gets their attention, and then they read the headline to see if its relevant to them
After that they check out the subhead
The subheads goal is to get them interested even more, so that they open up the ad copy and read it
Now the test process is identical as before (Apart from the new variable)
Because of that, I’m going to simplify the steps below…
Create The New Control
- Rename the winner of test #2 (Call it CONTROL IMAGE + HEADLINE)
- Remove losers from test #2
- Duplicate entire campaign to start at zero (Call it SUBHEAD Test)
- Turn off the previous headline test…
Add The New Variable (SubHead Testing)
- Dupe the Ad Set x 3
- Give each copy a name, and tweak audience age gaps
- Go into ad section- make sure only duplicates are selected, and click ‘create ad’, so you can add the variable
- Add the article URL
- Add the winning image and headline from the previous tests
- Copy the rest of the ad into the correct boxes
- Change the SUBHEAD for each copy so you can test different variations
- Publish the ad
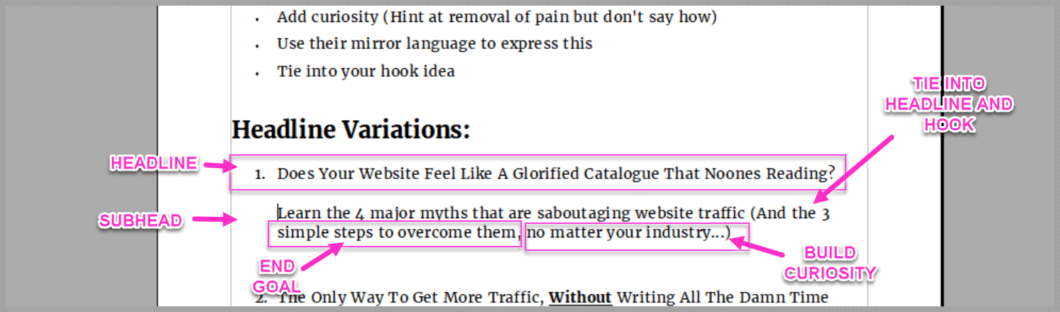
You should have written a few subheads already
Feel free to tweak the ones you have so that they work with your new control headline
(Remember the goal of the subhead is to tie into the headline, talks to the ‘after state’ goal and builds curiosity to read the intro)
Once you have the variations up and running, you just need to measure them as usual…
Test And Measure
- Wait for 15 minutes and check the ads are running
- Wait for 3 days and then test the results using the A/B Test tool
- Keep running and testing each day, until you have 95% confidence rating
Once you have the winning subhead, its time to test and improve the CTA section…
Step #4: The CTA Test
The final test
In theory, you could try out all new ad copy
But the biggest difference to your CTR?
It will be improving your call to action-the paragraph of text that gets them to go read the article
The process to set it up is still the same…
Create The Latest Control
- Rename the winner of test #3 (CONTROL IMAGE + HEADLINE + SUBHEAD)
- Remove losers from test #3
- Duplicate entire campaign to start at zero (Call it CTA Test)
- Turn off the previous Subhead test…

Add The Final Variable (CTA Variations)
- Dupe the Ad Set x 3
- Give each copy a name, and tweak audience age gaps
- Go into ad section- make sure only duplicates are selected, and click ‘create ad’ so you can edit the text sections
- Add the article URL
- Add the winning image, headline and subhead from the previous tests
- Change the CTA for each copy
- Publish the ads
Just like with the subhead- you can click the ‘View + Edit’ button, to edit each version all at once
A Call To Action needs 3 elements:
- Ask them to do something (Go read the article)
- Tell them what will happen when they take the action
- Connect to an emotional driver…
If you remember back to the ad writing chapter, we talked about the emotional reasons that people do anything
They are:
- Self Identity (to see ourselves in the offer)
- Need for Certainty and to remove anxiety
- Need for Uncertainty and to create excitement
- Need to feel Significance from others
- Need for Connection from others
- Need for Growth and struggle
- Need to Contribution and give
Every member of your audience wants what you have to offer
The only difference is the REASON behind WHY they want it
At the moment, your call to action appeals to one of those emotional factors- usually fear of loss/to remove anxiety
In this test, you’re going to tweak your call to action to appeal to a different emotional driver
Now its real easy:
You already know your audience, because you did your research
Think about your article, and what they could gain from reading it- but from different emotional appeals
Then go ahead and write 3 new CTA variations
By doing this, your different CTA’s will appeal to different segments of your audience
One of them will be more effective than the other- improving the CTR across to your article
Simple right?
Once you have them up and running, you just need to measure them as usual…
Final Test And Measure
- Wait for 15 minutes and check the ads are running
- Wait for 3 days and then test the results using the A/B Test tool
- Keep running and testing each day, until you have 95% confidence rating
By this point your ad is the highest performing CTR of any variations
Great work!
This will make a huge difference to your ad cost, and its performance…
Step #5: Broaden And Launch
The last step
Remember that your end goal is to drive paid traffic to your article, at a profit
Now you know that your ad converts, its time to scale it out to a wider audience
During the test phase you focused on 2 things
- Getting the audience to see the ad as often as possible (impressions)
- Measuring their response (i.e clicks)
With all these tweaks, you might even have a profitable ad by now
Lets take it a little further…
You’re going to change your audience, and goal
Why care?
By broadening the audience, Facebook lowers the cost to show the advert
(Less specific targeting = less costly)
So why change the ad goal?
A.I…
By ‘optimizing’ for a specific goal, Facebook starts to learn about the audience that converts on your article
It then uses that information to improve targeting, lower costs and get better results
Most people stick to their tight focus group, and so struggle to get a profitable ad
This is the secret you’ve been missing
The best part?
It takes around 3 minutes to set up…
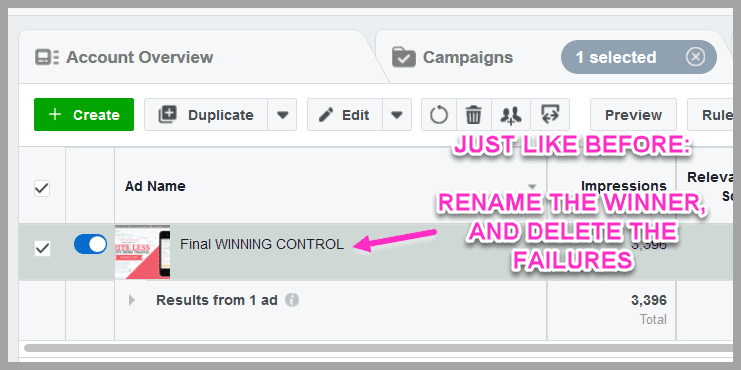
Find The Final Winning Control
Go ahead and open up your ads manager
Find your winning control, rename it and delete the failures…
Now its time to create a new conversion campaign…
Create New Campaign
You can’t duplicate and change the campaign goal from the ad section
So go ahead and click on the ‘Campaign’ button in the top tab…
This will load up your ad at the campaign level
Scroll your mouse over the winner and then click the ‘Duplicate’ button
A pop up will appear
Select ‘New Campaign’ and give it a name
Then the ad editor will load on the right hand side of the page
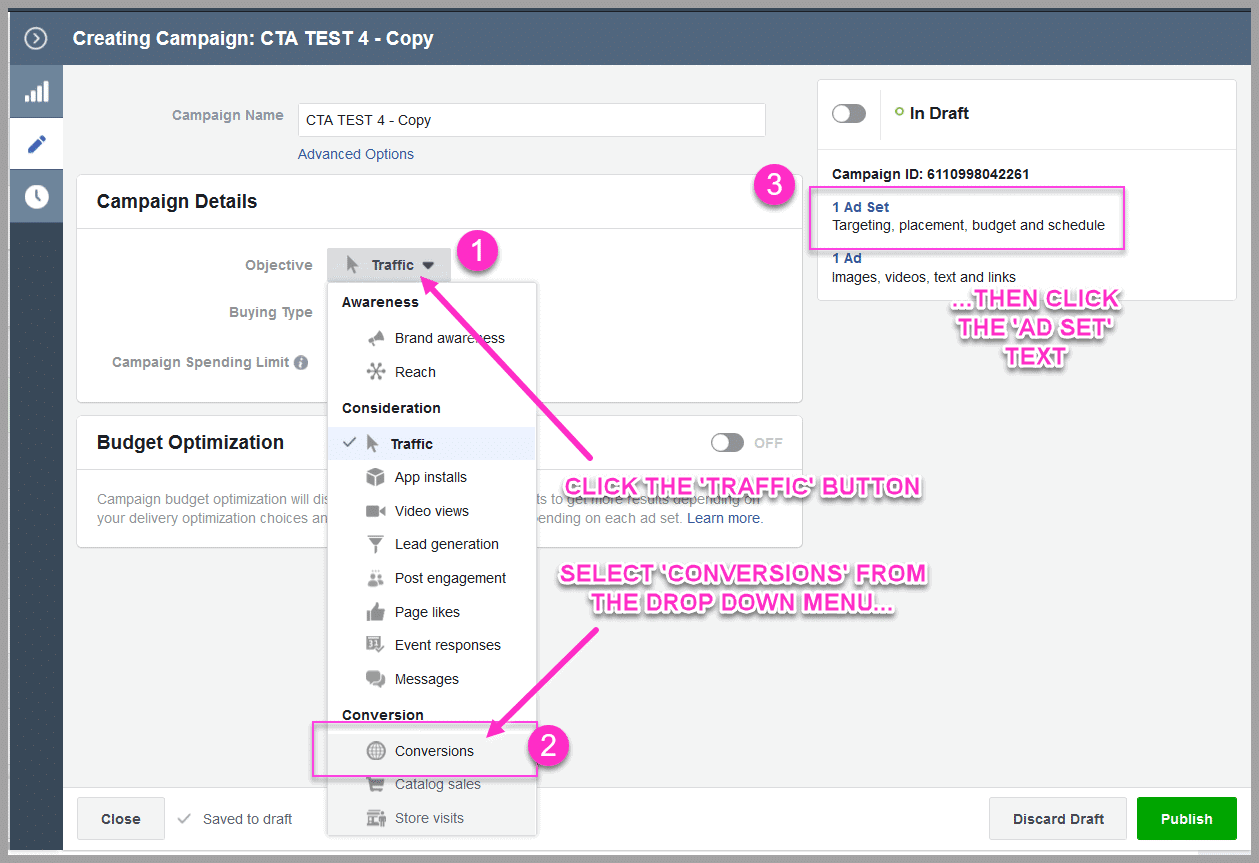
Click the ‘Traffic’ button to load a drop down menu
Select ‘Conversions’
Then click the ‘Ad Set’ button on the top right
This loads up the ad set manager…
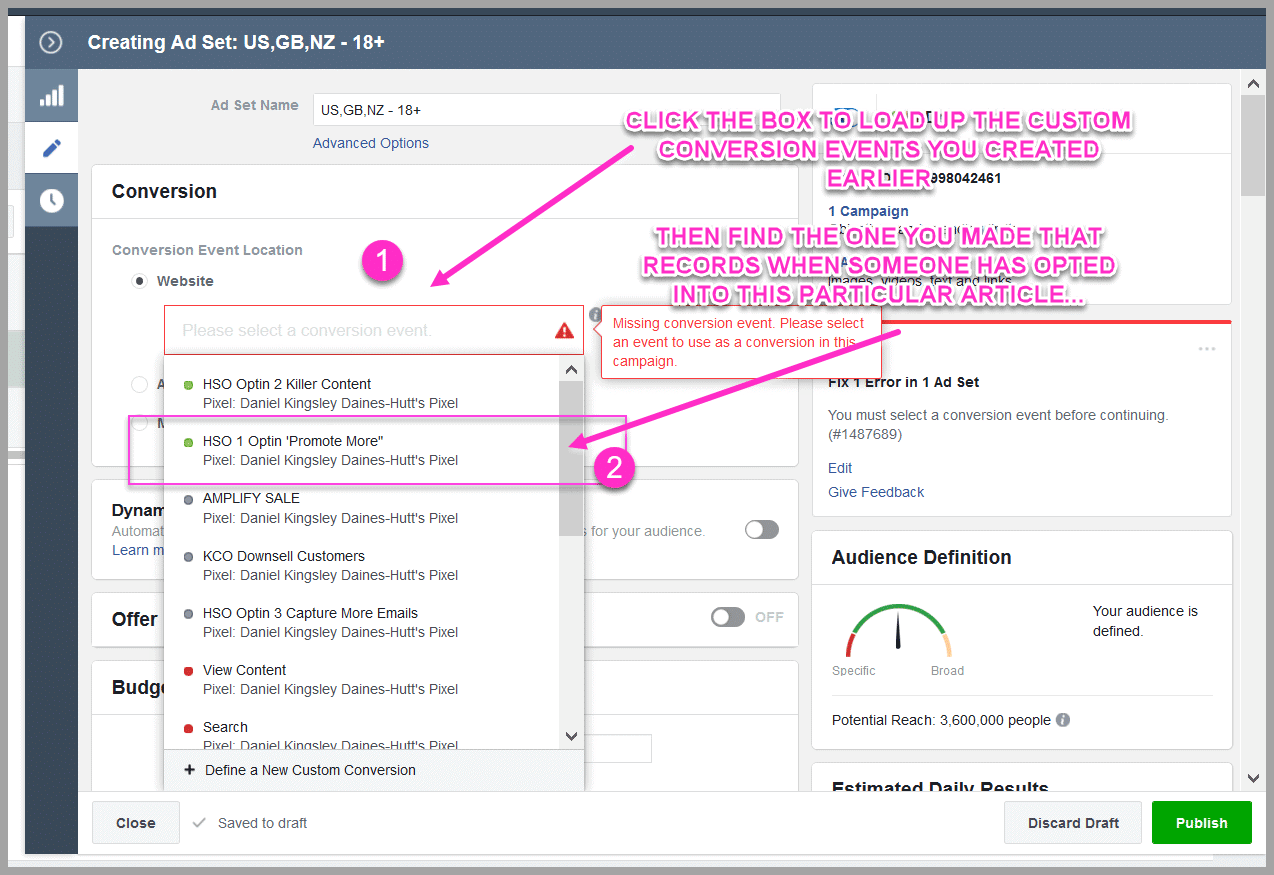
Now you need to select your conversion goal that you created in Chapter #6: Ad Tracking
This is the goal you want Facebook to record results from
(It’ll then use it to measure ad performance, cost and learn about your audience)
Simply click on the box, and then select the correct conversion goal from the drop down menu
Then scroll down to the budget section

I recommend starting your daily budget at around $20
(Too much too soon can skew the algorithm, so start low at first)
Now that the budget is set up, you just need to change the audience targeting…
Scroll down further to the audience section
You should see the focus group audience still targeted
Remove it, and then select the broad audience you made earlier…
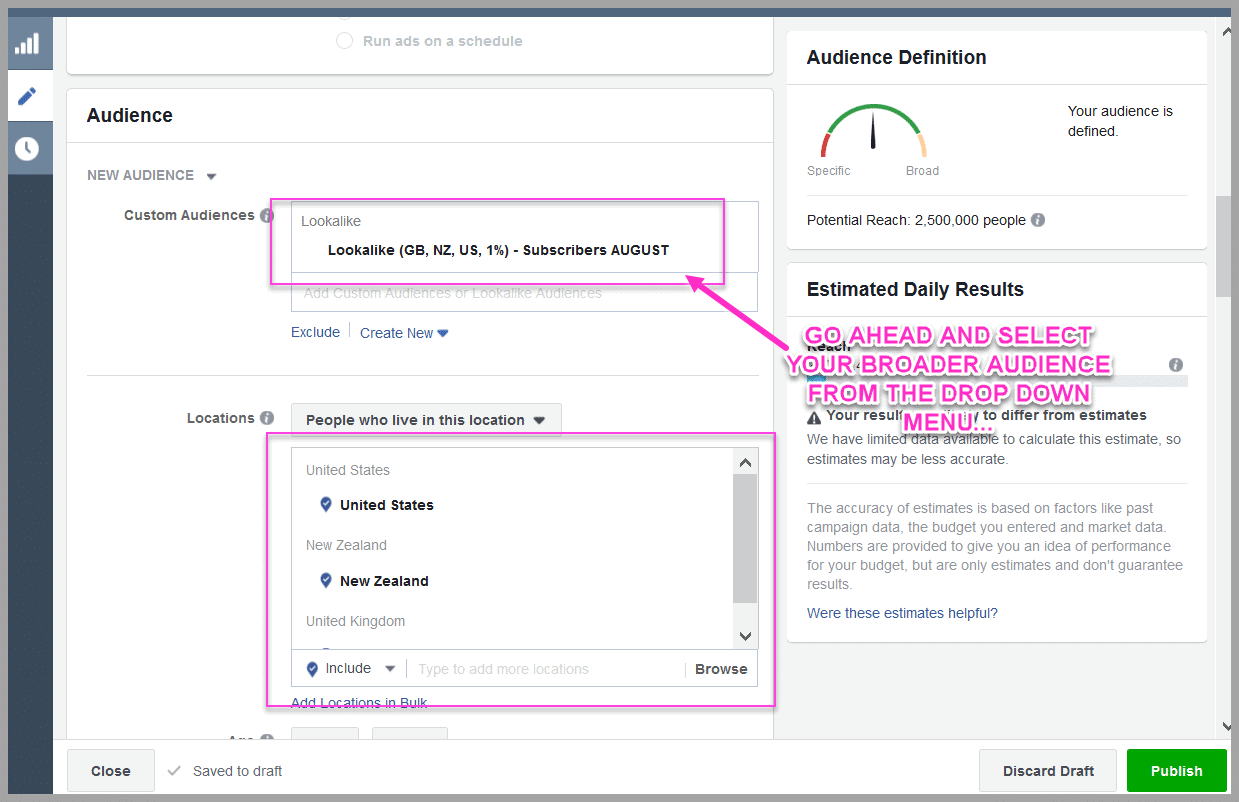
Easy right?
Before you hit publish, its always a good idea to check on the advert
Scroll up to the ad section and give it a click
Give your advert a quick look to make sure there are no errors
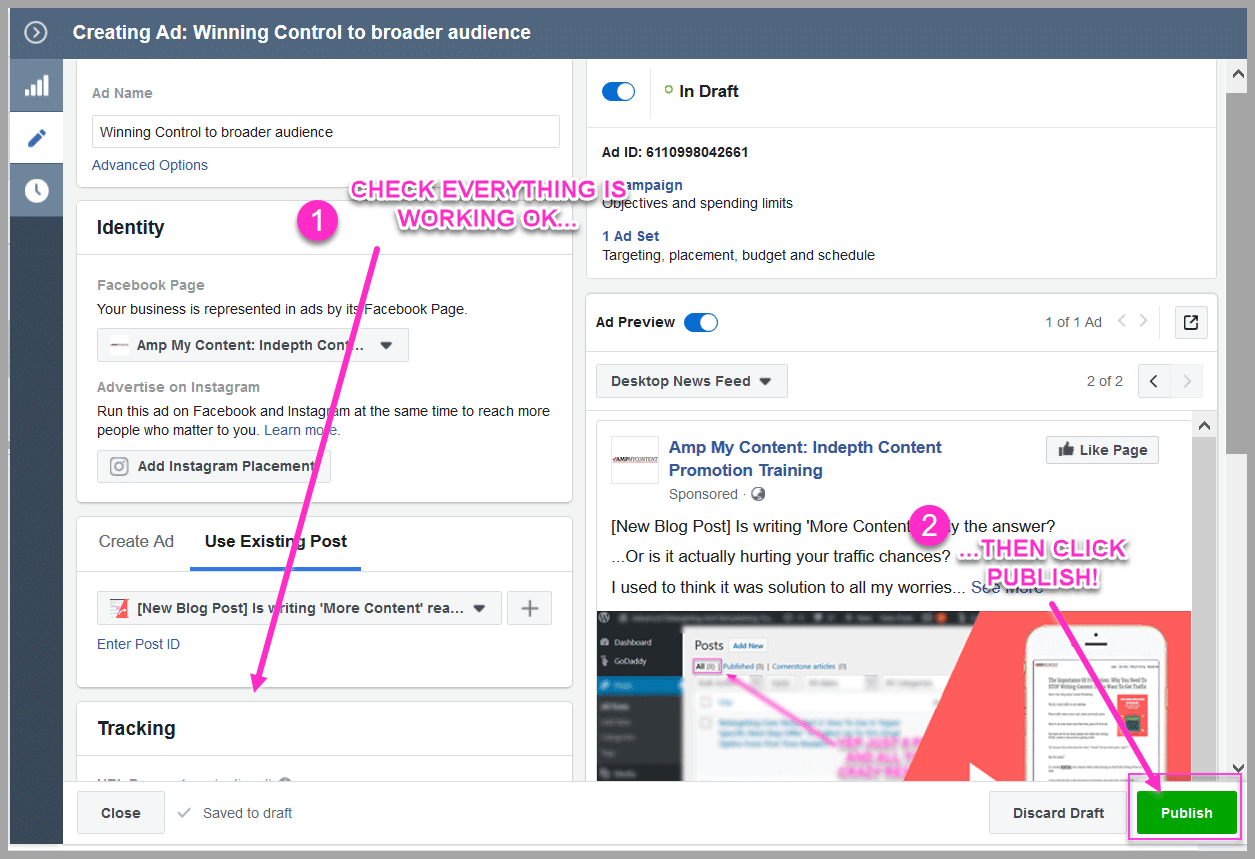
If its all ok?
Just hit the green publish button!…
Test And Track
Just like before
- Give it 15 minutes and then check the ad is running
- Then come back after 4 days and check on the results
(Any results before might not be accurate, so don’t touch the ad before then)
Now this time you’re not split testing or measuring results
Instead?
You’re looking to see if the lead cost is within range…
You should see your conversion goal on your dashboard

As long as the cost per optin is BELOW the max cost that you found in Chapter 2, then great news…
Your ad is now profitable!
You can happily keep promoting your article to cold audiences, knowing that you will see an ROI
Not bad right?…
What To Do Now:
So there you have it
Not just an entire step by step process of how to test Facebook ads, for your business
Even better?
You also have a system to run a profitable advert to a cold audience, and promote your content
Now more ‘ghost town’ content for you buddy!
With this method you can scale and compete with MUCH larger companies, without writing all the damn time!
Better still?
You can run this as low as $5 per day and KNOW that you will make money
(As well as grow your audience and leads…)
All that’s left to do now?
Go set it up for your own content!
Important:
You can download a PDF version of this article to follow along and take action
Simply click the image below, then enter your email to have it sent to you
Even better?
We’ll also send you 2 follow up articles via email, when they go live…
- How to troubleshoot your ads performance (and further lower cost)
- How to scale up to larger audiences (and stay profitable)
Simply click below to get this bonus AND those next articles!
|
|
|---|---|
|
|
|
|
|
|