If you’ve been following our series so far, then you’re about to get some serious traffic. The kind of traffic that can change your business and your life.
But traffic on its own is not enough.
Why?
Because that traffic needs to be able to convert also! Far too many people create content for just traffic alone but all that means is, you got people to you and then they leave…
But if you can actually collect the email? Then every new blog subscriber is almost 37% more likely to buy from you.
Even better?
They will share new content and buy from you again and again. Suddenly your content not only attracts traffic, but it also grows your audience WHILE ALSO helping you grow sales.
But the best part?.
All that new traffic you’re about to get will be far more efficient and not wasted.
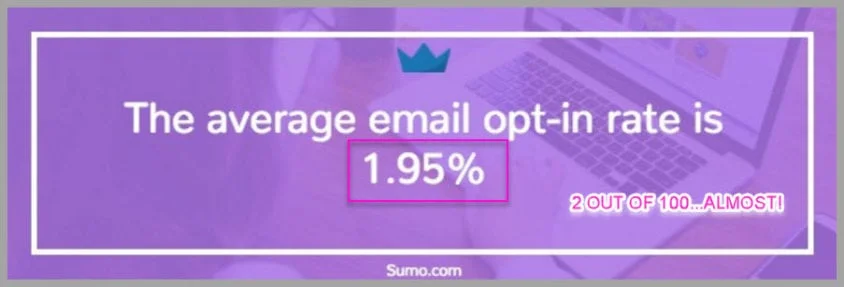
We told you how email is the 2nd most effective sales channel right? But did you know that most websites only convert 1.95% of readers into subscribers?
Yep less than a measly 2% That means 98 out of 100 visitors are wasted, gone, lost.
Meh to that! Let’s show you how we convert between 17% and 83% of our readers into blog subscribers with each piece of content we create.
That’s not a typo either. This method is going to change your business almost overnight.
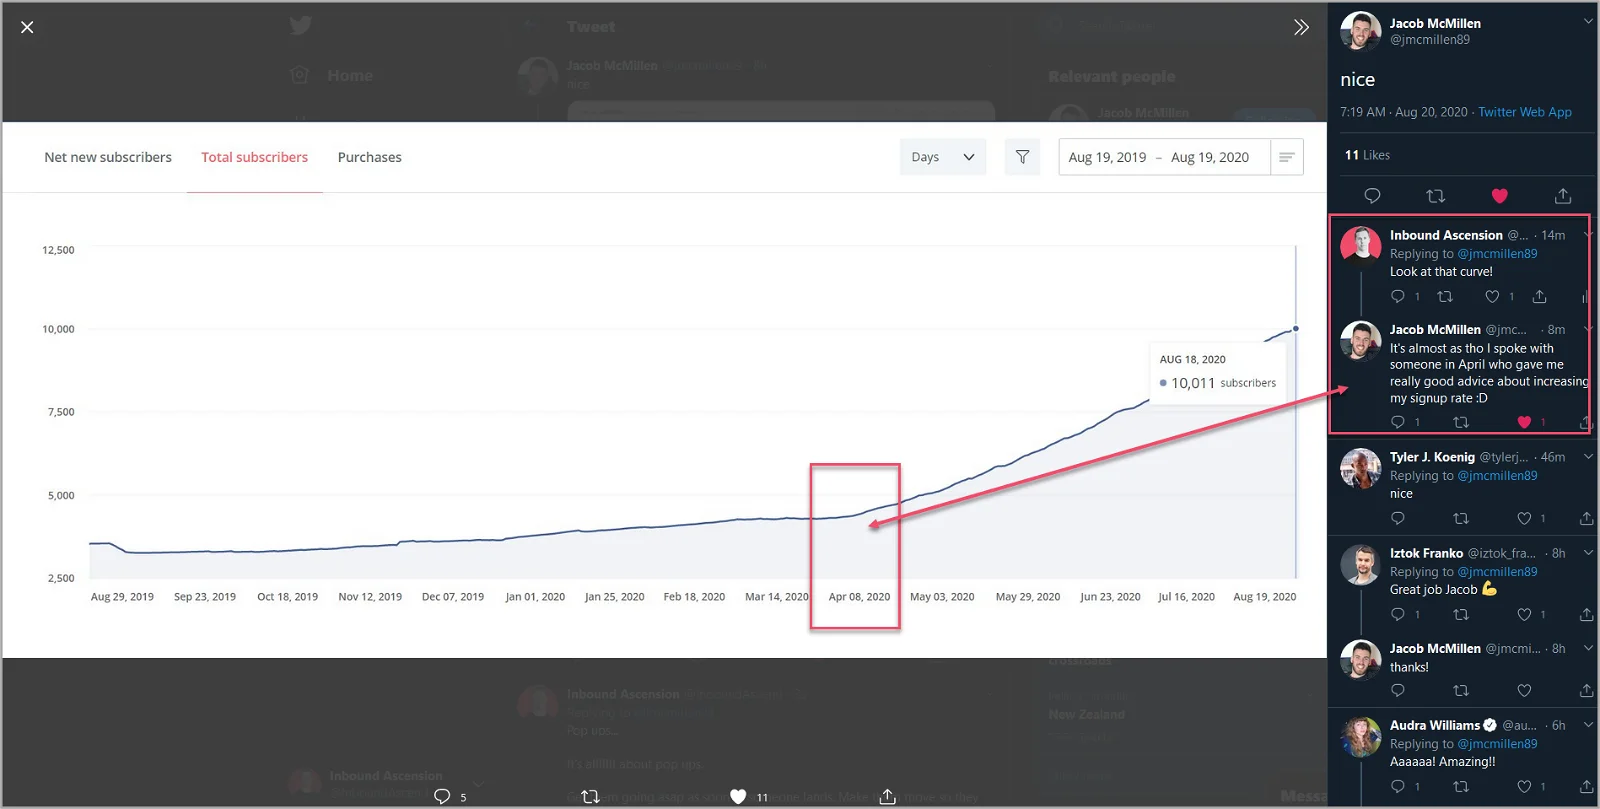
Don’t just take my word for it though. Have a look at how Jacobs conversions changed below…
Pretty cool right?
Similar traffic volume, but far more blog subscribers.
Want these kind of results for your own content? Well keep reading to find out how…
The Hyper Specific Next Step Offer: How To Get 5x More Email Optin’s From Your Content
So a quick recap:
In the last few posts we’ve been talking how to get traffic
And we’ve broken down a fair few myths and mistakes
We talked about the importance of promotion instead of constantly writing new content…
How you can get far more traffic faster, easier and more efficiently by promoting content rather than writing all the damn time
(Its literally the fastest way to break even on your content creation cost AND see a positive return on your content)
But that’s not all…
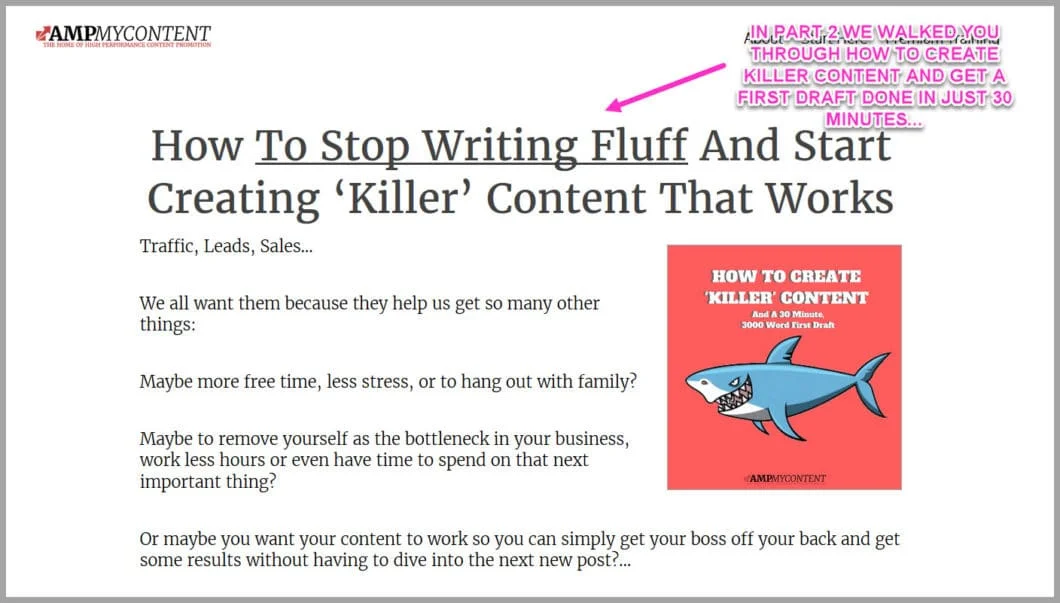
We also talked about why you need to be promoting ‘Killer Content’ and why ‘weaksauce’ content is just not worth your time
Why?
Because killer content is a one, two punch for your traffic
It promotes easier, it gets results faster, ranks quicker AND because its great people love it and you can write far less often
We even broke down how to create that Killer Content and get past those common writing objections in the last article
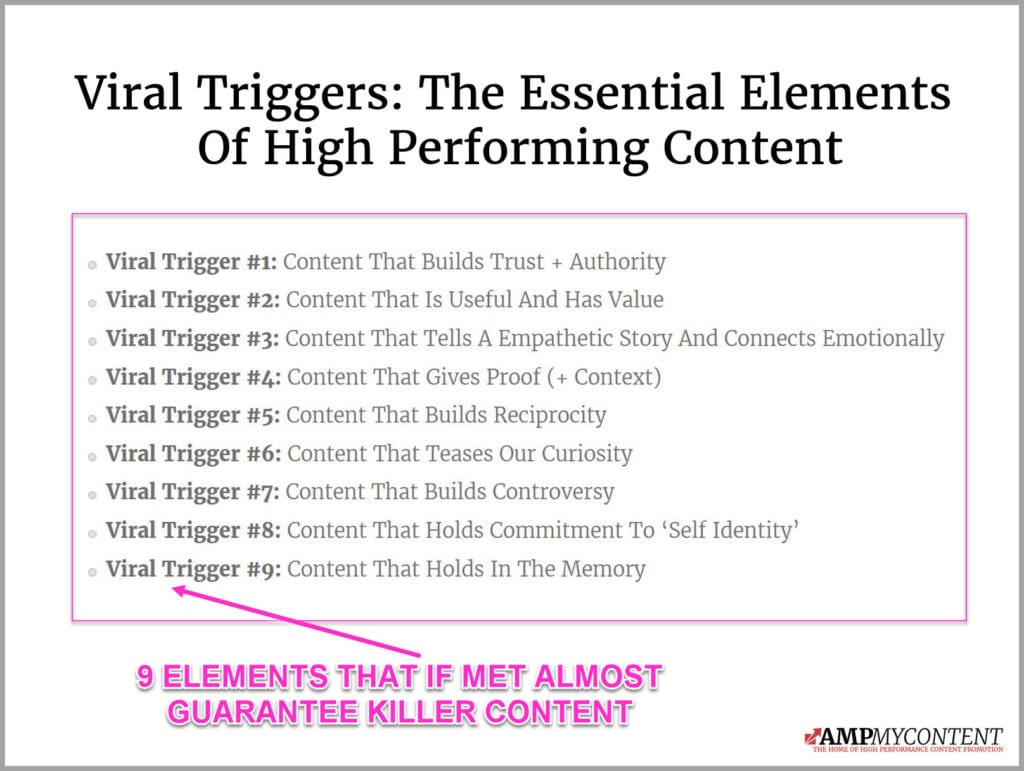
If you can tick those 9 boxes that make up the highest performing content online, then you’re almost guaranteed to succeed…
We also talked about the value of systems and how they can help you get past the major writing stumbling blocks:
- How to get past that dreaded blank page
- How to start writing and get a draft done in 30 minutes
- How to get past fears of fraud and analysis paralysis
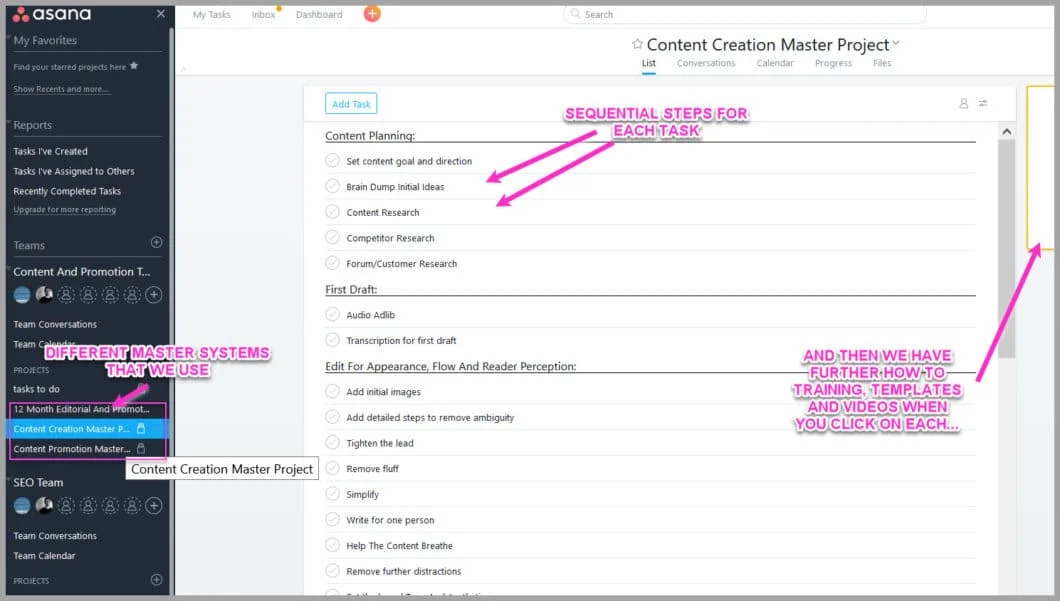
And we showed you how we use systems for writing, editing and even promotion…
Well in this lesson today we’re going to share one of our complete systems with you
You’ll be able to log into it, follow along and collect more emails than ever before
But the best part?
Its going to finish off your Killer Content and make it far more effective than ever before
How?
Oh buddy, this method is going to help you in so many ways…
Obvious Benefit Of An ‘HSO’
Whats an HSO?
I’ll tell you in just a second…
But the obvious benefit of this method, is it’ll help you collect far more emails with your content
How many more?”
You should get around 5x-10x more emails
(And no that’s not a typo)
The majority of websites convert only 1.95% of their audience into a subscriber…
Yep less than 2 out of 100 peeps
That means 98 are leaving 🙁
And when your fighting tooth and nail for traffic it can be heartbreaking right?
Losing all those people you fought so hard to get to you…
But this method?
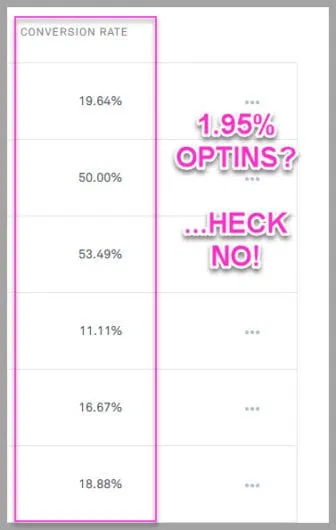
Well these are our current optin rates
Pretty cool right?
It gets better
Because of the way we use this method, it has a few sneaky extra benefits…
Sneaky ‘High Value’ Benefits Of An HSO
Remember those 9 elements of High Value content?
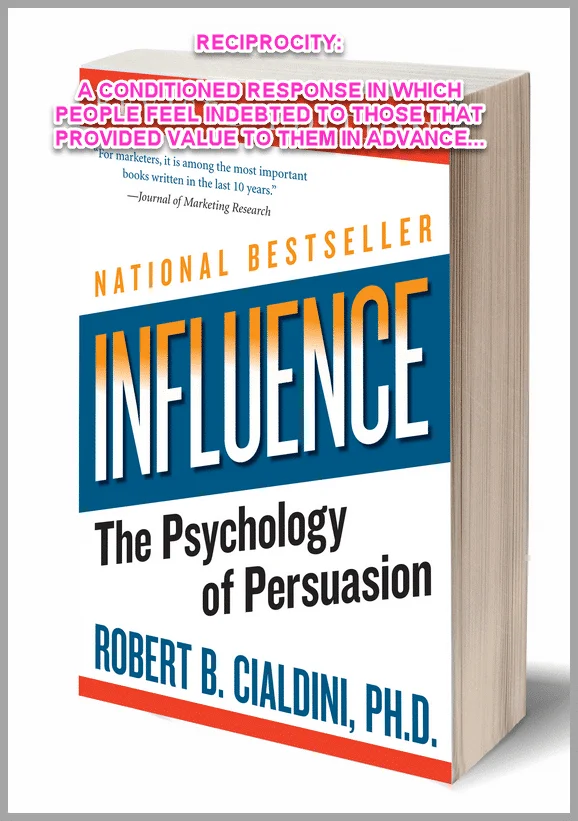
Well 2 of those are Reciprocity and Usefulness
If you can make sure your content hits these, then its far more successful
How so?
Well if your content can help someone do something then they trust you more AND they feel indebted to pay it back to you
The way we capture emails with an ‘HSO’ actually improves the reader experience and hits both of those elements
(That’s partly why the optins are always so high, I’ll share the other reasons in a second)
And because you improve their experience they now want to buy from you in the future
Pretty cool right?
- More optins and
- Subscribers who are actually more likely to buy from you then before…
So you’re probably wondering what this method is right?
Well back when we started improving our writing, we suddenly saw a whole heap of traffic
That brand new site hit 50,000 visitors in 14 days…
But the thing is we didn’t have ANY email capture in place
Whoops!
It wasn’t until around 30,000 readers had already the post, that we started capturing emails…
When you finally get traffic and this happens?
Well lets just say that you can be a little bit ‘peeved’
But every failure is a chance to improve right?
And so because of that I wanted to make sure every post in the future could get subscribers
But I also wanted to go one better than ‘just collecting the email’
I wanted to find the most effective method of capturing the email AND improving the reader experience
Why?
Because WE read sites and we’re customers also
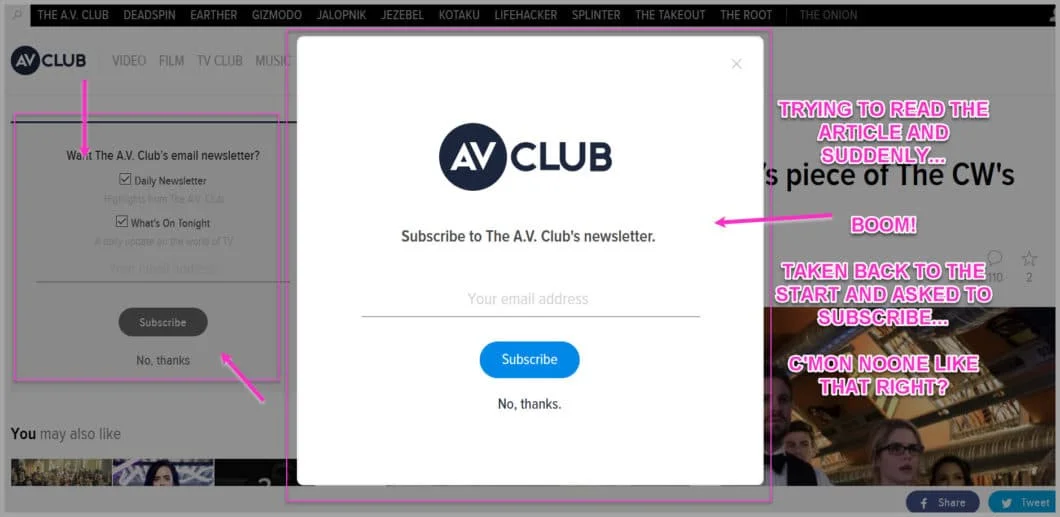
And there’s nothing worse than those spammy, popup covered sites that BLAM you in the face asking for the email
I mean c’mon buddy I’ve been on the page maybe 2 whole seconds!…
And so by finding the best method that we would enjoy, it was almost guaranteed to be something our readers enjoyed
And so we tried everything:
- Popups
- Header Bars
- Exit intent popups
- Side bar optins
- In article optin forms etc
They worked ‘ok’… but not how we had hoped (And some of them felt a little sleazy)
And then we tried this last technique and we hit the jackpot
These are optin rates for different articles each using this method
Since then we now use this method on every single article that we write
Our lowest performing HSO gets us 11 out of every 100 readers into subscribers
I know it doesn’t sound too crazy, but its 5x the industry standard…
…and that’s our lowest performing HSO
Not bad eh
But the best part?
You can do the exact same thing with your own content…
It doesn’t matter what topic, industry or even your current traffic numbers
You might not get the same traffic as us but you will DEFINITELY get more optin’s than ever before…
The 3- Steps To Using A Hyper Specific Next Step Offer
There are just 3 steps to collecting far more emails than ever before
- Create A Hyper Specific Next Step Bonus
- Set Up Automated Delivery Of That Bonus
- Create And Install A 2-Step Optin Inside Your Content
Here’s why this works
Do you ever find yourself lost in a Netflix binge?
The last episode was great and then the next episode is there waiting for you…
…it can be hard to say no right?
And its because the next episode ties into what you just watched
That’s all you’re doing here
Your HSO is designed to be the next step your readers will want to take, because it ties into what they are currently doing
They are reading the post and are super excited about the topic right?
Well rather than leave them hanging, this then gives them the next logical action that they want to take immediately after reading
Its hyper specific to the article and the next logical step that they want ALL while adding more value
Even better?
By using a 2-step optin you can leverage the principle of commitment to increase the number of people who optin even further
Better still?
Because its increases the post value, people get a better experience and tell their friends about your content…
(Oh and influencers will see you as a high value writer and actually link to you)
Pretty cool right?
Not only will you have killer content but now you’ll collect far more email’s than ever before
It still gets better!
This means that when you start promoting it in the next article, all that traffic is FAR more efficient and not wasted…
SideNote:
The Hyper Specific Offer is just a small part of what we use to create killer content and get far better promotion results with every article.
We reveal this and more (along with our entire writing and promotion systems) inside our premium training program, ‘The Amplify Content Academy’.
Step #1: Create Your ‘Hyper Specific Next Step Offer’
OK so the first thing you need to do is create your ‘HSO’ or Hyper Specific Next Step Offer.
(HSO for short)
But what is it?
Basically an HSO is an added bonus to your content that people can optin for.
Its an added optional bonus that ties in perfectly with the content, and gives them the next logical action to take…
Segmentation Is Vital
A real important point to understand
The HSO is NEVER generic
You don’t just make one of these and add it to every single post you write
That’s lazy and ineffective
Instead you need to always create it specific to that ONE article
Its a little bit more work, but in the long term the difference in emails you collect is insane…
Take this example here:
This very same optin that’s smashing industry standards?
It performs VERY differently if you put it onto a random article instead
Don’t just take my word for it…
That’s a 70% drop in performance
Why is this?
Its because the HSO needs to be the next logical step that the reader will want to take…
Give Them The Next Action To Take
Far too much content leaves the reader without a call to action to go do something
You just got them all excited and now they go off and read some other site…
Or worse?
You have a generic Call To Action that’s the same site wide
This doesn’t work because it doesn’t tie in with the readers current needs
Its needs to be the next thing that they want IMMEDIATELY after reading
(Just like that next Netflix episode…)
For Example
In this article here I’m talking to you about HSO’s and how important they are
By the time you finish reading you’re going to want to set up your own asap right?
So that’s exactly what I offer
My HSO for this post your reading right now…is a video showing you how to create your own HSO
I know that pretty meta.
But does that make sense?
I offer you EXACTLY what you want next…
(I even take it one step further and give you access to part of our premium training system where we break it all down into steps and lessons)
Its super simple
Your HSO for your content just needs to be the next logical step that the reader would want to take
And because its specific it means far more people will say yes to it
(That’s why it can’t be a generic one that you reuse, because that offer wouldn’t align with the reader at that moment
I couldn’t give you a video about Facebook right now, because it has nothing to do with this current article)
Does that make sense?
Awesome
Let show you how to make one…
How To Create Your Hyper Specific Next Step offer
So the first thing is to brainstorm what your offer should be
Whats the next logical step that your audience will want after reading?…
Got an idea?
Awesome, now you simply need to make it
It doesn’t need to be a video either…
It could be:
- An added bonus document (Some additional steps you don’t cover in the article perhaps)
- A Checklist to take action on
- A PDF cheat sheet
Anything that you think will help the audience take that next step that they want to take…
The key thing to remember for any HSO is it doesn’t need to be flawless
And it doesn’t need to be huge either
Its actually better if its something they can take action on that takes 5-30 minutes max…
How To Make An HSO Video Bonus
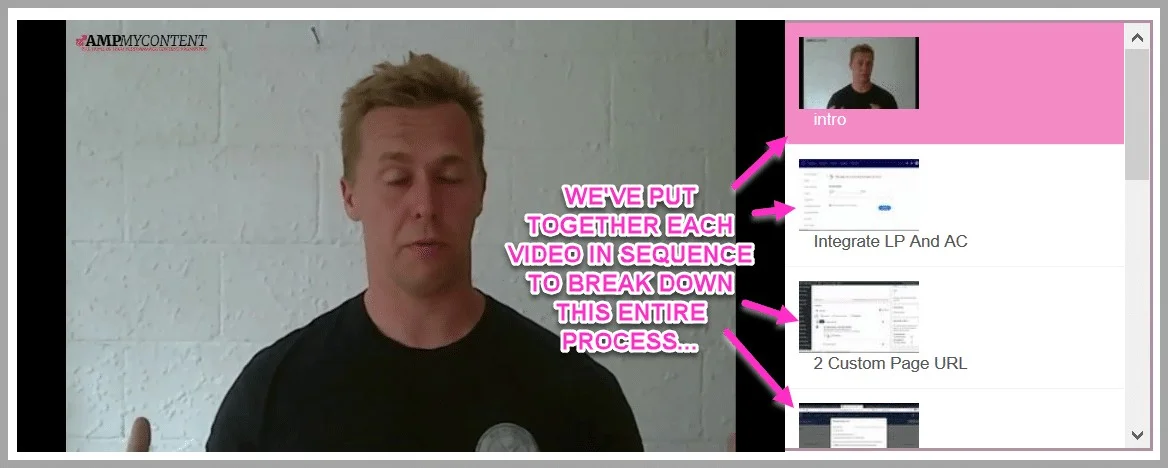
A video is a super simple HSO offer
If you have been describing something in detail in an article it might cover thousands of words
But the same actual process on video?
It might only take 5 minutes
So offering a video walk through can be super helpful for your reader to follow…
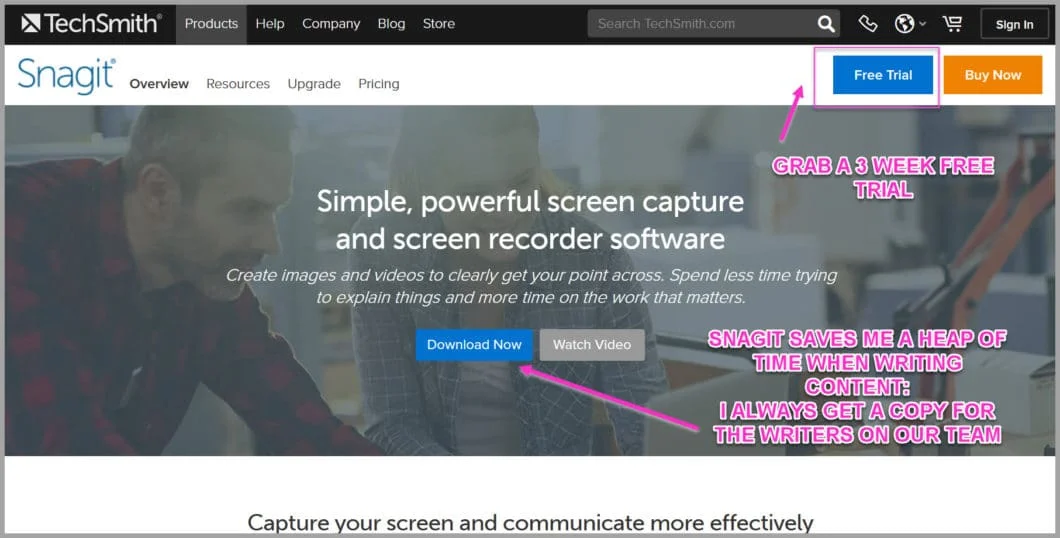
1: Use A Tool Like Snagit
Snagit is an image and video capture tool
Its super helpful if you’re doing any content marketing and one of the few tools we recommend
Once you have it installed you just need to make your recording…
2: Record A Video Of Your Walk-Through
Snagit is real easy to use
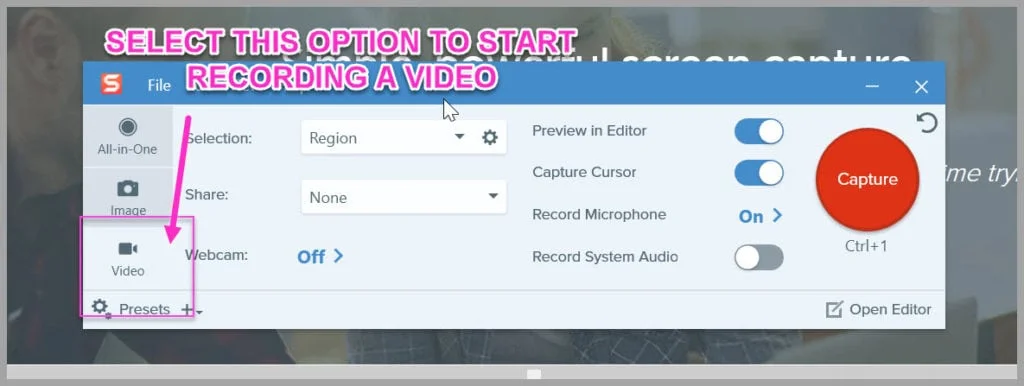
Simply press the the video button to load up the video options and then press ‘Capture’
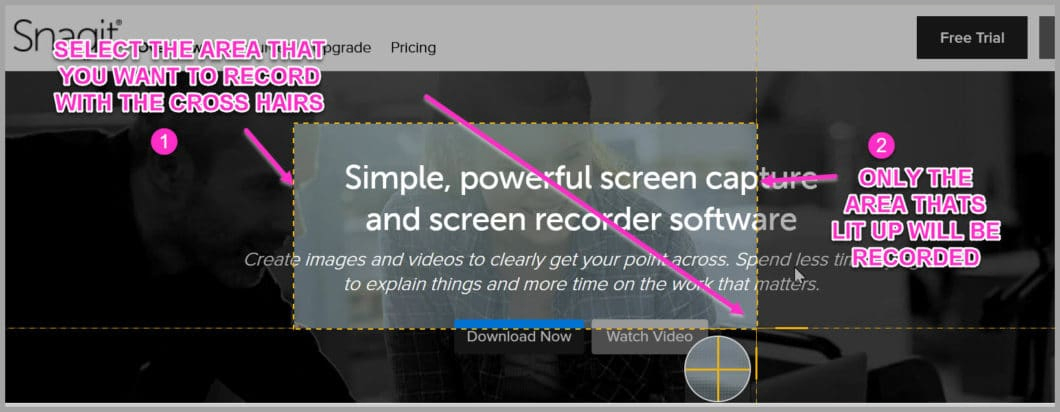
This will then load your video selection area
You can choose to record your whole screen, your face, or even just a small section of your screen like so…
In this example it would only record inside the yellow dotted lines
Easy so far right?
Then all you have to do is hit record and walk them through your bonus
This could be as simple as you talking through the steps or showing them what buttons to press
The idea is it gives them a quick action to take
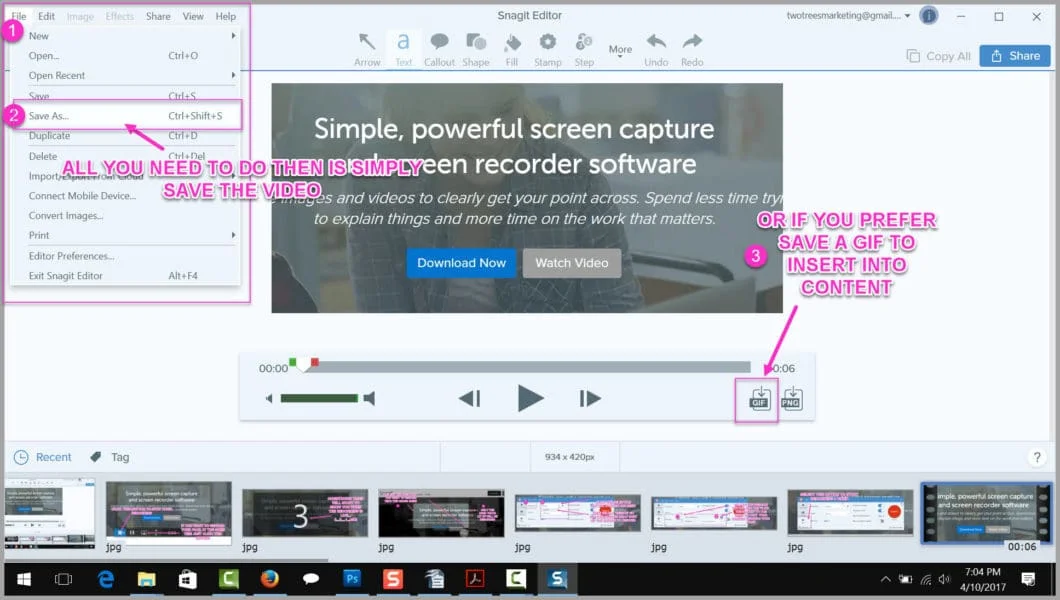
Once you finish recording, the video will then load up in the Snagit editing suite…
You cant save it as a video, a GIF or even pull screenshots from it
Easy right?
But what if you don’t want to make a video…
How To Create A Checklist/Cheat Sheet PDF HSO
Super easy again
Remember that the goal is to give them something they can use to take action
- It could be some additional steps not covered
- It could be a checklist to follow and tick off…
- Or it could a ‘cheat sheet’ (Kinda similar to a recipe)
So lets show you how
(Remember that all of this is covered in far more detail inside the HSO for this very post)
1: Make The Cheat Sheet In Open Office/MS Word
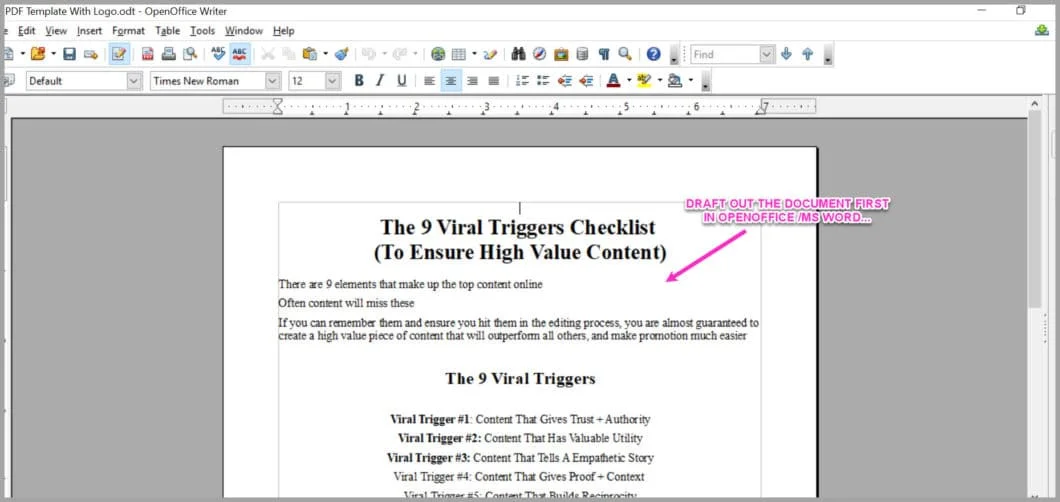
All you need to do is create the HSO in something like OpenOffice or Microsoft Office
Simply draft out what the bonus is
In this example we have a checklist for when editing an article…
2: Add Some Images To Make It Look Good
So rather than just give them a document full of text, you can make it look smart by adding some images
You don’t even have to get that technical with the design and layout
A super easy way to make it look professional?
Just add a custom image into the header section…
Simple right?
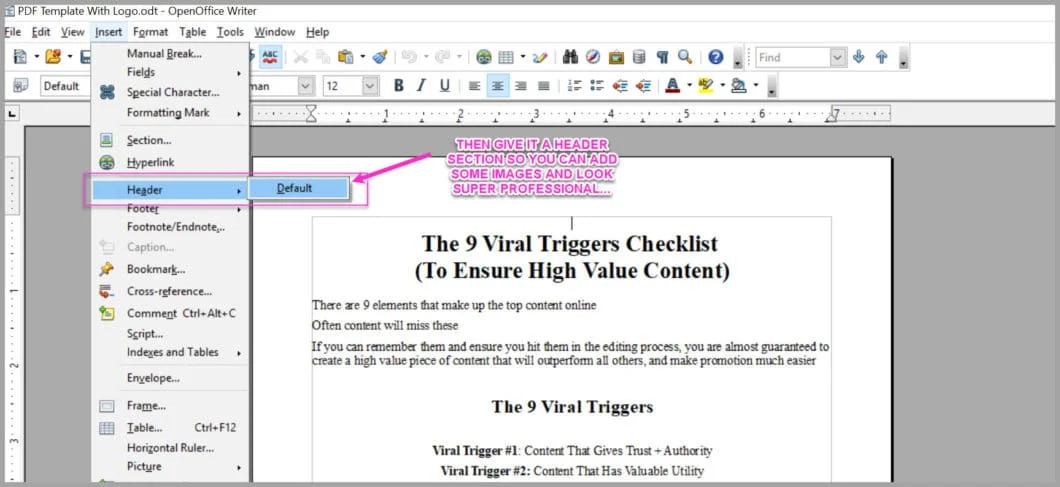
So once you’re written out your checklist, start by adding a header section
In the top menu simply click ‘Insert’ and then select ‘Header, Default’
You should now have a section that you can add an image to…
Keep the header area highlighted so you can specify that’s where you want the image to go
Then from the top menu select ‘Insert’, ‘Picture’, and then click ‘From File’
Then just find the image you want to add and it will upload
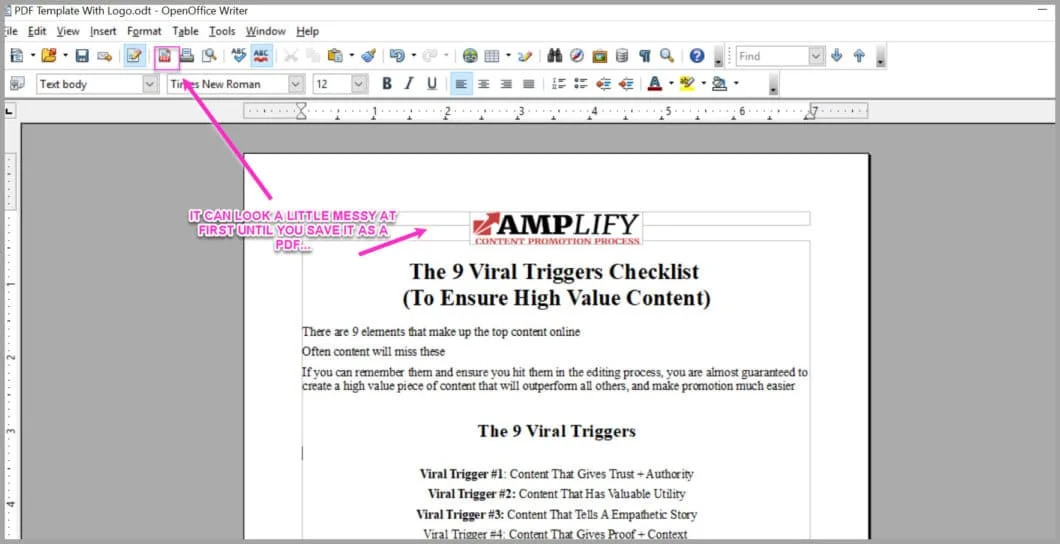
It should look something like this…
Starting to look better but not quite perfect yet…
3: Save It As A PDF And Check Out The Quality
Once you insert the image it can look a little messy
That’s ok
Its usually the layout inside OpenOffice and it will look much better once you save it as a PDF
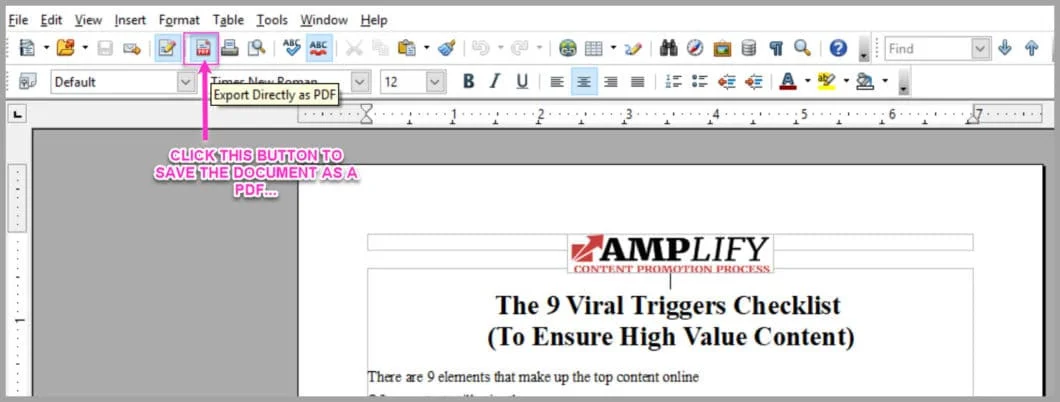
And so in the top menu look for the red PDF button and click ‘Save As PDF’
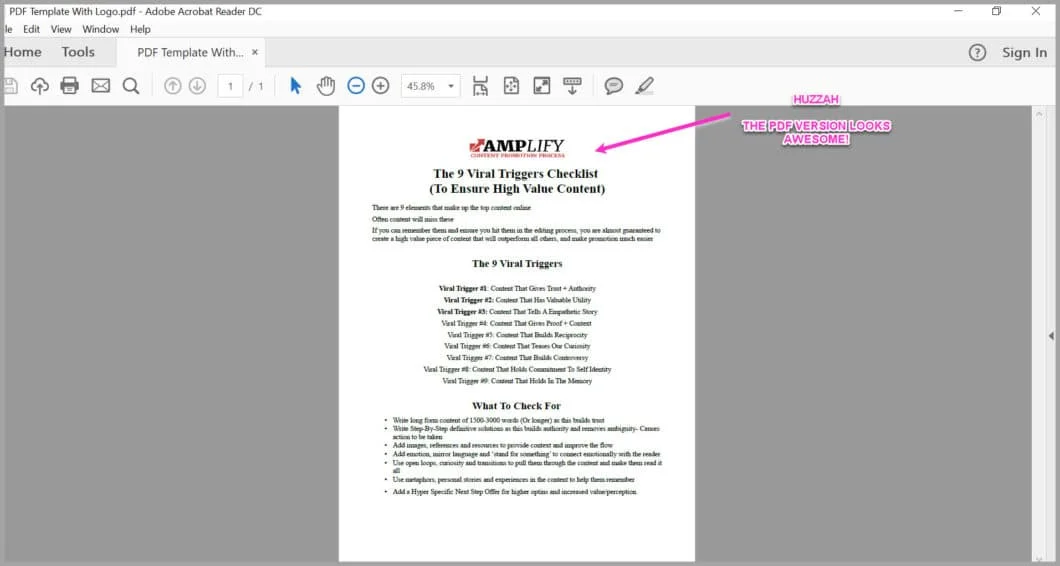
Then go and find the PDF you just saved and open it
It should look faaar better…
And that’s it
You now have an awesome looking PDF type HSO that you can give to your readers
Easy right?
So now that the HSO is created, you need to be able to deliver it to the people that want it…
Step #2: Set Up Automated Delivery Of Your Offer
People can read your content at any time of day
And so you need to make sure that those who optin for your HSO, receive it when they ask for it
Fortunately you can set this up to be delivered automatically inside your email provider
And so that’s what we’re going to do now:
- Your going to create a specific list and form just for this offer (Segmentation is important)
- Your going to create an email that sends them the HSO when they optin
(Again we go into fine detail on this inside the bonus section, but let me break down the larger points)
1#: Create A New List For Your HSO Offer
For this example I’m using Active Campaign. (Its the only email provider that we recommend)
Log into Active Campaign and in the top menu you can see a button marked ‘Lists’
Click that and then a new page will load
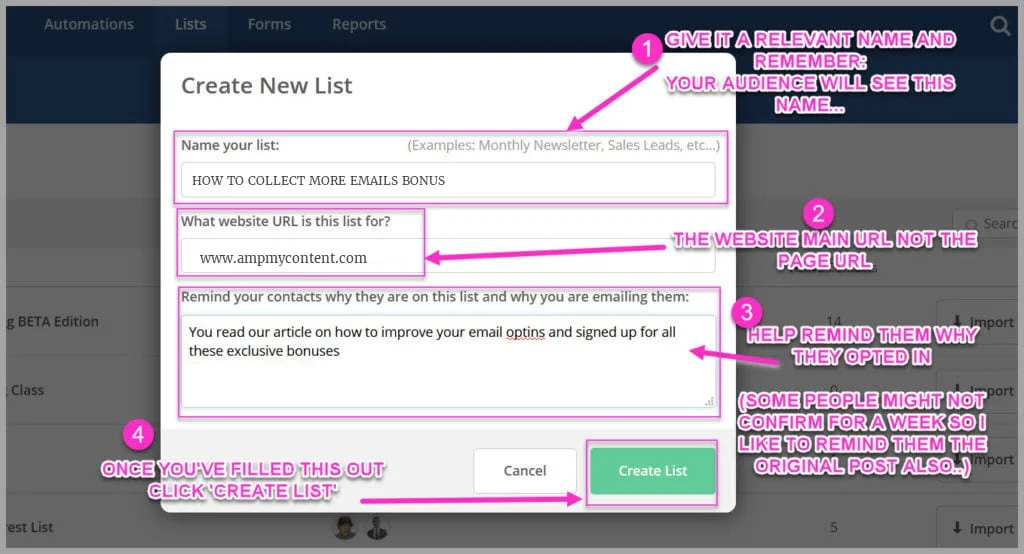
Go ahead and click the green button called ‘Add New List’
A new pop up will appear asking you to add details about this new list
I like to make it specific to each HSO offer (So I don’t mix them up..)
Go ahead and fill out the details like so:
Once you’ve filled out the details, click the green ‘Create List’ button
Simple so far right?
OK so this email list is dedicated just for people who take your HSO on this particular article
The thing is they still need to optin for it..
Even if we use a 3rd party optin tool, we still need to create an email ‘form’ for that tool to use
And so that’s what we’re going to do now
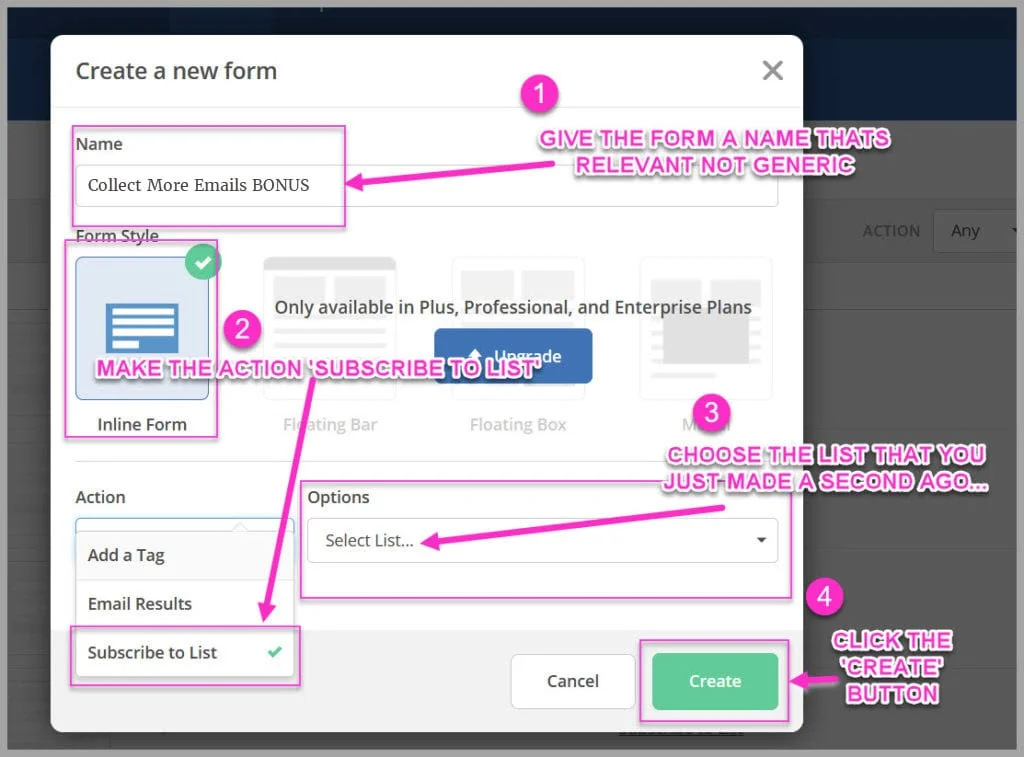
On the top menu search for the ‘Forms’ option and click it
Then click the green ‘New Form’ button…
This opens a new pop up asking you to fill out the form details
You’ll notice there are a few different options available
Select the ‘Action’ as ‘Subscribes to list’
Then in the options select the list that you just created
Finally click the green ‘Create’ button…
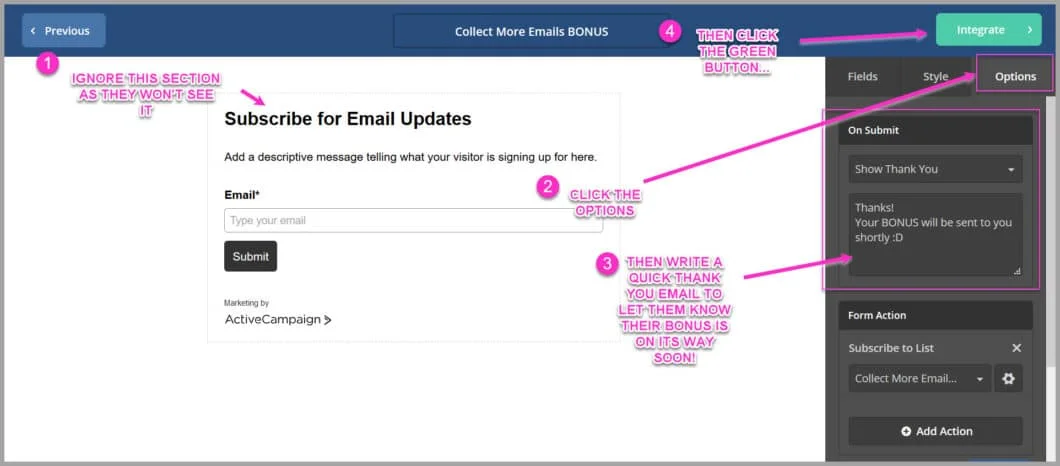
This will then load up a new page
You can ignore a few of the details here as the audience simply won’t see it
Click on the options button on the top right and select the ‘On Submit’ option
Write a quick email to let them know that their bonus will be sent to them shortly…
Why do this?
Basically once they enter their email, they will get that reply from you but NOT their bonus yet
This just gives them some piece of mind while they wait
Go ahead and click the green ‘Integrate’ button
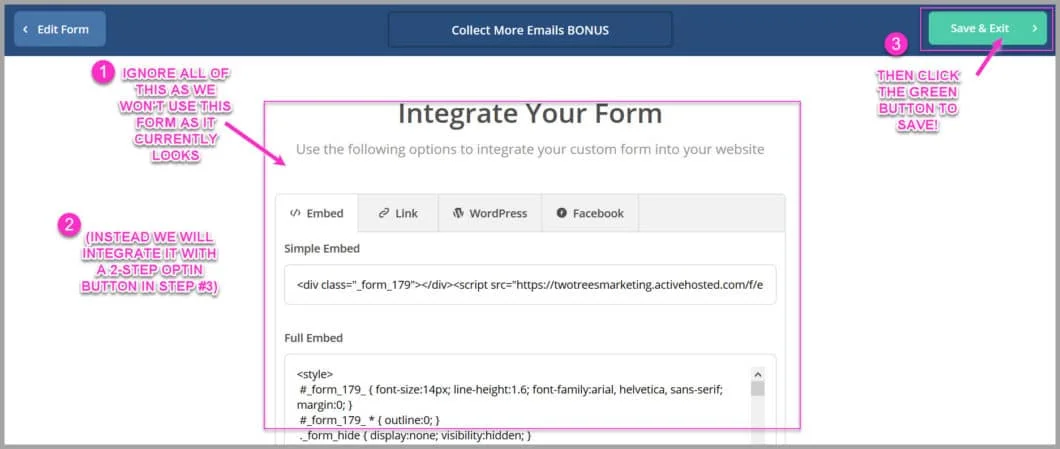
Another new page will load up…
You can ignore all the details on this page as we won’t be using any of these options
(Instead we will use a 3rd party tool to create a 2-step optin button in just a second)
Go ahead and click the green ‘Save+ Exit’ button
The next step is to send their actual bonus to them…
2: Automatically Send Them The Bonus
Head back to the top menu and select ‘Automation’s’
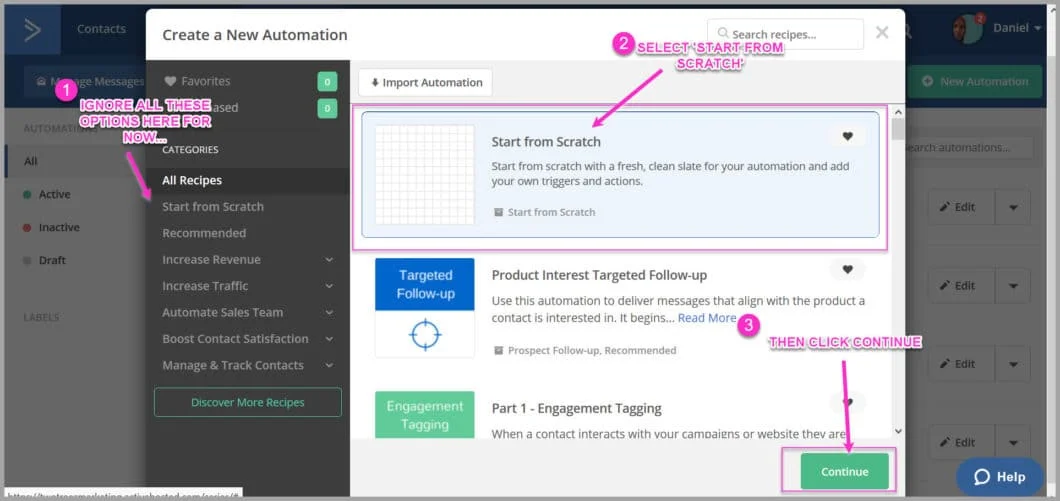
Then click the green ‘Add New Automation’ button
This then opens up a new pop up
Here you can see a whole HEAP of options on how to set up automation’s
Just choose the ‘Start From Scratch’ option
This way we can set up all the details that we need
Then click the green ‘Continue button…
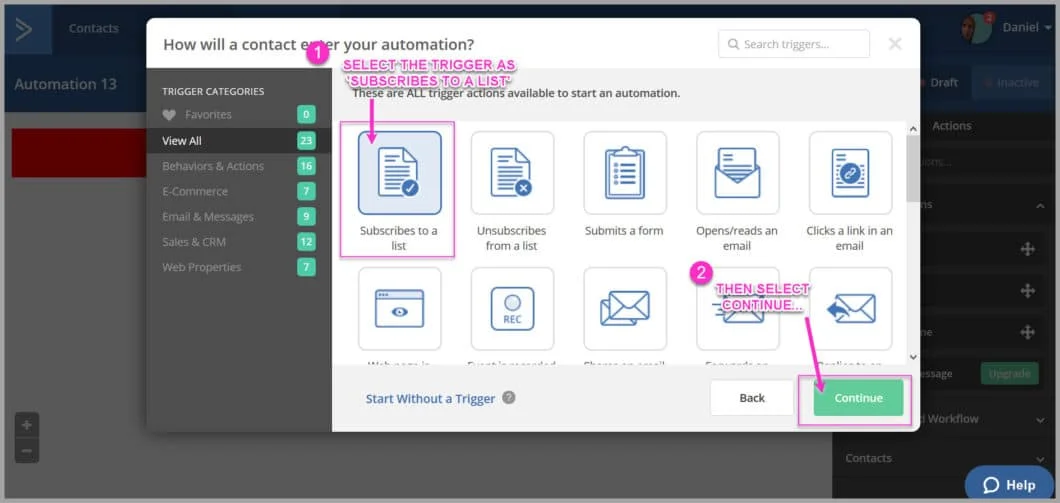
This loads up a new page
Here you can select how the automation is triggered i.e what needs to happen for the email to be sent to the reader
Select the ‘Subscribes to a list’ option
Then click the green ‘Continue’ button
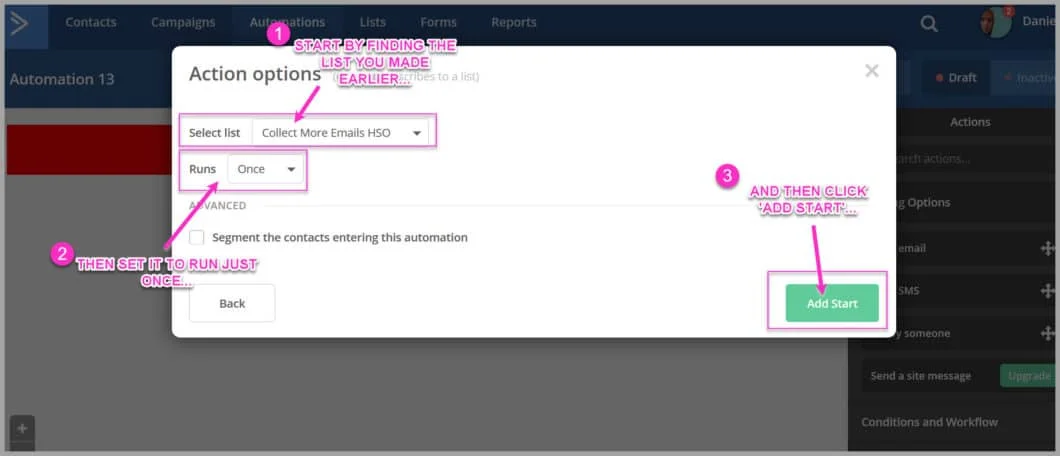
This will open up another new pop up!
Remember the list you created earlier for this offer?
Now you just need to connect it to this trigger
Go ahead and select
- That list you made from the drop down menu…
- Set the email to be sent just once
Then click the ‘Add Start’ button…
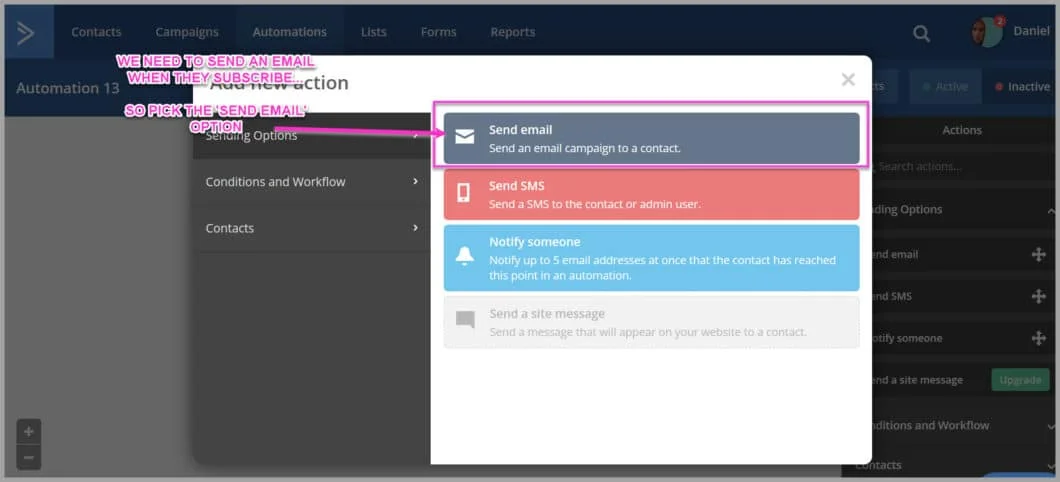
This opens up a new page where we can choose what happens when they have subscribed
Select the top option ‘Send Email’…
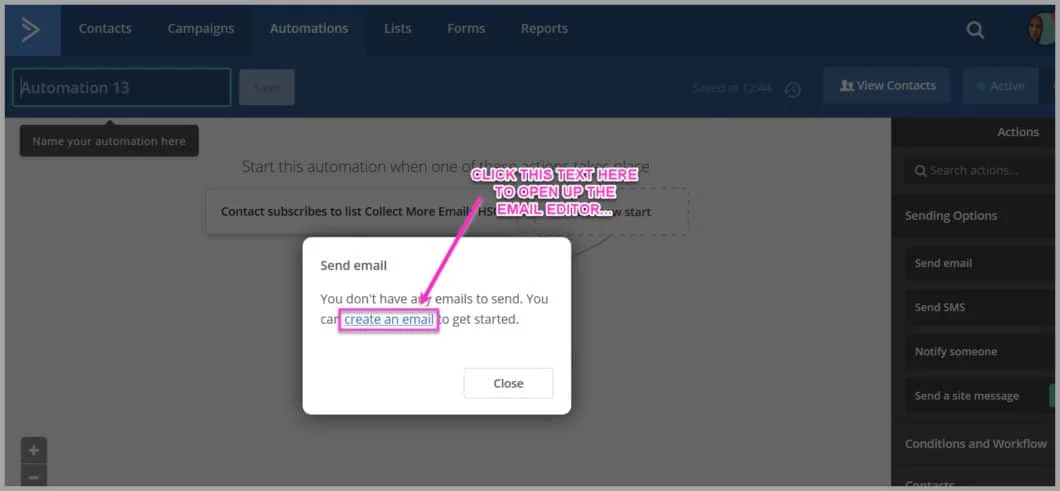
This will open up the email automation planning page
It should look a little something like this…
Go ahead and click the ‘Create An Email’ option
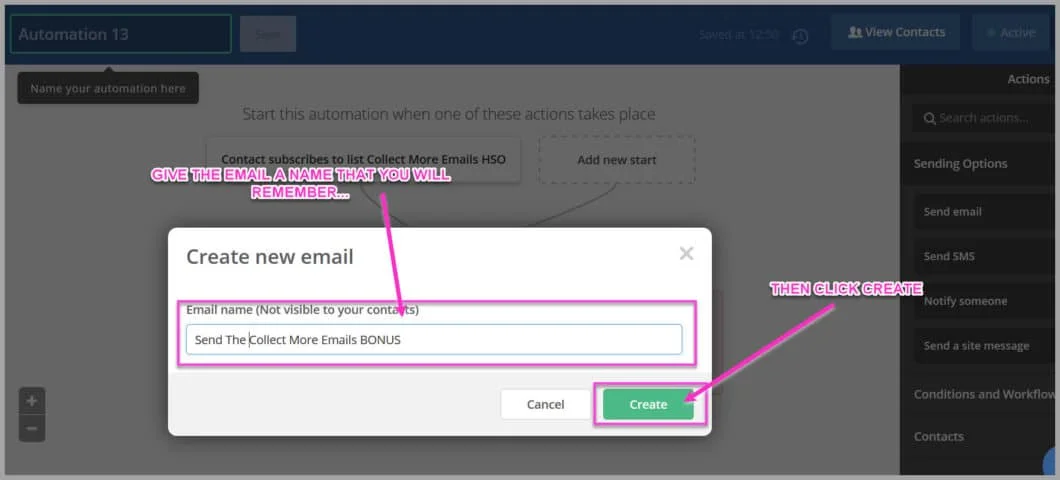
This will then open a quick pop up asking your new email:
Give the email a name you will remember
Then click the green ‘Create’ button
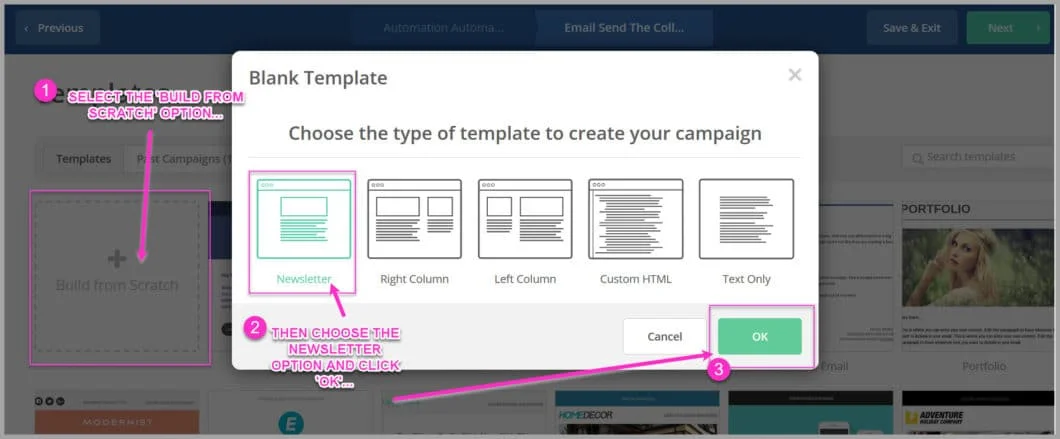
This loads up a new page
Click the ‘Build From Scratch’ option and another pop up will appear
Here you can select the basic design of the email
We just want simple so select the ‘Newsletter’ option and then click OK
A new pop up will ask you to give the email a headline
IMPORTANT:
This is the headline that your audience will see in their inbox
Write something like “Here’s the BONUS that you asked for!”…
Then go ahead and click the green continue button
Hurrah!
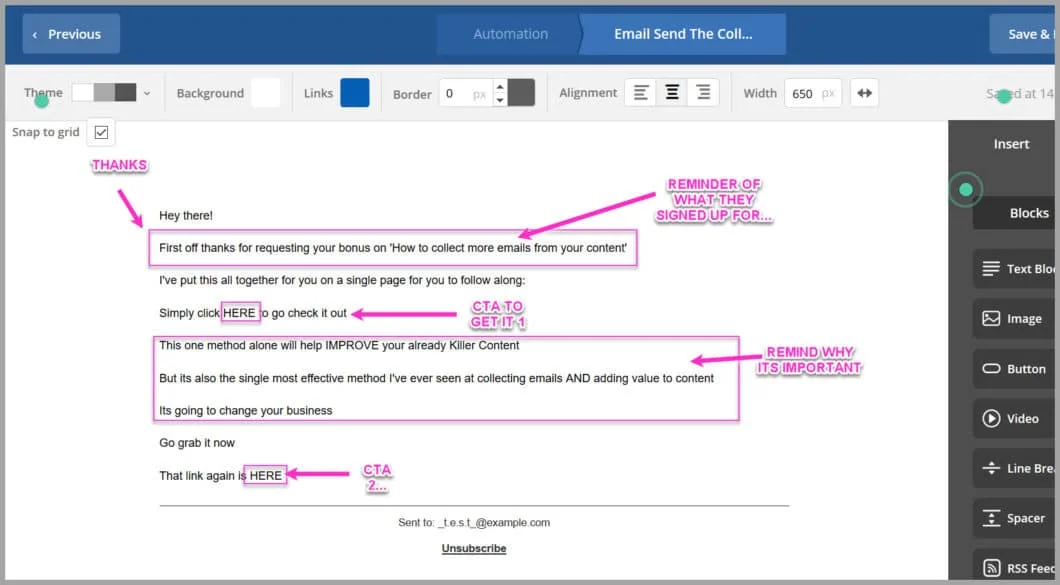
We can finally write the email…
I like to keep it short and sweet:
- Say thanks
- Remind them what they are getting
- Remind them WHY it will help them
- Give them a link to the thing…
OK so you wrote the email but how do you link to your HSO in the email?
Well there are 2 ways:
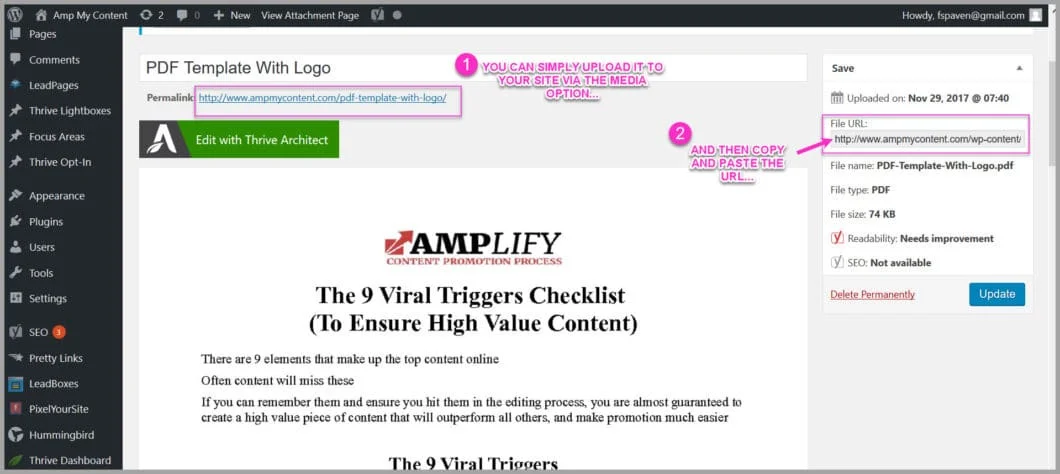
#1: You can upload it to your website and get the file URL like so…
Or…
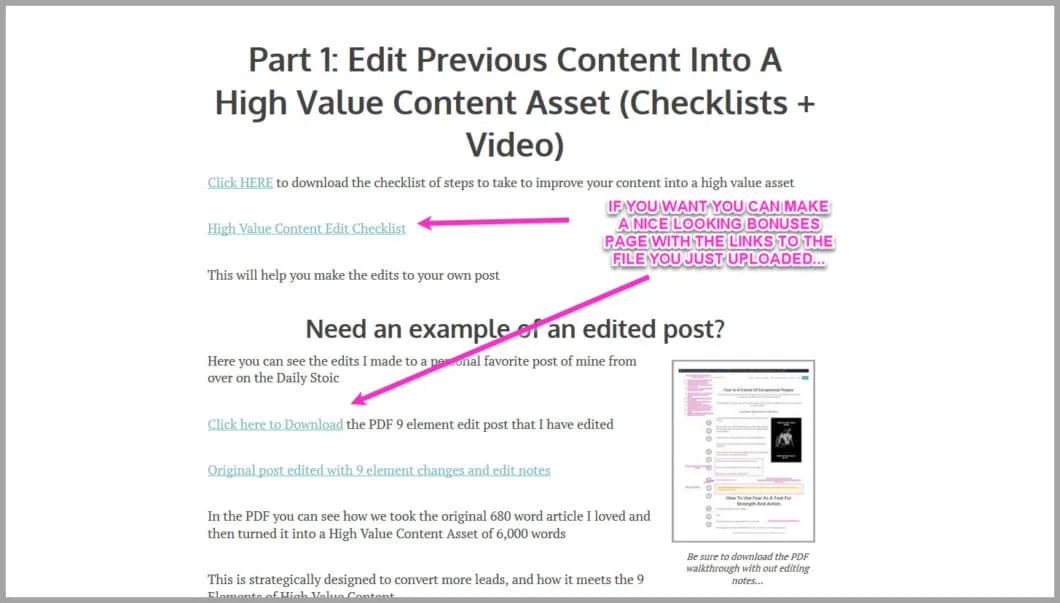
#2: You can still upload it but host it on a special bonus page for them to get it on (Like so)
Which ever you decide to do, you need to remember to add that URL into the email that you send the reader
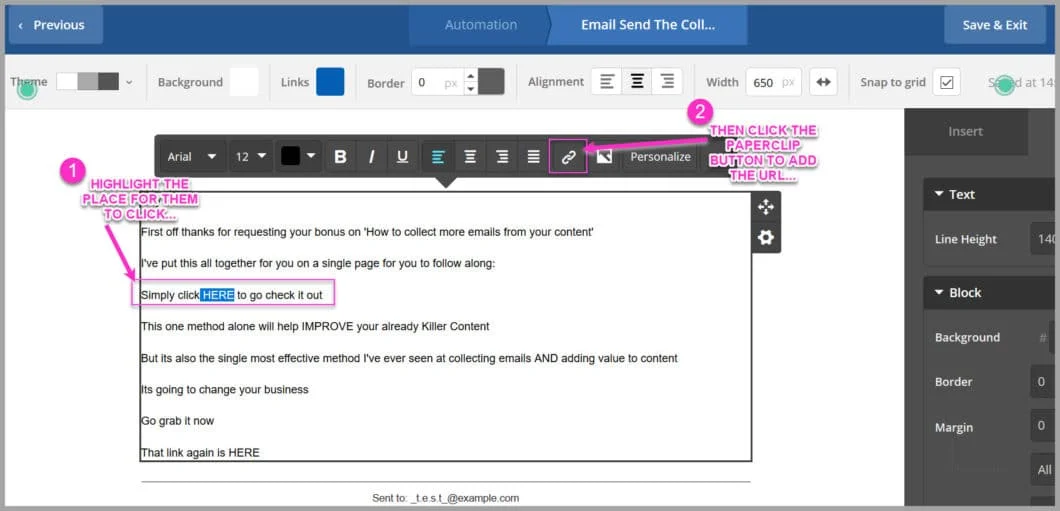
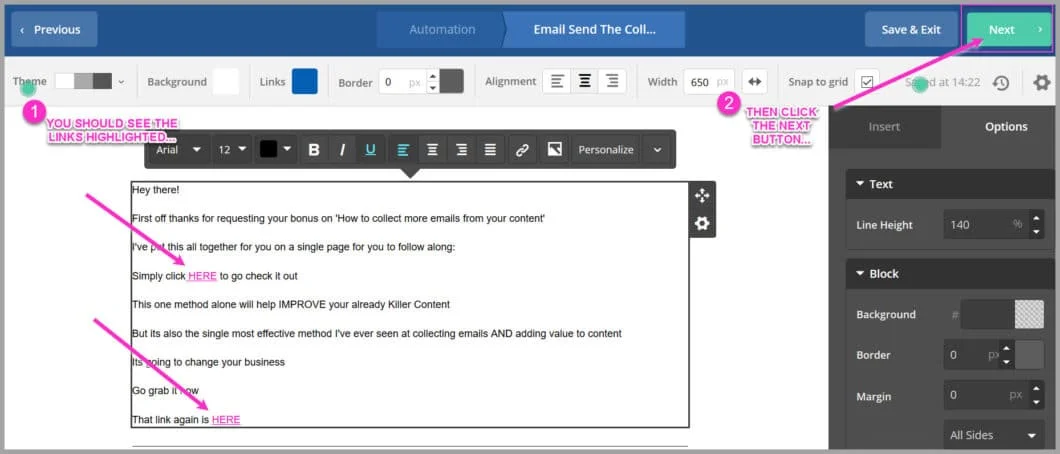
So highlight the section in your email that you will ask them to click
And then click the paperclip button…
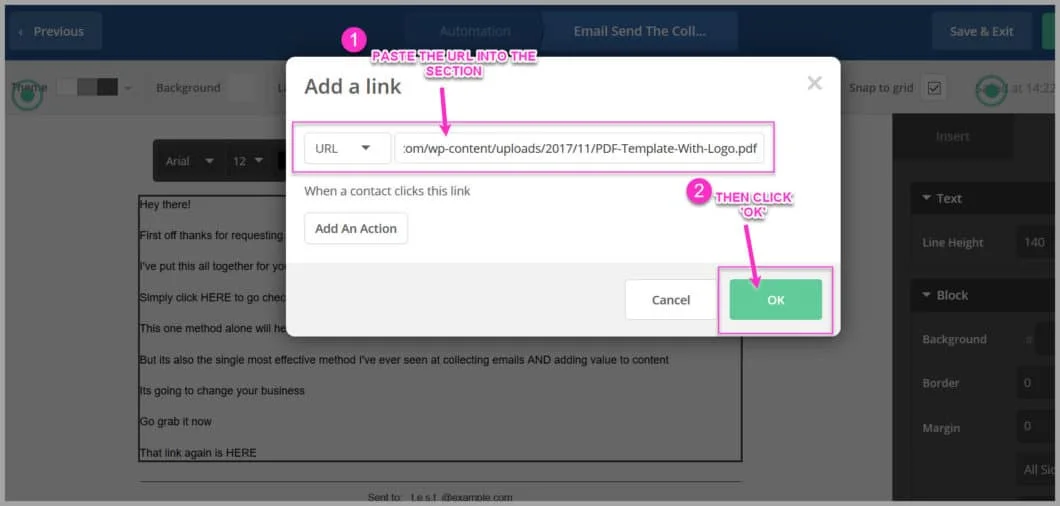
Then simply paste the URL into the box
Then click the green ‘OK button…
Wahey!
The links are now added into the email
(You should see them highlighted)
Then click the green ‘Next’ button…
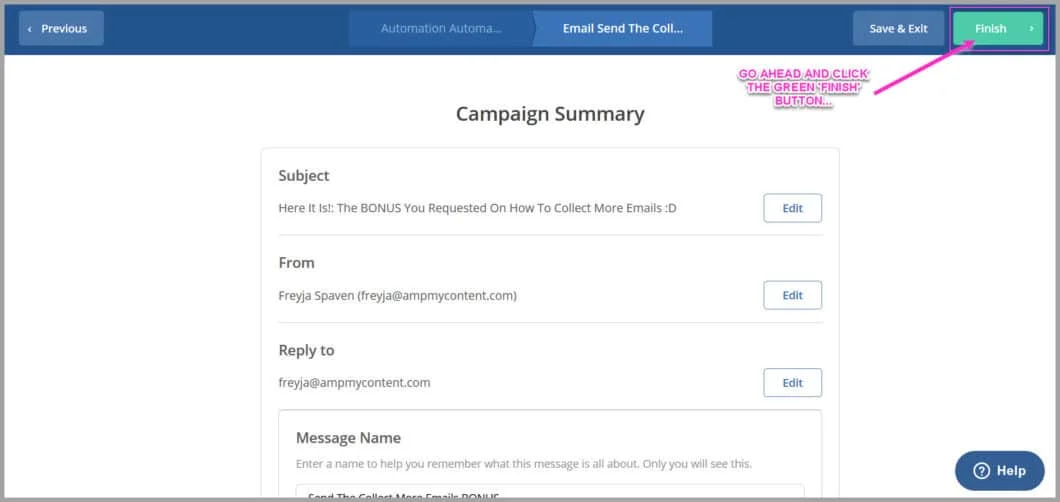
This will now load up the final page
Go ahead and click the green ‘Finish’ button:
Just one last thing to do now…
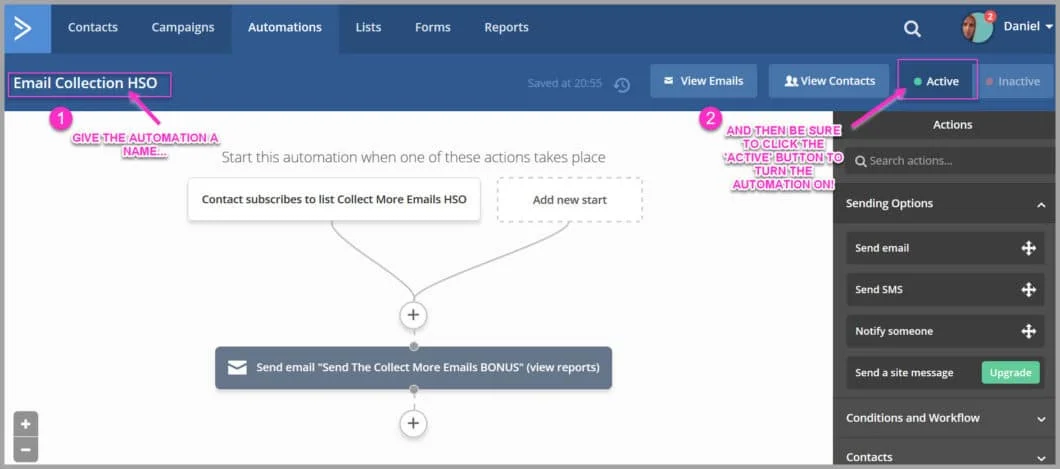
A new page will load up
Go ahead and give the automation a name (You will do one of these for every post you make so it helps to remember which is which)
Then be sure to CLICK THE ACTIVATE BUTTON!
If you don’t then the automation won’t deliver the email to those readers who optin!
And that’s it for step #2
Easy right?
Everyone who opts in will now get their bonus delivered automatically, no matter what time of day
There’s just one more step to go
We need to give them a form to optin to…but not just and old form
We’re going to use a 2-Step optin button and for a damn good reason
This step alone can mean the difference between 2% optins and 10%…
Step #3: Create And Install Your 2-Step Optin
In this step we’re going to:
- Create a 2-step optin button
- Connect it to your email account
- Install it into your post
There are a few tools you can use to set this up
In this example I’m going to show you how to do this using a tool called Leadpages
So lets dive in…
1. Connect Your Email Provider And Leadpages
The first thing to do is connect your email provider and your leadpages account
This way when they optin with the leadpages 2-step button, the email automation you just made will work and be sent to your readers
So go ahead and open up Leadpages and log into your account
In the top menu click on your name and then a drop down menu appears
Click on the ‘Integration’s’ option
This will load up a new page
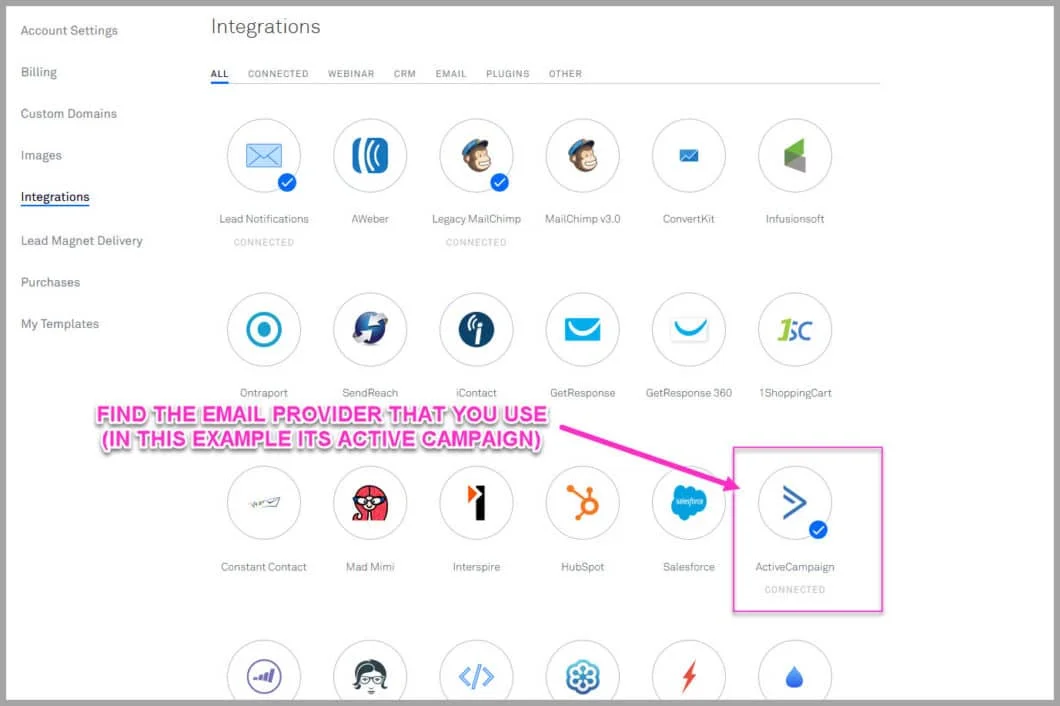
Scroll down until your find your email provider…
In this example click on Active Campaign
This will load up a new page…
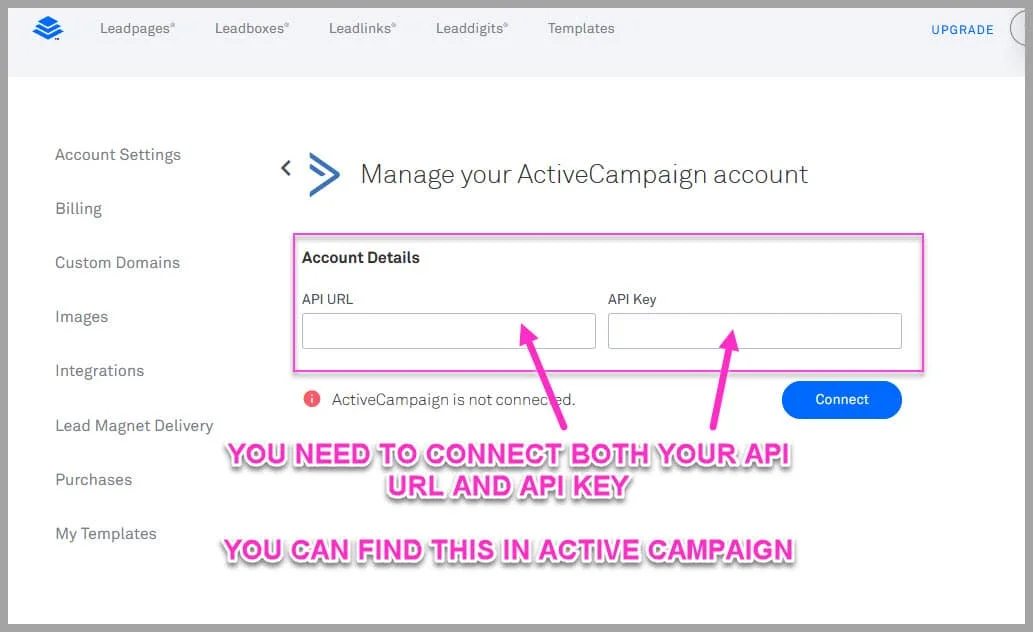
To integrate this account you need 2 things:
- An API Key and
- An API URL
Don’t worry about what they mean, we just need to go get them from Active Campaign and then copy and paste them into Leadpages
So open a new tab (keep this one open) and head across to Active Campaign
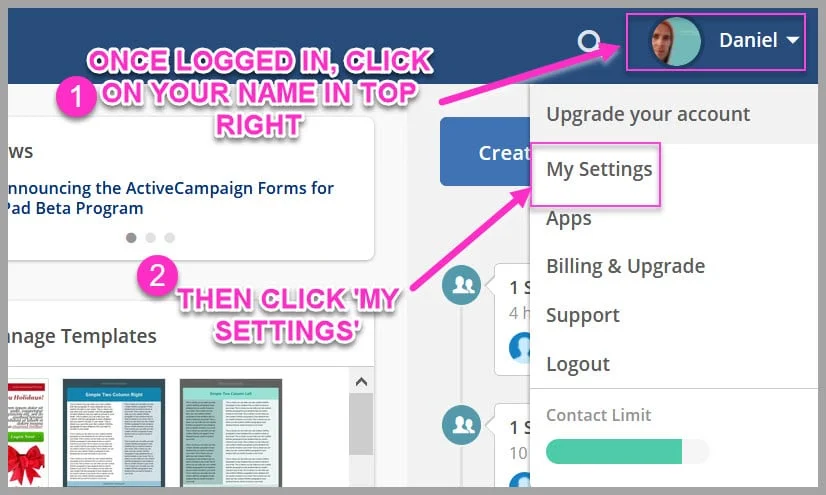
Click on your name in the top right and a pop up window appears
Click on the ‘My Settings’ option
A new page will load up
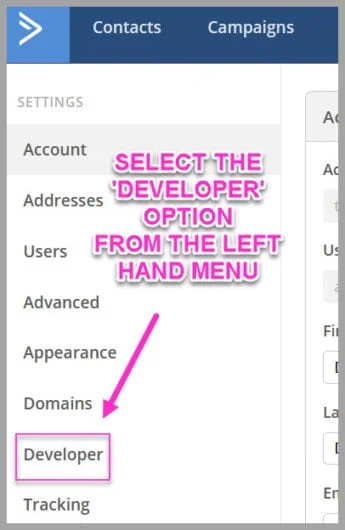
On the left hand side you can see new menu options
Click on the ‘Developer’ option
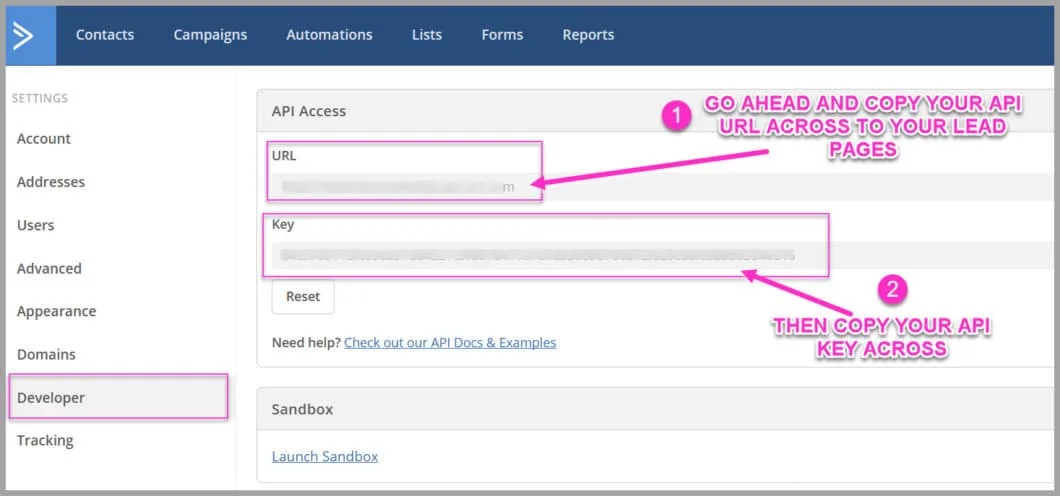
This loads a new page that has your API details
You should see both the API key and the API URL
Simply copy and paste them across into Leadpages…
(I’ve blurred mine out here but you get the idea)
Once you’ve copied them across click save
It should let you know that its connected…
Easy so far right?
OK so the next thing is to actually create your 2-step optin button…
2. Create Your Email Crushing, 2-Step Optin Button
This part is so important, I CANNOT stress this enough
The reason this method works so well is:
- Yes its specific
- And yes its the next logical step they would want to take…
But the thing that will get far more optins is having a 2-step optin button
Why?
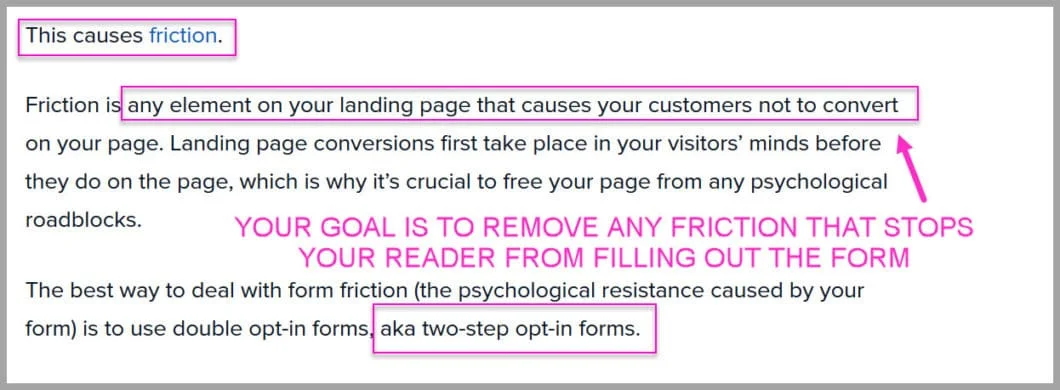
Well people have a subconscious level of effort when filling in forms
By showing the form up front we get far less people opting in
That’s why we don’t use a form on its own
Instead we have it appear once a reader clicks on a specific section of text
Why?
Because we also like to finish things that we start…
And so if we click a button and THEN the form appears?
This makes a HUGE difference in optins
In fact you’ll see a jump or around 37% of people actually following through and entering their email…
Crazy right!?
It doesn’t even matter if you have a whole heap of fields for them to fill out after they enter the email
Because they started they want to finish
And this works in so many industries…
For Example:
Investor Carrot is a blog on investment
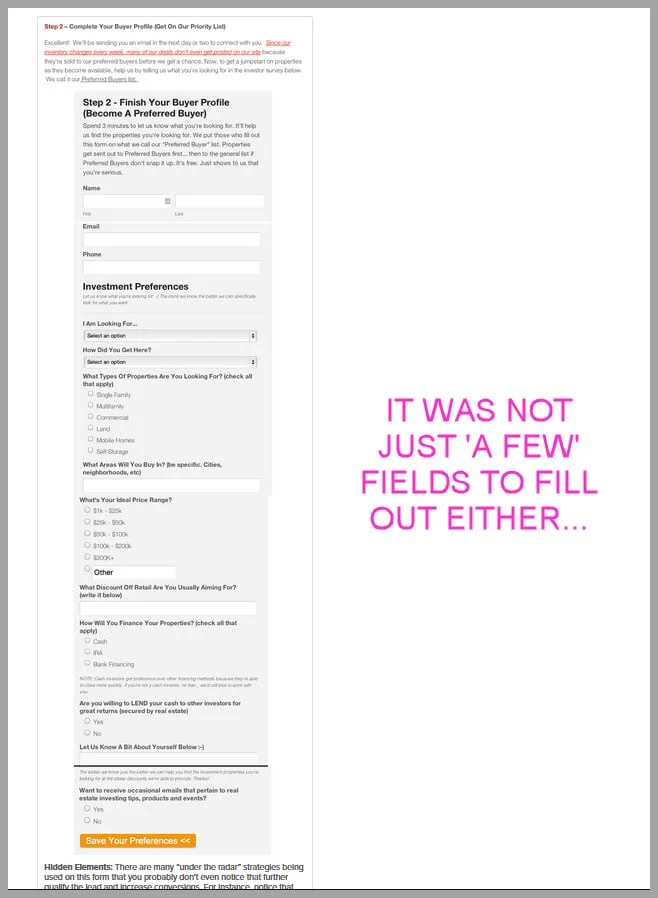
They used to struggle to get optins and had a whole HEAP of forms on their website to fill in…
But once they changed to a 2-step optin?
They SMASHED it
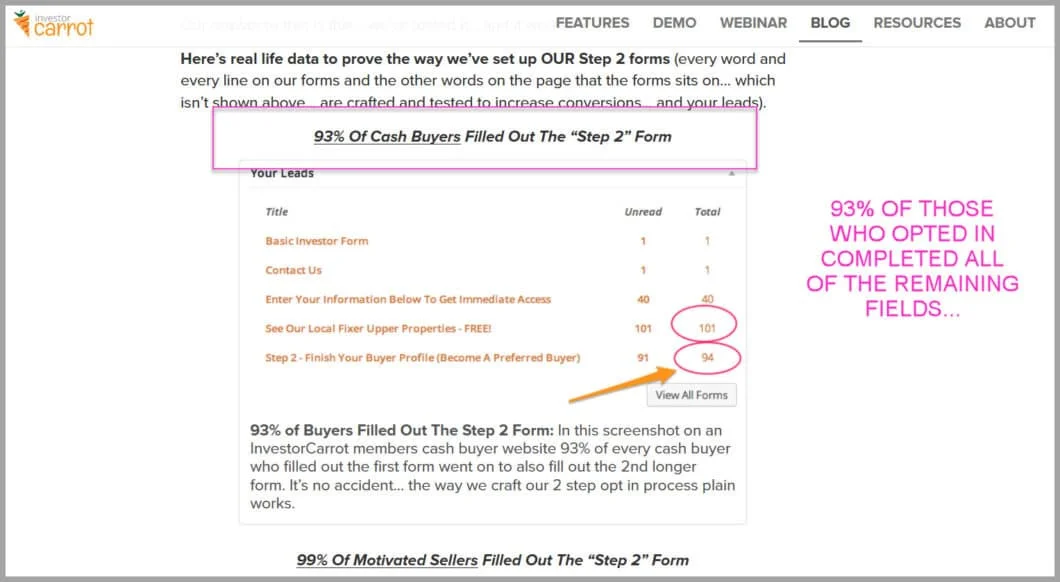
They saw a 43% increase in optins
Not only that but the ones who then opted in?
They carried on and filled out ALL THOSE FORMS…
I know what you’re thinking
With all those new optins surely they would be lower quality?…
Not at all
They were the same high quality
In fact 93% of those new subscribers went on to fill out the forms
Even better?
99% of those people then become customers
With this one method they saw an increase in sales by around…30%?
Not bad right
Like I said I CANNOT stress how important this is instead of a standard form
So lets show you how to make yours…
Go ahead and log into your Leadpages account
In the top menu is an option called ‘Leadboxes’
Click that and then click the ‘Create New Leadbox’ button on the right
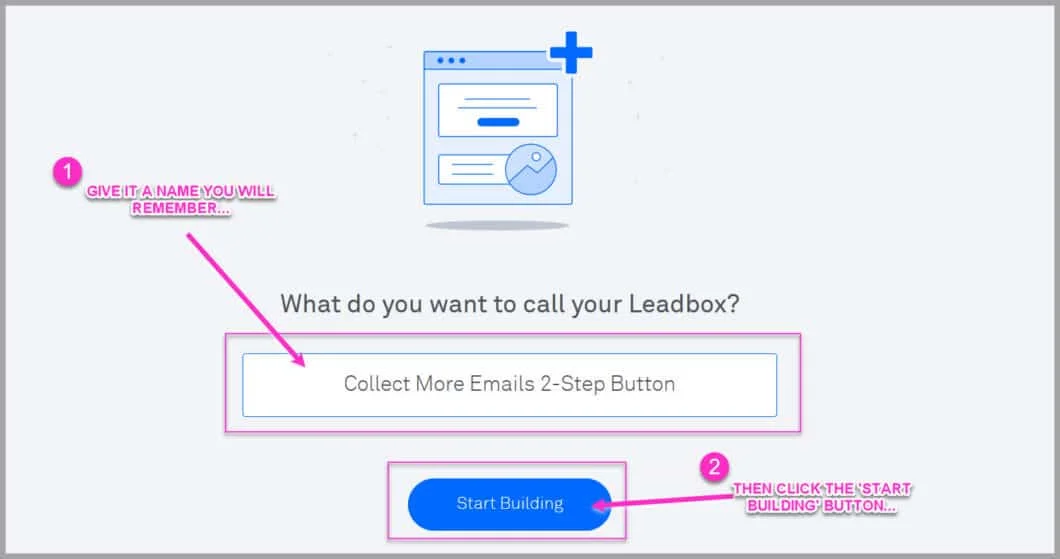
A new page will load up asking you to give the leadbox a name
Give it something you will remember…
Once you’ve given it a name, click the blue ‘Start Building’ button
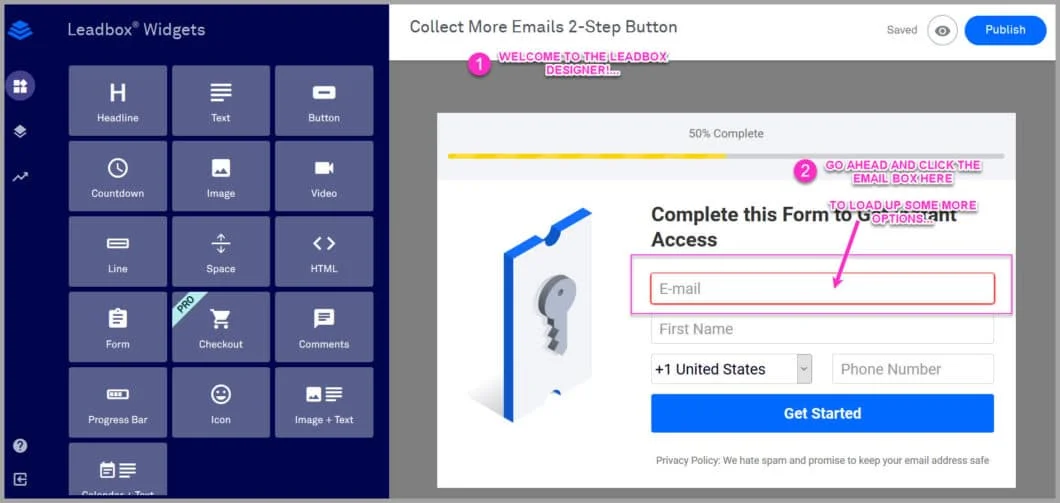
This will load up the leadbox designer…
The first step is to connect the email form from your automation you made earlier:
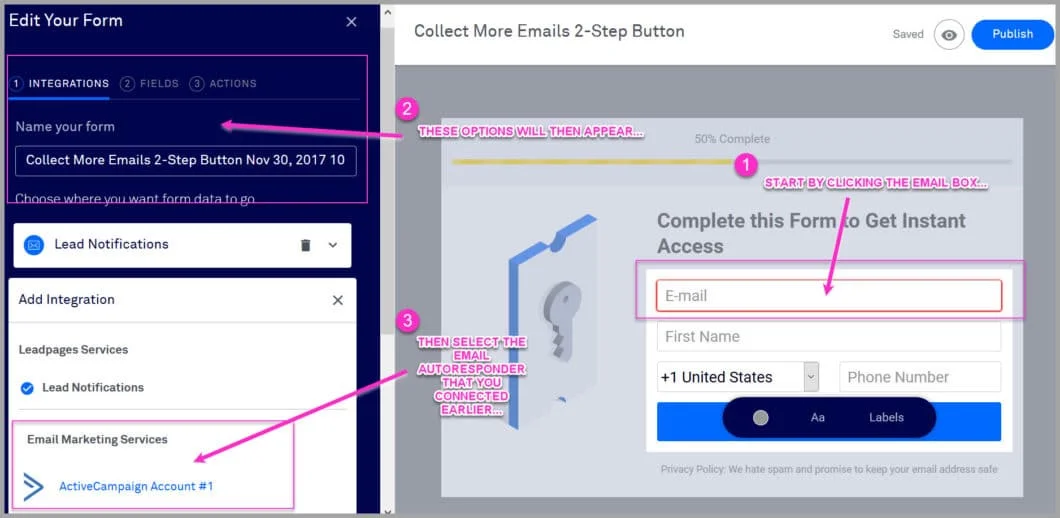
Go ahead and click the email box on the designer
Some new options will then pop up…
Click on the Email Provider that you integrated earlier
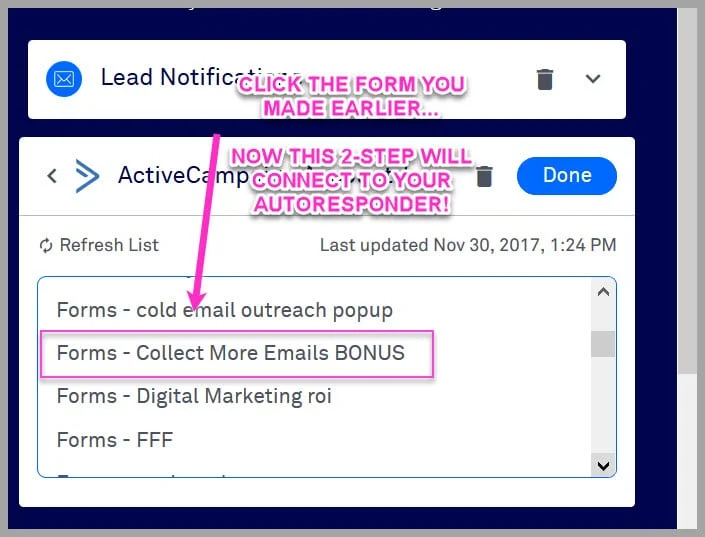
A drop down menu will appear showing all the lists and forms you have in your email provider
Click the form that you made earlier…
Once you click the form, go ahead and click the ‘Fields’ button
This allows you to edit the different sections of your 2-Step Optin button
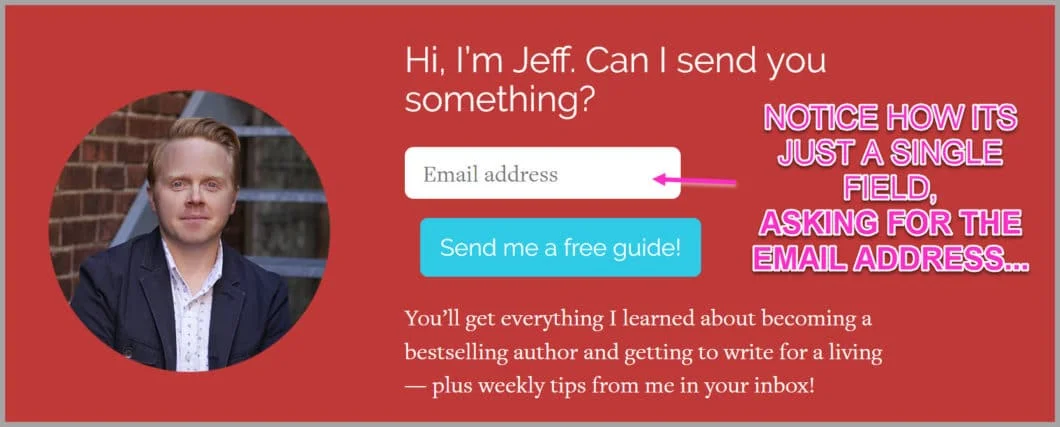
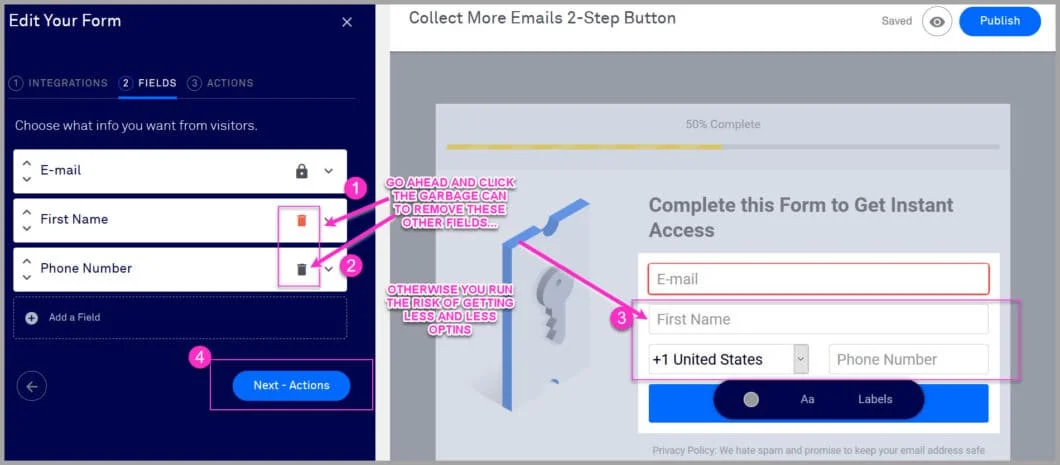
I HIGHLY recommend that you remove all other requests so that you ONLY ask for the email
Why?
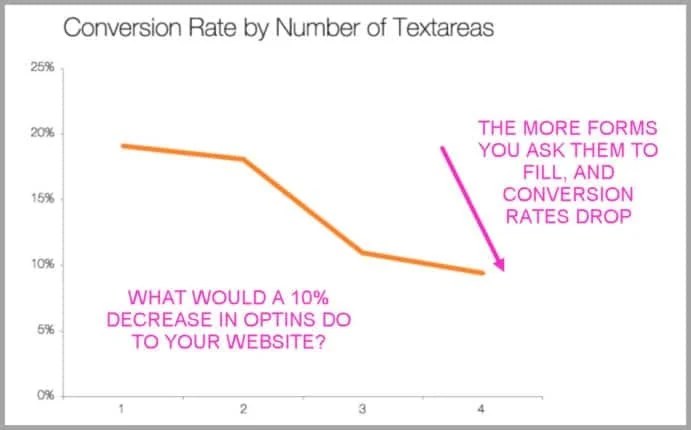
Well for every extra form you ask for in one go, you actually lower optin rates by 10%…
You want to remove as much friction to take action as possible
Otherwise you’re traffic is far less effective at converting your readers
(You can ask for the other details afterwards but only ever ask for the email first…)
So go ahead and click the garbage cans and remove those other fields…
All you want left is the email option
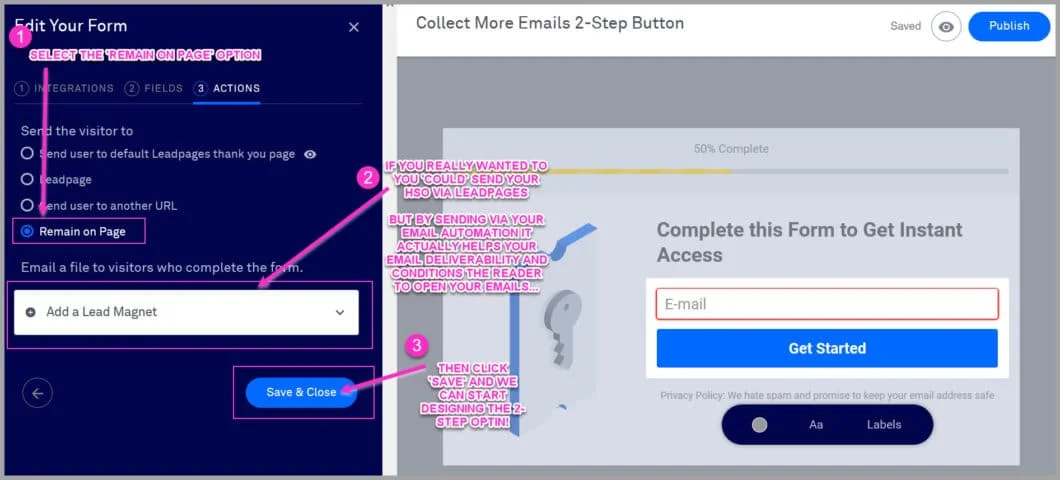
Then click the actions option to edit the next stage…
So from these options you need to select the ‘Remain on same page’ option
Then if you really wanted to you could upload your HSO here to be sent by Leadpages
Without being too nerdy its better to send it via your email provider instead (And we already set it up)
Then click the ‘Save And Close’ button
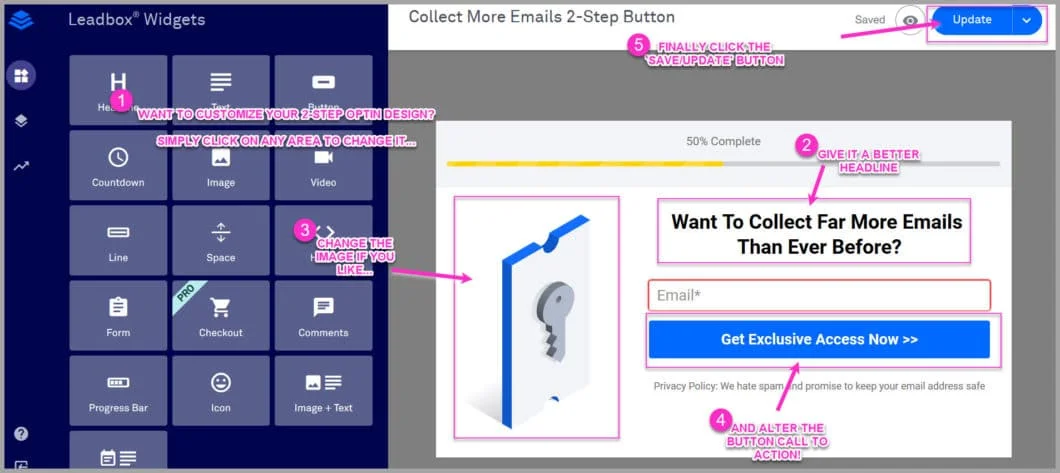
Now we can actually design the 2-step optin button…
Simply click on them to alter each part:
Start off by improving the headline
Talk to the benefit of what they actually want (And what your HSO will give them)
Then improve the call to action on the button
(It doesn’t hurt to talk about the actual bonus on the button)
Finally you can remove the image or add a new one if you like
Easy right
Once you’ve edited the 2-step optin its time to publish it
Hit the blue button in the top right corner
This will bring up a new screen…
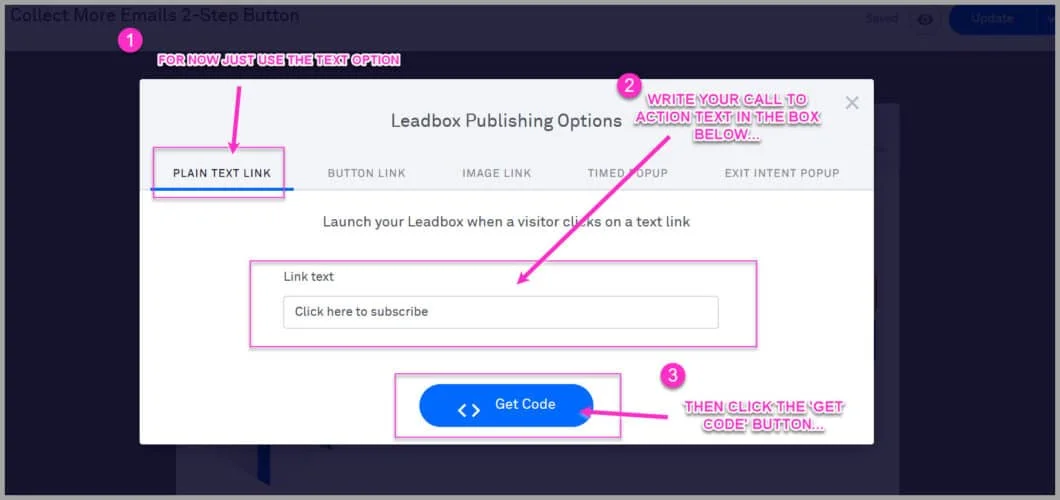
For now just use the text option
(This text will be what the reader clicks on for the optin form to appear)
Write your call to action inside the box i.e the text they will click on inside your article, that will reveal your optin form
I like to add something along the lines of:
“Bonus: Want To Get Desire And Avoid problem With Exclusive Offer”
For Example
“BONUS: Want To Collect More Emails And Stop Wasting Precious Traffic? Get An Exclusive Video Walking You Through Every Step Of This Guide…’
Once you’ve written your call to action click the blue ‘Get Code’ button
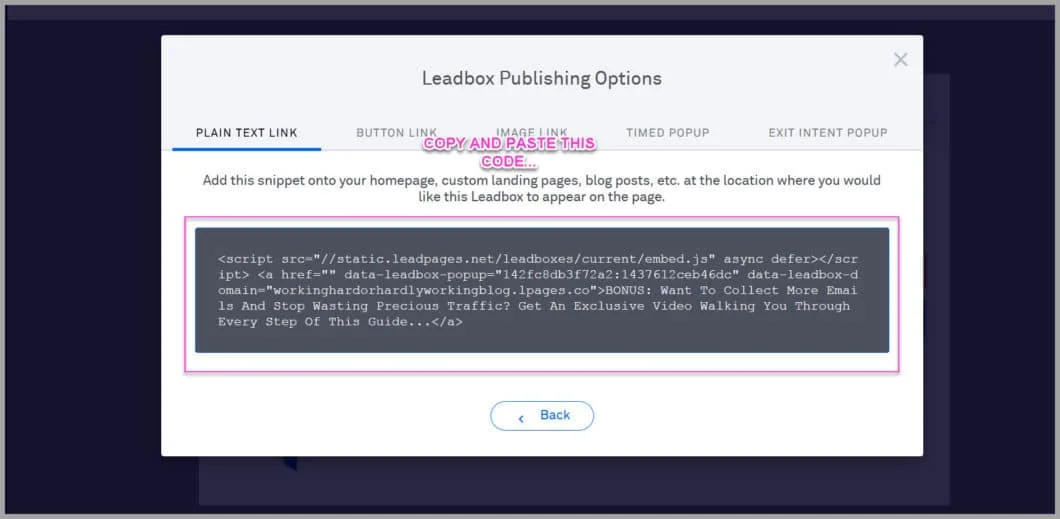
A new screen will appear with some code in a box
Don’t freak out
All you need to do, is just copy and paste that code into your website
For now leave that tab open
And let’s show you how to install this into your site…
3. Install Your 2-Step Optin Into Your Article
OK so now that its all designed, you just need to put that optin into your article
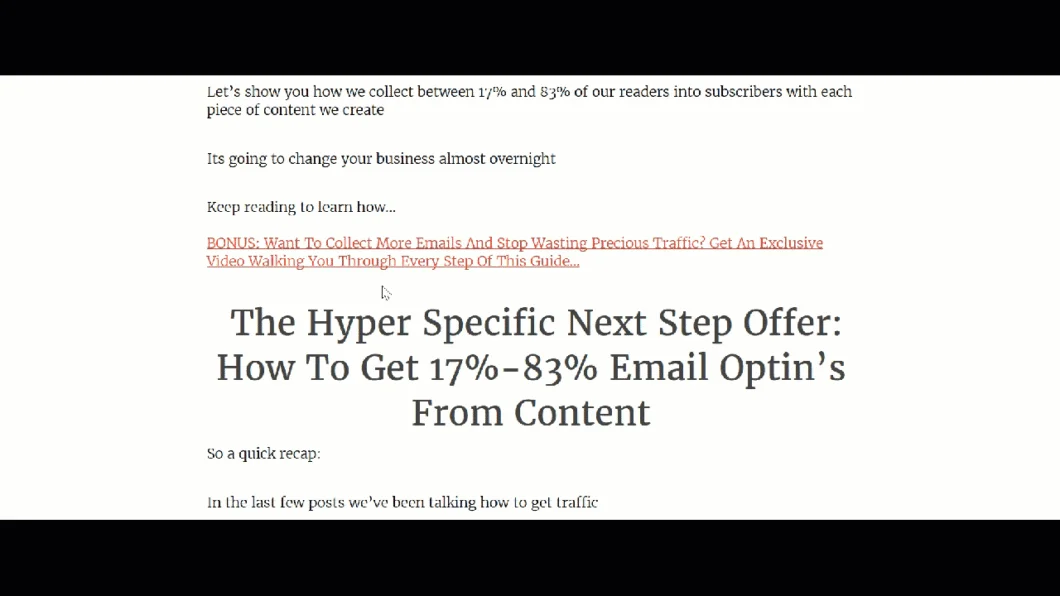
It will look a little like this…
This way when they click on the text, the image pops up and they opt in for your HSO
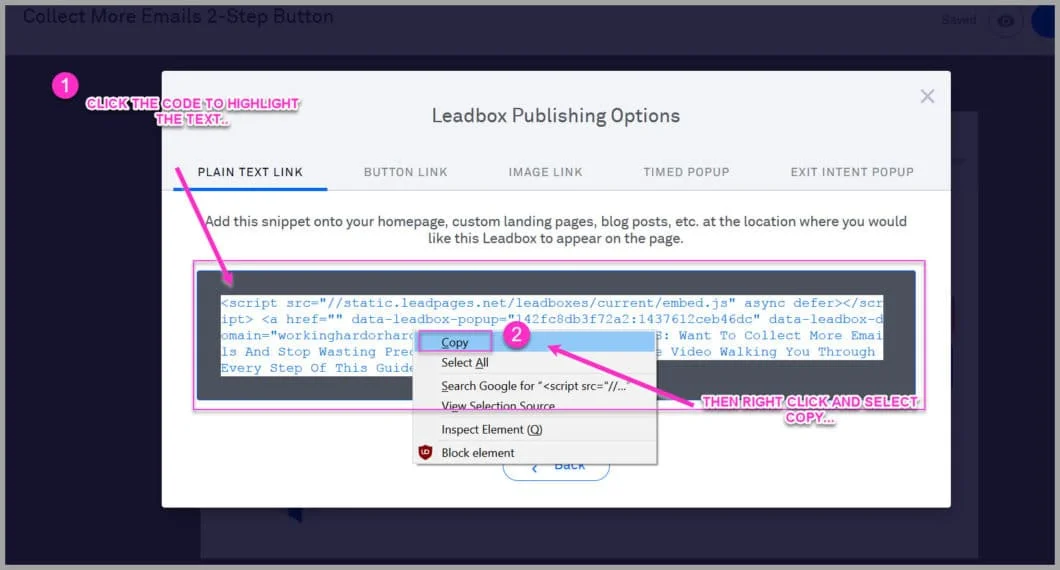
OK start by clicking on the code that Leadpages just gave you
This should highlight all the code
Then simply right click and select ‘copy’…
With this leadpage still open, open up a brand new tab
In that new tab load up your website
You need to go open up the article that you want to install this 2-Step button in
So load up the article in the editing mode
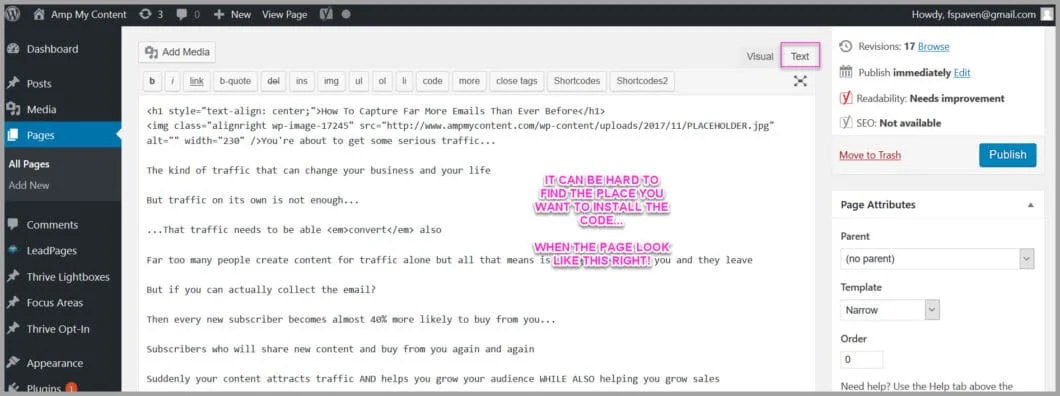
If you use WordPress then it should look like this…
You can install this anywhere
Personally I like to put my HSO near the top of the article
But to help me remember exactly where to put it, I’ll write some lines of text and highlight them a different colour
Why?
Well to install the code you need to go into the ‘text’ section of the article
The thing is, the text version can look a little strange…
Not only that, but it ALWAYS takes you back to the top of the post
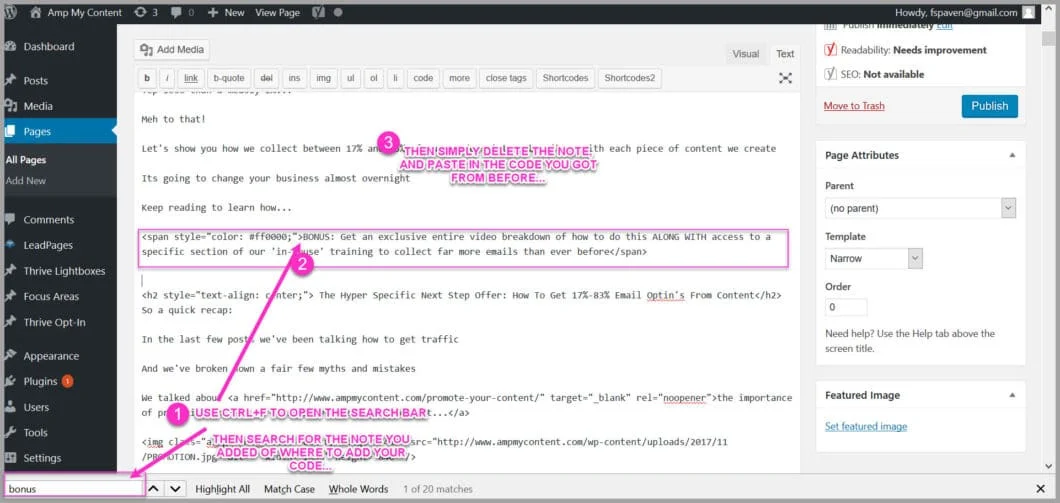
But because you wrote that note, you can now find the area to paste in the code
Simply press CTRL+F to open the Search Bar
Then search for the note…
This should help you find the right location much easier
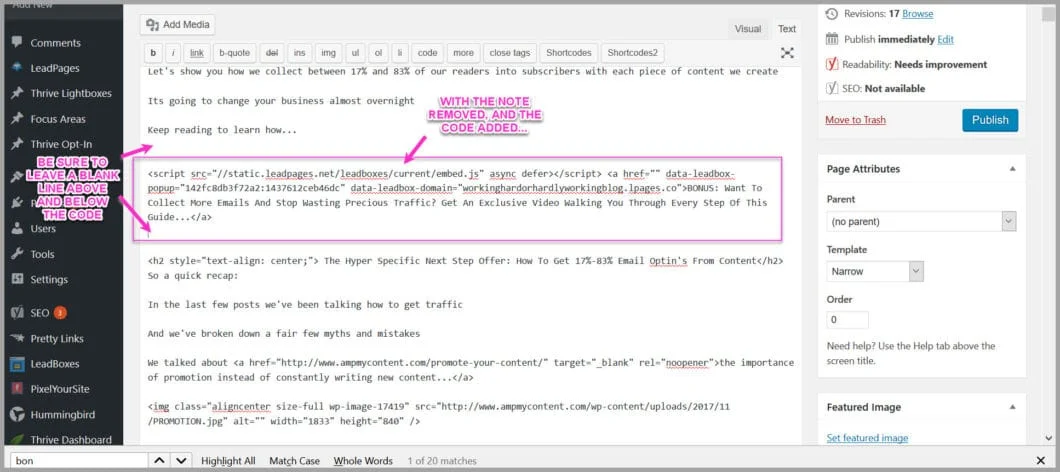
Then simply delete the note, and paste the code in
It should look like this…
Be sure to leave a blank line above and below the code
(If ever the code doesn’t work its usually because a line of text has been added to the start or the end, or you didn’t paste the full code across somehow- it should always start with “<script src” etc)
Once its been added into the article, simply hit save and reload the page
It should now look a little like this…
And that’s it finished!
Super easy right?
This method alone will help you capture far emails than ever before… EVEN IF you have low traffic to your site
[nbox type=”warning”] Want To Collect More Emails And Stop Wasting Your Hard Earned Traffic? Get An Exclusive Mini Video Course Walking You Through Every Step Of This Guide… [/nbox]
Now Its Your Turn!
What a ride so far eh?…
My goal with this series is to get you in the best possible position to see results from your content
If you’ve been following along then you already know that promotion is far more effective and faster return on your time and money…
You also know that Killer Content gets better promotion results, links, shares AND means you can write far less often
And you also know that the fastest way to see a return on your promotion AND scale up your audience and sales, is to collect the email
Better yet?
Once you complete your Hyper Specific Next Step offer you’ll be able to collect 5-10x more emails than ever before…
And so you’re now ready to start promoting that content and getting actual results
But what promotion should you be doing?
We all know sharing to social a few times just isn’t going to move the needle, and there’s far more to promotion than I can fit into a single article
In fact there are so many awesome things I can share with you:
- How things actually go viral, and how you can make this happen strategically
- How each marketing channel works and how you can leverage effectively them by being smart/lazy
- How you can use content and promotion to create evergreen, compound assets-things that drive traffic and sales years after their creation
- Why SEO is the only part of the answer and what you need to be doing to keep the lights on in the mean time
- How promotion is actually 3 stages, and different techniques apply to different points in your promotion
- And much more…
If you’re interested in finding detailed, step-by-step solutions to these and more questions then I’ve got good news.
Hyper Specific Next Step Offers are just a tiny part of our premium training inside’ the Amplify Content Academy‘
What is it?
It’s our own internal training program that we use for step-by-step content creation AND promotion here.
The academy is open right now and is perfect for those who want a strategic specific path to follow when creating and promoting content.
A system and strategy to write far less and see actual, measurable results that drive traffic, links, shares and blog subscribers.
For now though I want to challenge you to take action:
You NEED to go create your first Hyper Specific Next Step Offer.
I cannot stress enough how much this can change your business.
Remember Jacobs results from earlier?
It’s not hard to do, you just have to do the work.
And to help you do that, we’ve given you access to a tiny segment of the HSO editing section from inside the Amplify Content Academy.

The videos are totally free, and you can watch and use them all right now.
This way you can collect more emails and get a taste of how the Academy works before you join.
Pretty good right?
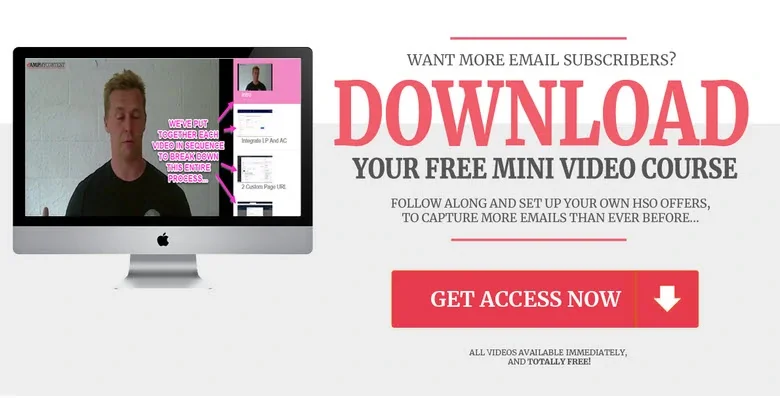
Click the image below and then enter your email to get access.
